Planning a perfect Galentine’s bash doesn’t mean spending a fortune.
Want to throw a party that looks amazing without breaking the bank?
We’ve got 50 simple, fun DIY galentines party decor ideas that will make your celebration sparkle.
Grab your craft supplies and let’s make some magic!
1. Heart Balloon Arch
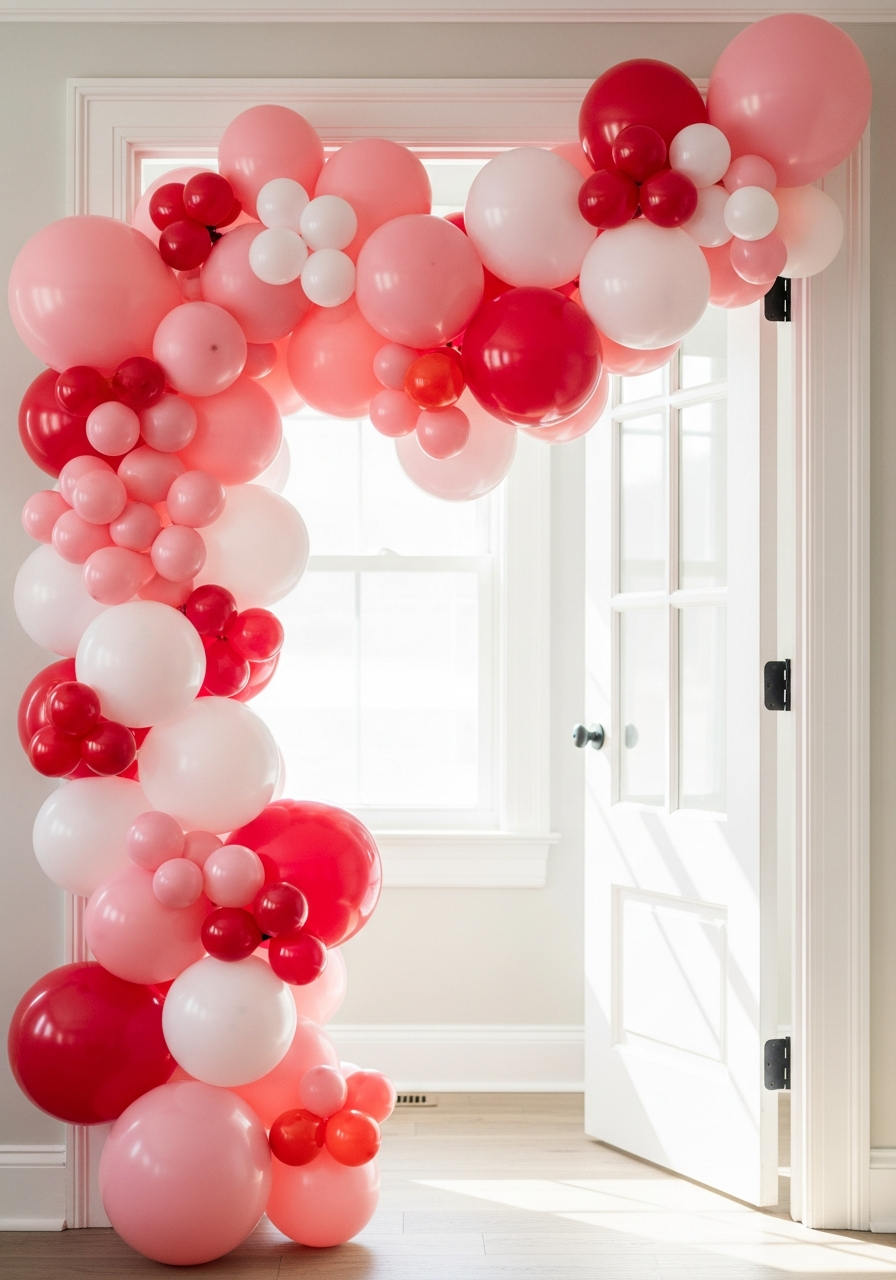
Make a big entrance with a homemade balloon arch. Use varying sizes of pink, red, and white balloons. This works great as a photo spot or over the main doorway.
- Use a balloon strip kit for easy assembly.
- Mix matte and shiny balloons for texture.
- Add small foil heart balloons as accents.
Pro Tip: Inflate balloons to different sizes for a professional, clustered look that hides the plastic strip.
2. Paper Heart Garland
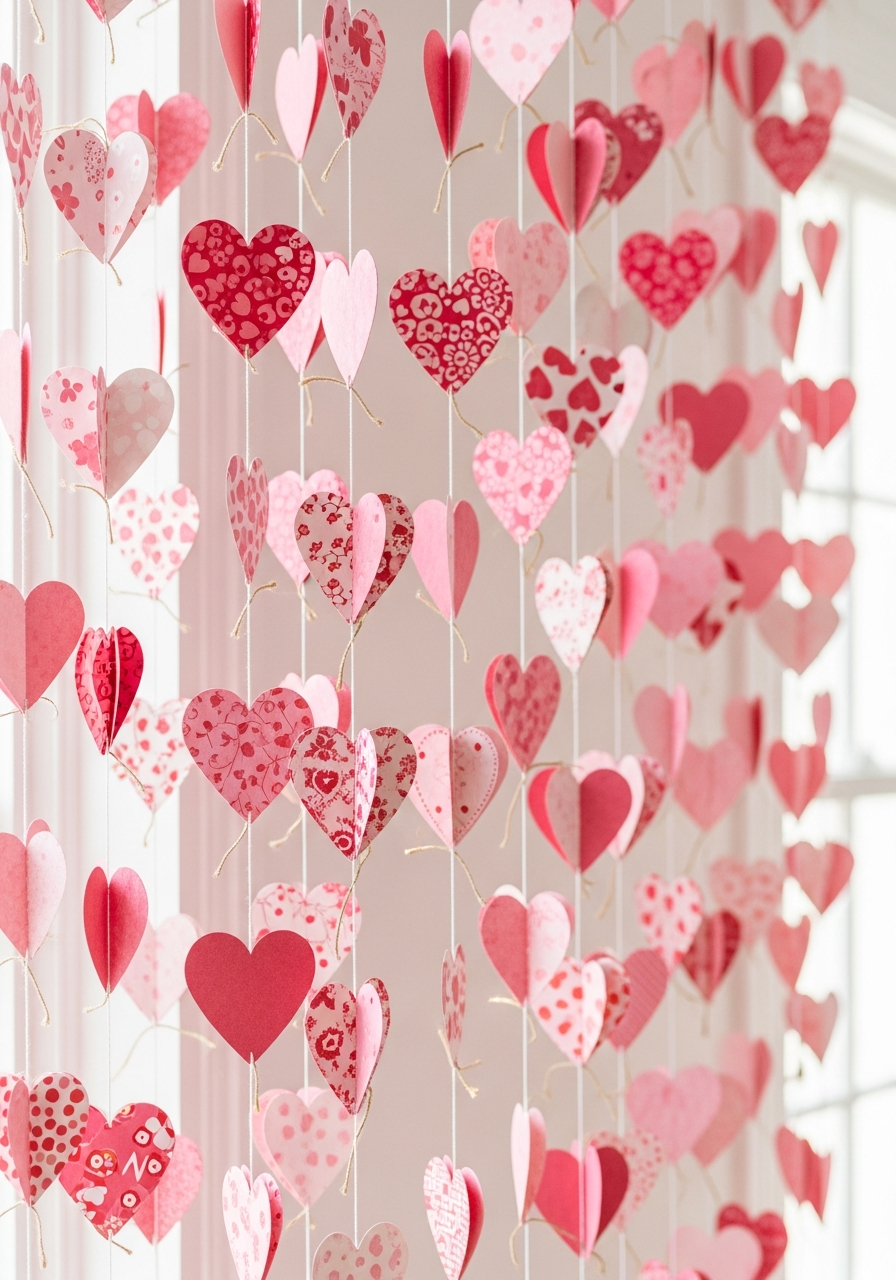
Cut out many hearts from thick paper or patterned scrapbook sheets. String them together using thread or twine. Hang several strands close together to form a full wall backdrop.
- Use pink and metallic gold paper.
- Vary the heart sizes for visual interest.
- Hang vertically or horizontally across a window.
Pro Tip: Use a large paper punch tool if you need hundreds of perfectly uniform hearts quickly.
3. Glitter Galentine Banner
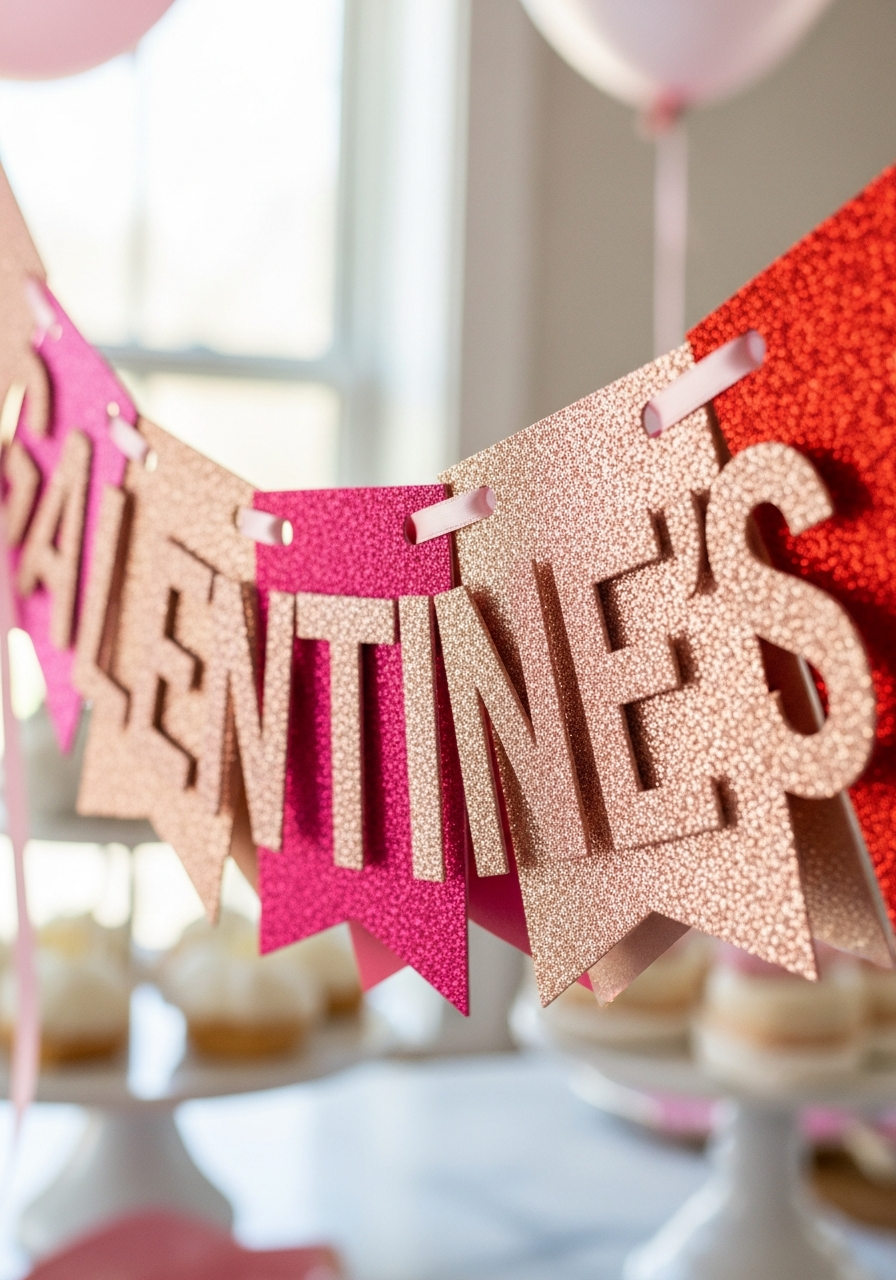
Spell out a fun phrase like “Besties” or “Galentine’s Day” using glitter cardstock. Cut out the letters and punch holes to string them onto ribbon. Hang it above the dessert table.
- Use a stencil or printed template for letters.
- Seal the edges to stop shedding glitter.
- Choose a thick ribbon or twine for hanging.
Pro Tip: Print the letters backward on the cardstock so you can cut them out without marking the glitter side.
4. Framed Bestie Signs
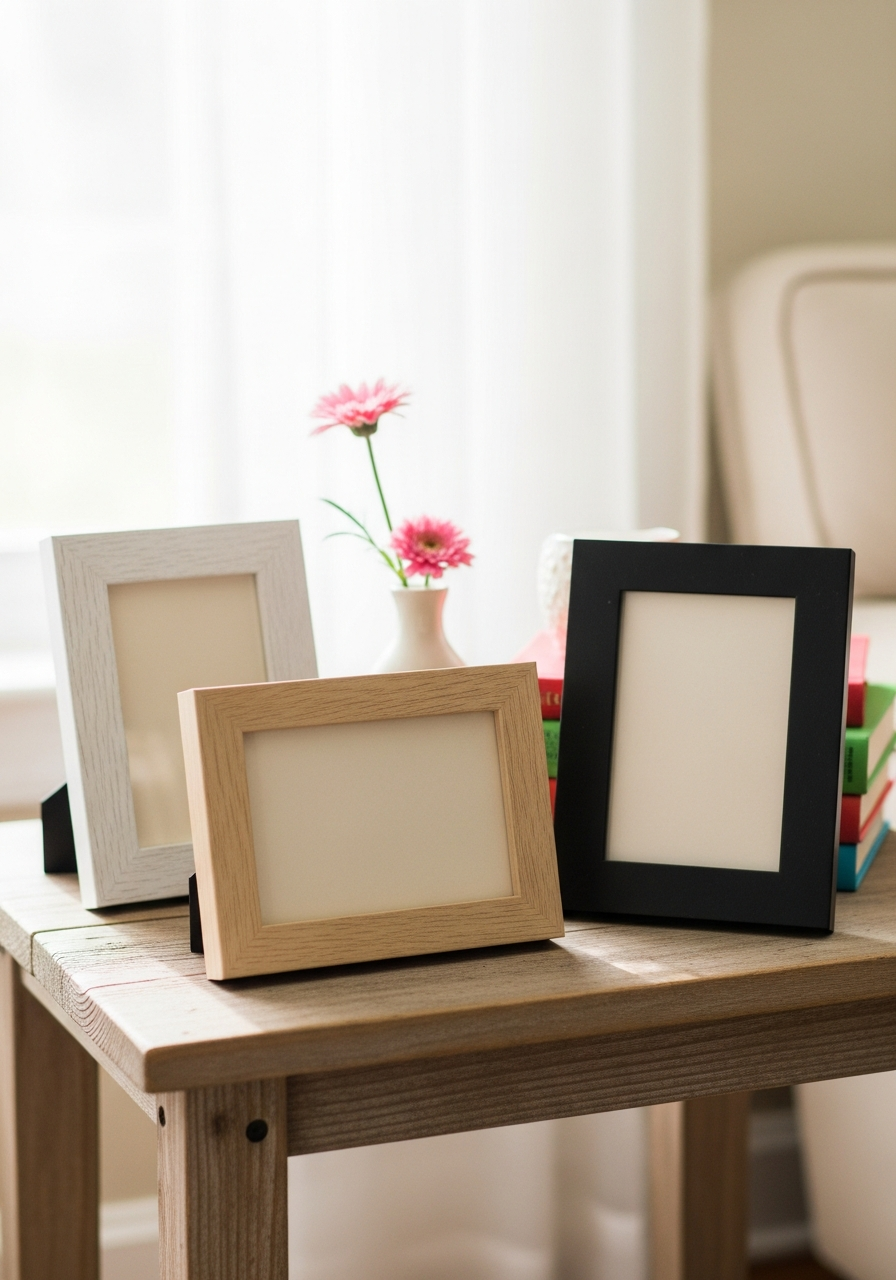
Find cute, simple quotes online and print them out on nice paper. Place these prints in affordable frames you already own or buy cheap ones. Use them to decorate small tables or shelves.
- Use matching white or gold frames.
- Print on cardstock for better quality.
- Place one near the guest book or favor station.
Pro Tip: Use digital fonts that mimic handwriting for a personal, cozy feel on your prints.
5. Polaroid Photo Wall
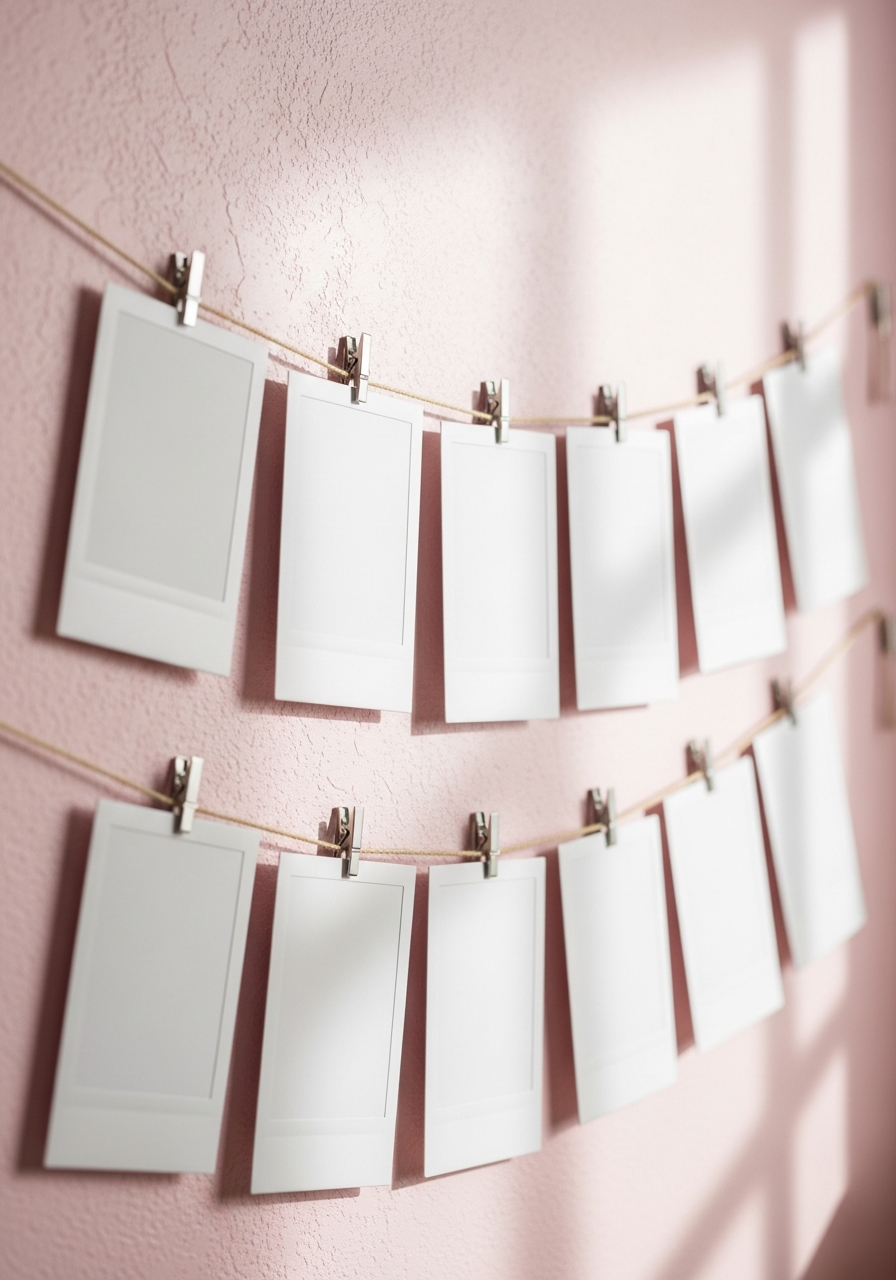
Cut out rectangles from white cardstock to look like classic Polaroid photos. Hang these empty frames on a wall using string and tiny clips. Guests can clip up their own instant photos.
- Use mini wooden clothespins.
- Hang frames at varying heights.
- Add a small banner above the display.
Pro Tip: Use double-sided tape on the back of the frames to keep them from spinning on the string.
6. Giant Conversation Hearts
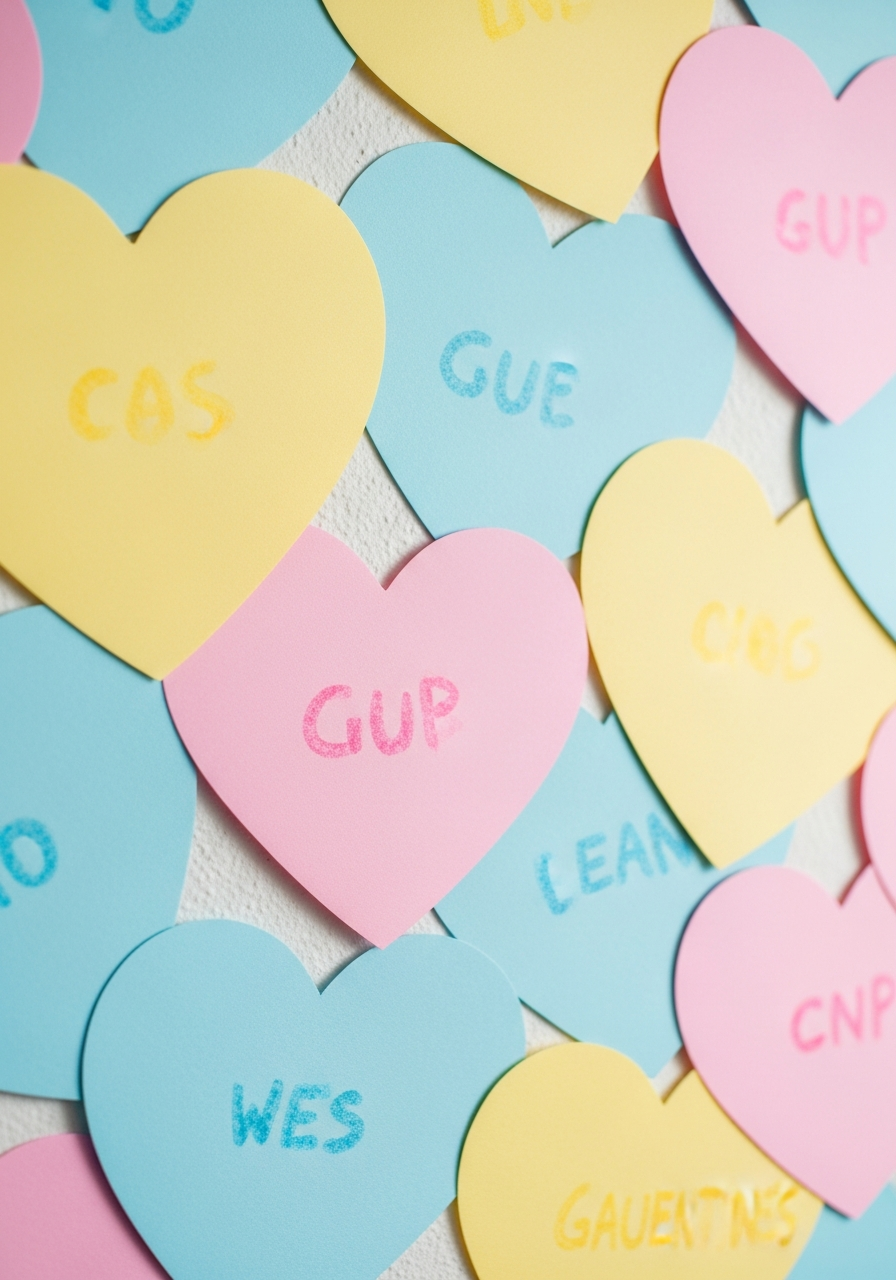
Cut large heart shapes (about 1 foot wide) from colored paper, like pale pink, yellow, and blue. Write classic conversation heart phrases like “BFF” or “Call Me” in marker. Arrange them tightly on a wall.
- Use pastel construction paper.
- Outline the words in a white marker.
- Make them look slightly tilted for fun.
Pro Tip: Use painter’s tape to secure the hearts to the wall without damaging the paint when you take them down.
7. Tissue Fringe Curtain
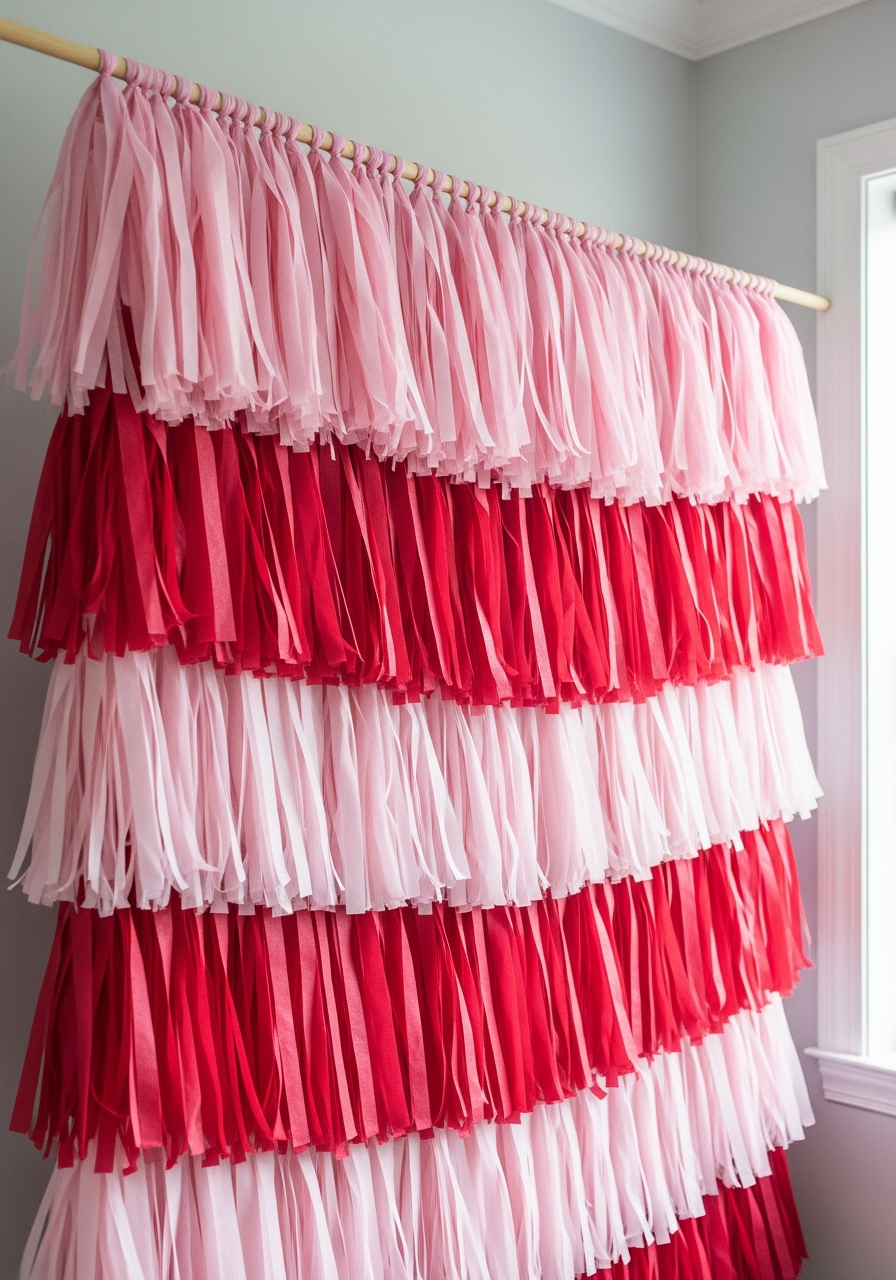
Buy rolls of pink, red, and blush tissue paper or crepe streamers. Cut them into long strips and layer them onto a rope or dowel rod. This makes a perfect photo booth backdrop.
- Layer colors for an ombré look.
- Use heavy-duty tape to secure strips.
- Make it wide enough for two people.
Pro Tip: Cut the fringe strips at slightly different lengths to give the curtain more texture and movement.
8. LED Heart Sign
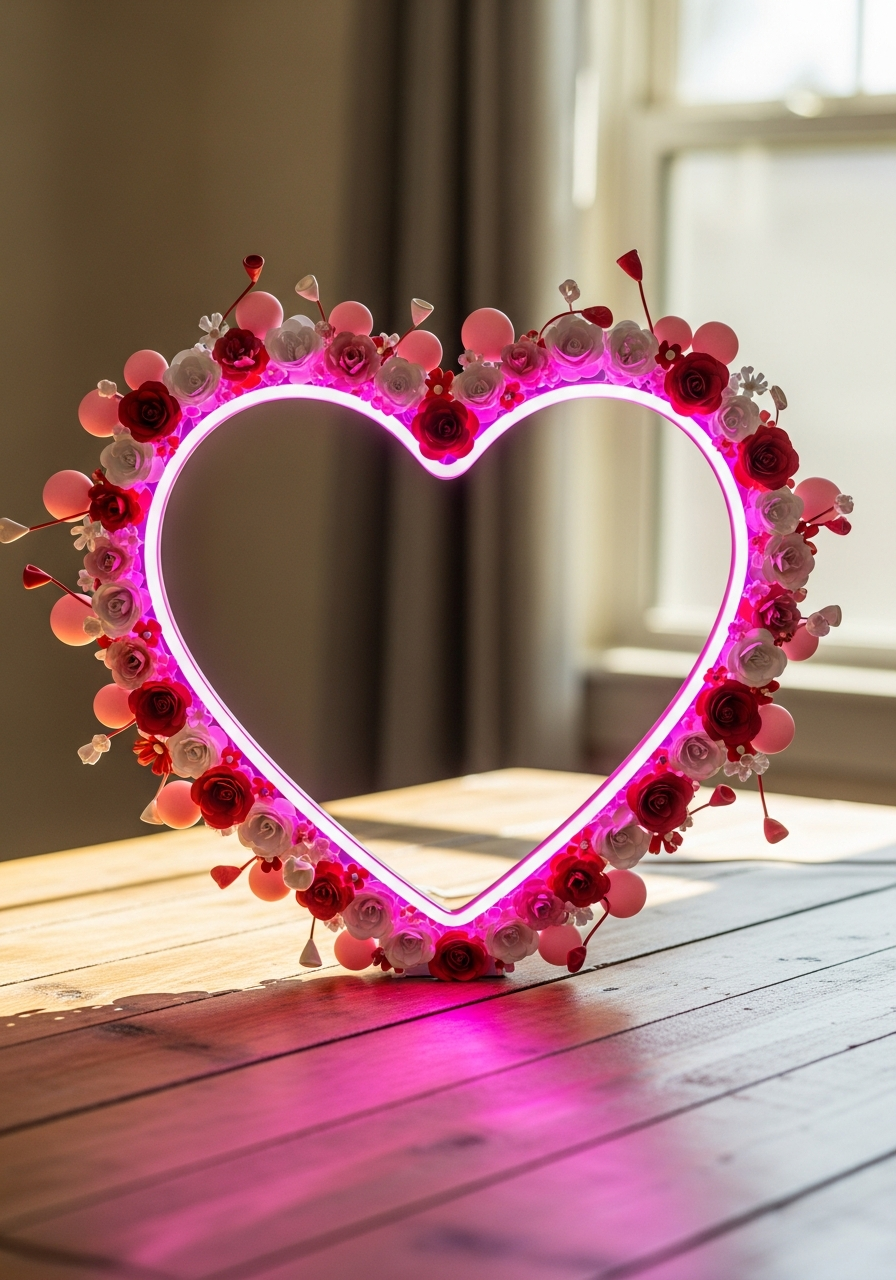
Use an affordable LED heart sign to add glow and visual interest. Frame the sign with simple paper flowers or small balloons to make it look custom and part of your diy galentines party decor.
- Use battery-operated signs for flexibility.
- Hang it near the dessert table.
- Frame it with a paper garland.
Pro Tip: If you don’t have a neon sign, use EL wire (flexible glowing wire) to shape your own heart on a foam board.
9. Tissue Paper Pom-Poms

Fold and cut layers of tissue paper to create fluffy, round pom-poms. Hang them from the ceiling using fishing line at varying heights. Use shades of pink and red for maximum impact.
- Use 8-10 sheets of tissue paper per pom-pom.
- Fluff them gently for fullness.
- Hang them in groups of three or five.
Pro Tip: Make smaller pom-poms and use them to decorate the ends of the balloon arch or chair backs.
10. GALENTINE Letter Balloons
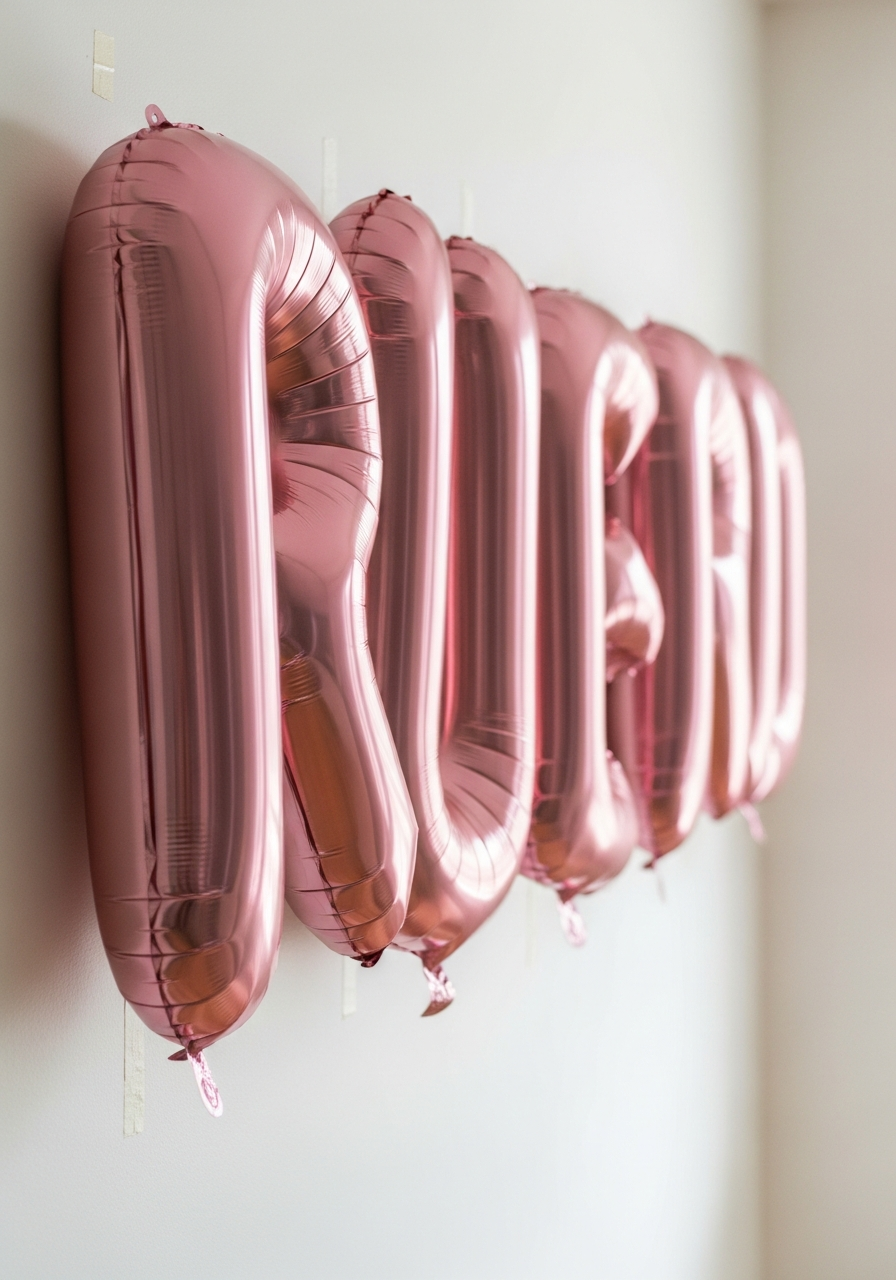
Purchase individual foil balloon letters that spell out the theme. Inflate them (usually with air) and tape them directly to a clean wall space. This is a clear, fun decoration.
- Use rose gold or silver letters.
- Ensure the wall is clean first.
- Space the letters evenly apart.
Pro Tip: Use rolled-up painter’s tape or mounting putty on the back of the balloons for easy removal without damaging the wall.
11. Heart Labeled Candles
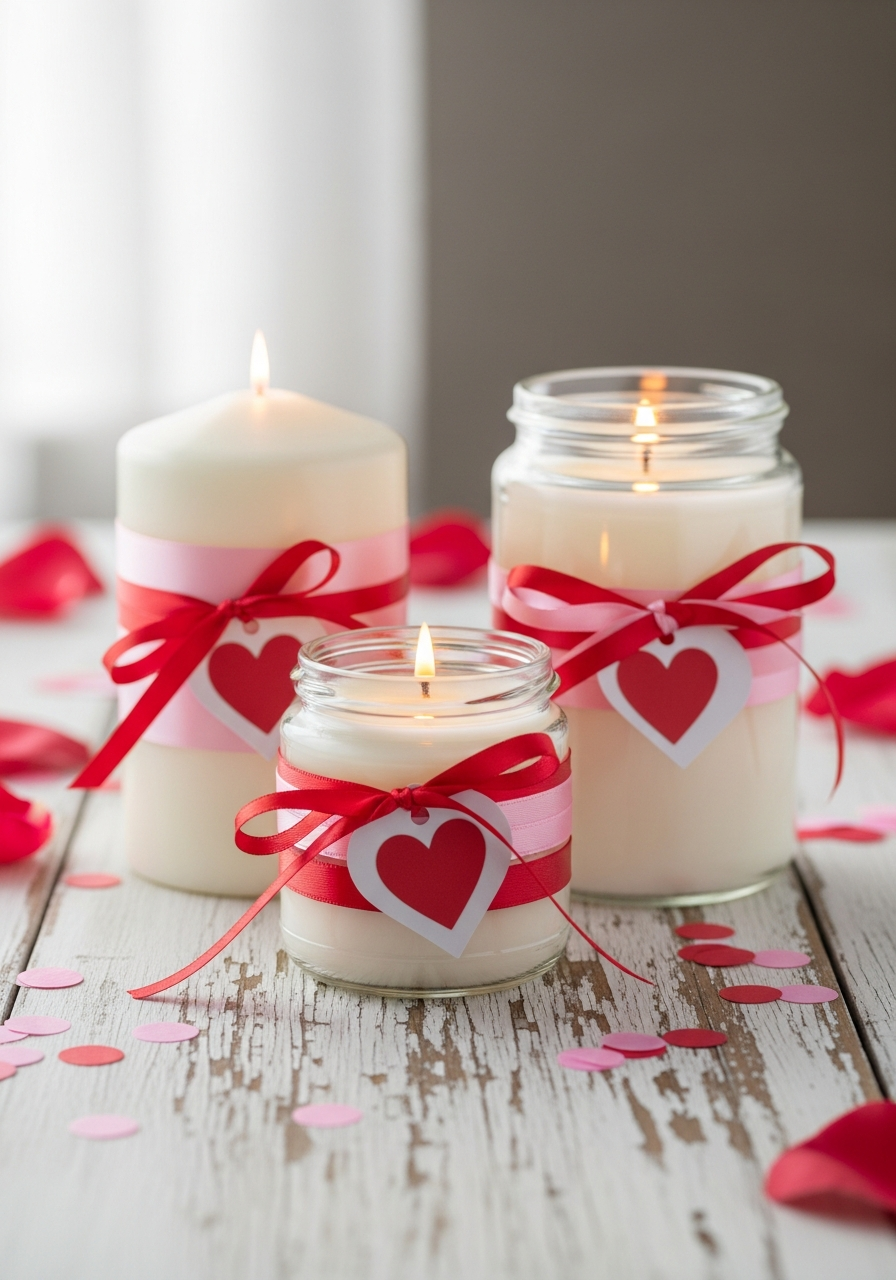
Take simple pillar candles or jar candles. Print small heart designs or quotes onto sticker paper. Apply these stickers or wrap the candles with ribbon and a paper heart tag to make centerpieces.
- Use unscented candles for dining areas.
- Tie a small bow with twine.
- Place them on mirrored trays for extra light.
Pro Tip: Use battery-operated LED candles if the party venue has strict fire safety rules.
12. Ribbon Wrapped Mason Jars
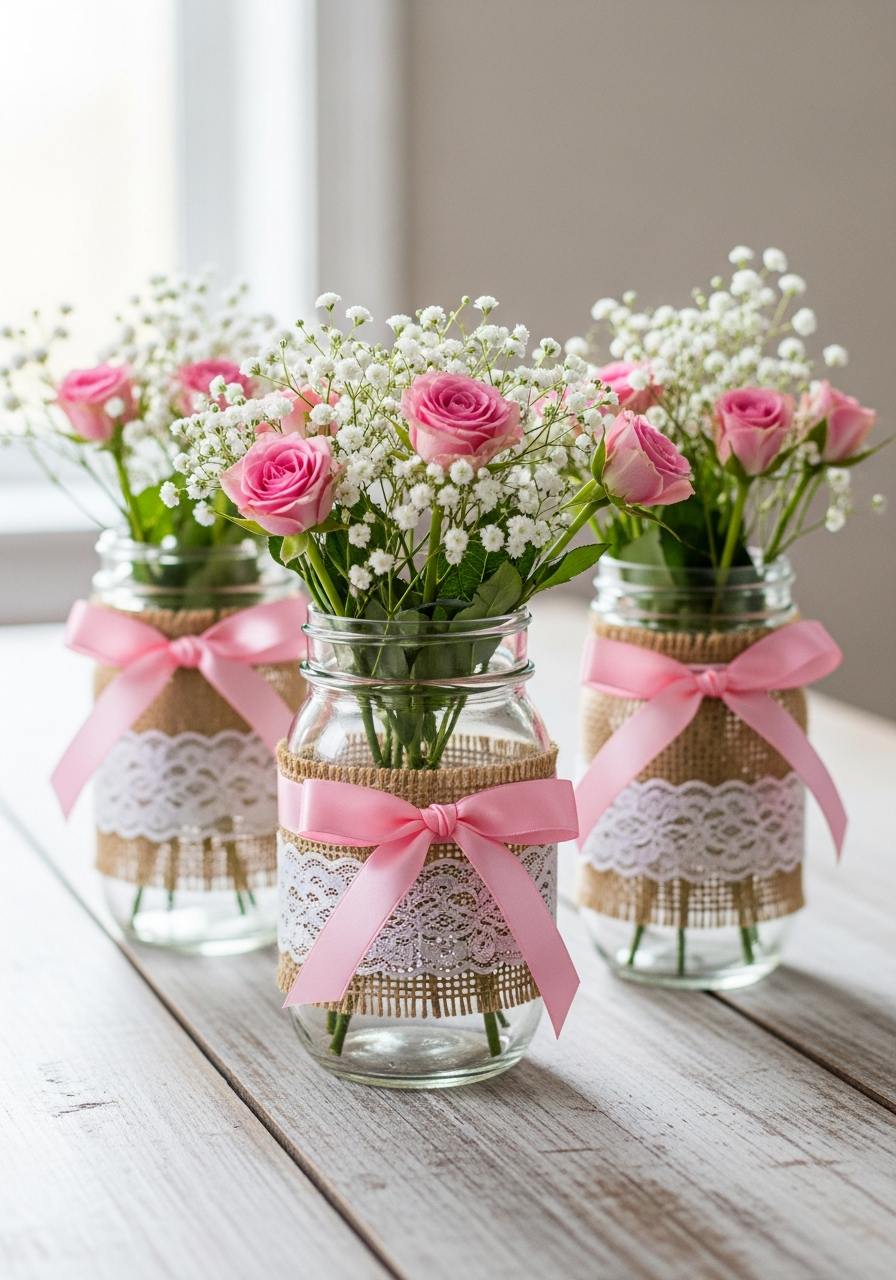
Clean out old mason jars or jam jars. Wrap the center of the jar with pink ribbon, lace, or burlap. Fill them with water and use them as rustic, charming flower vases for the tables.
- Use hot glue to secure ribbon.
- Fill with affordable baby’s breath.
- Tie a small bow at the front.
Pro Tip: Paint the jars white or blush pink first for a cleaner, more cohesive look before adding the ribbon.
13. Heart Confetti Scatter
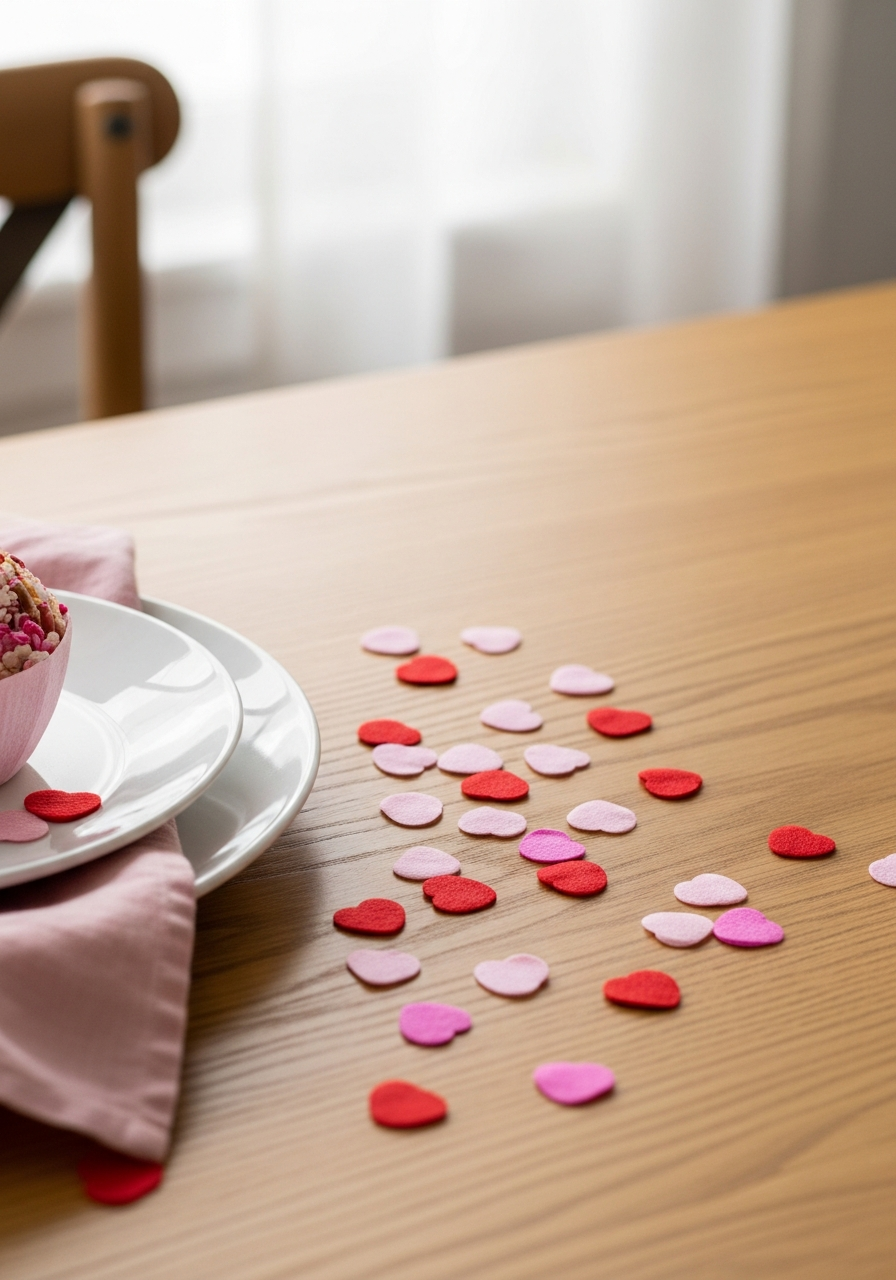
Buy or make small heart shapes from colored paper or felt. Sprinkle a light layer across all the main surfaces, including the dining table and gift table. It adds subtle, festive texture.
- Use a hole punch for small paper hearts.
- Mix glitter and matte paper.
- Use felt hearts for a reusable option.
Pro Tip: Limit the confetti to the center of the table runner to make cleanup easier later.
14. Place Cards With Notes
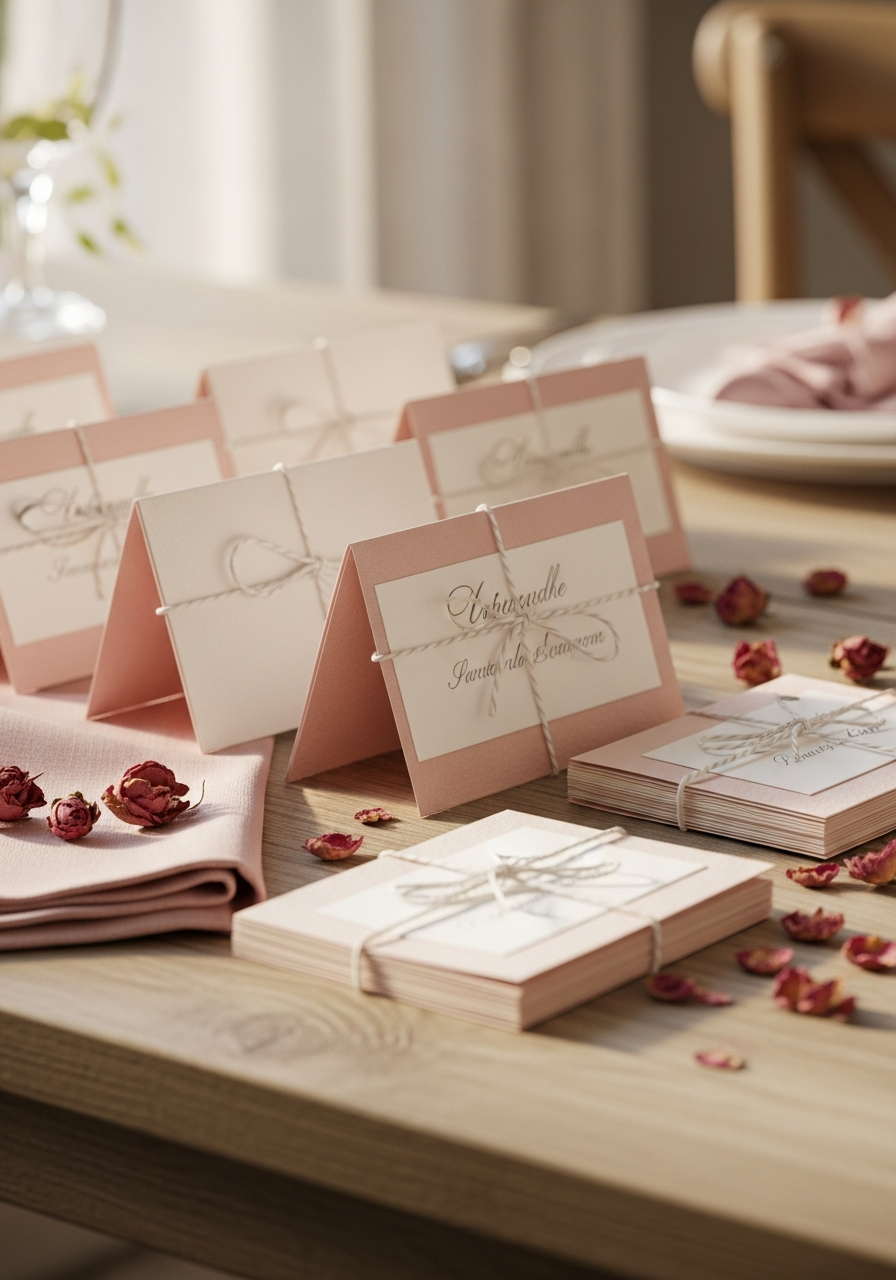
Create folded cardstock place cards for each guest. Inside, write a short, personalized compliment or favorite memory about that friend. It doubles as a decoration and a sweet gift.
- Handwrite the guest names neatly.
- Use pink ink or metallic pens.
- Place them right on the dinner plate.
Pro Tip: Keep the notes short and sweet (one sentence) so they don’t take too long to write for a large group.
15. Painted Bottle Vases
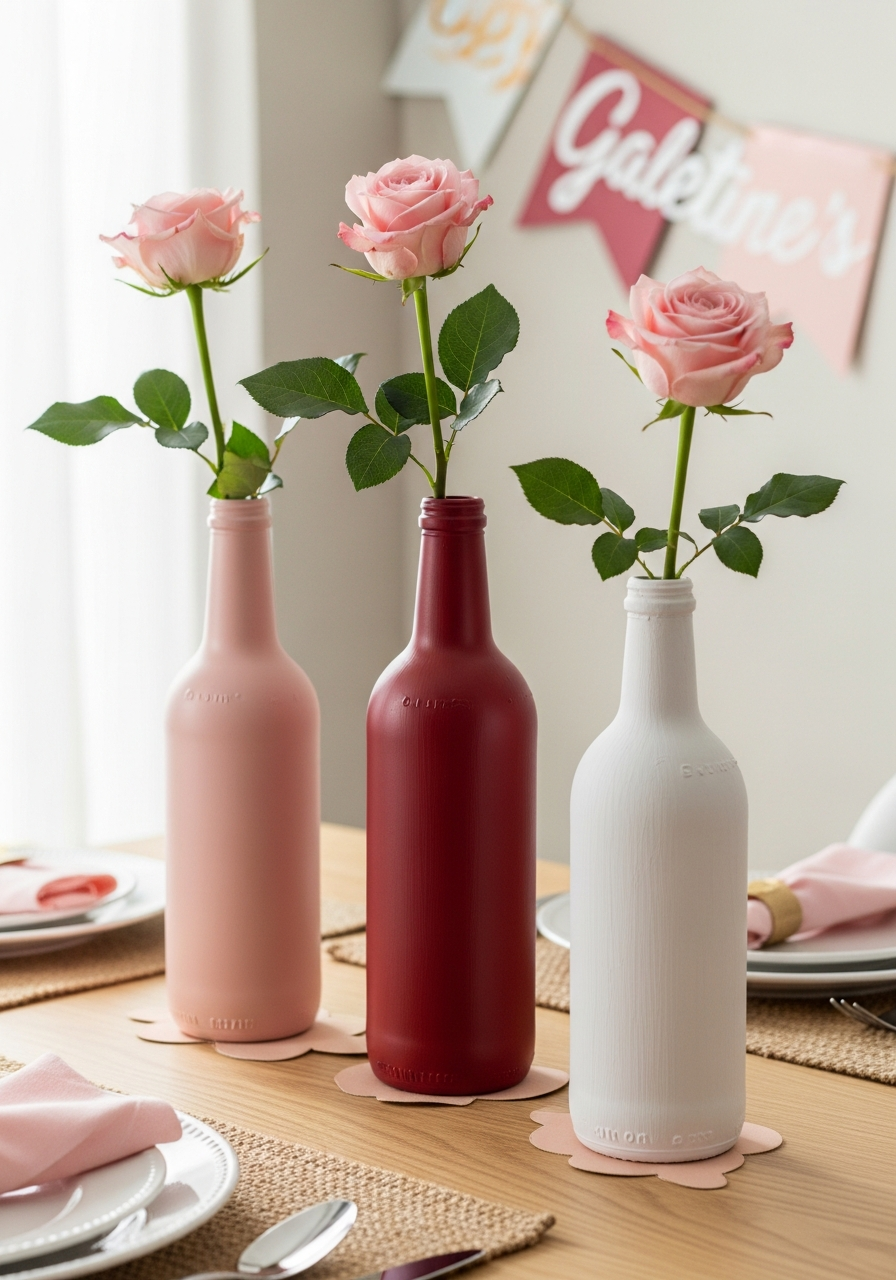
Save empty wine or glass bottles. Use acrylic paint to coat them completely in blush pink, deep red, or white. Once dry, use them as tall, unique vases for single-stem flowers.
- Use chalk paint for a matte finish.
- Spray paint works fastest.
- Pair tall and short bottles together.
Pro Tip: Before painting, clean the bottles thoroughly with rubbing alcohol to ensure the paint sticks evenly.
16. Pink Floral Centerpieces
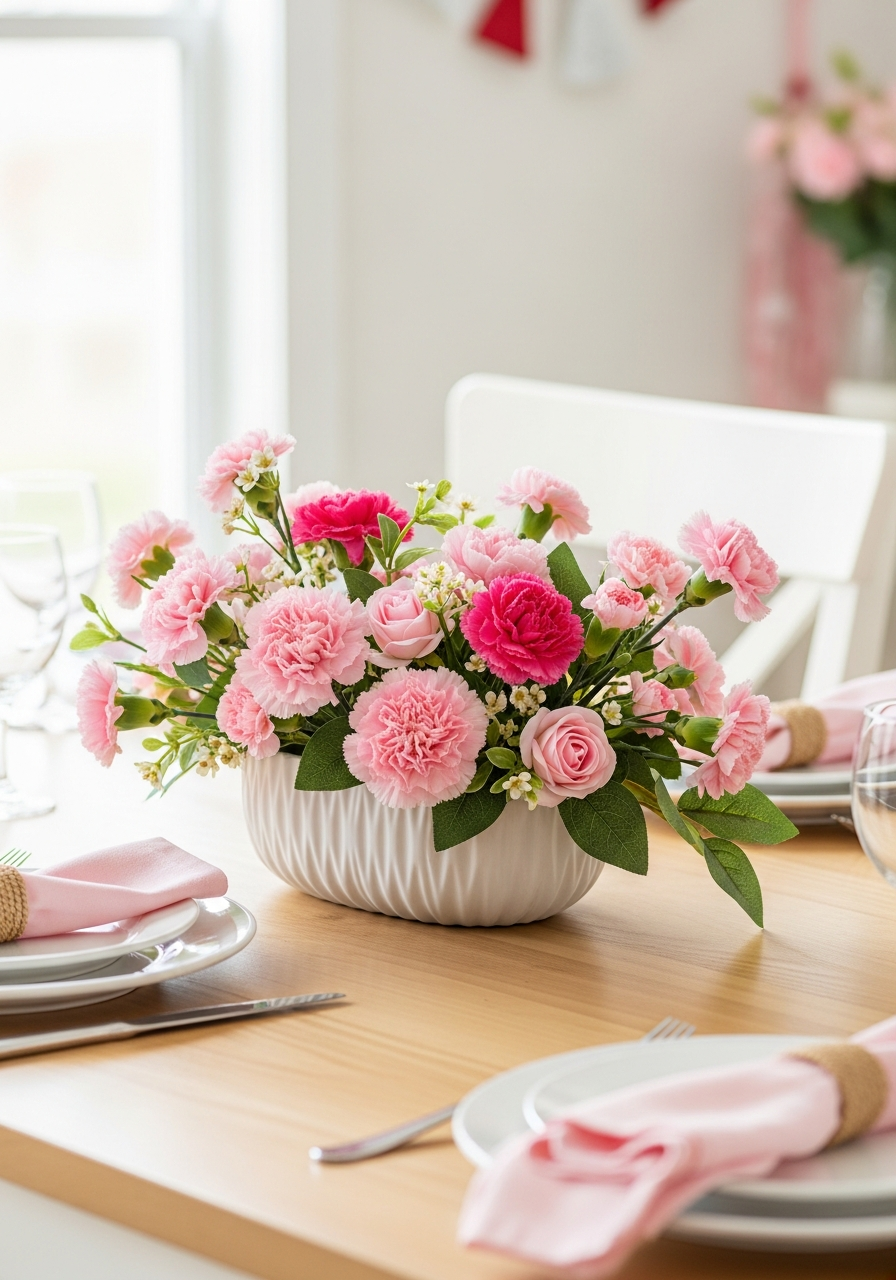
Purchase affordable pink flowers like carnations or faux roses. Arrange them simply in the DIY vases you created. Keep the arrangements low so guests can talk easily across the table.
- Use lots of greenery for filler.
- Group small vases instead of one large one.
- Add a few white flowers for contrast.
Pro Tip: Buy flowers at a local grocery store the day before the party; they are often cheaper and just as fresh.
17. Kraft Paper Runner

Lay a long roll of brown kraft paper down the center of your dining table. Use markers or paint pens to draw simple hearts, arrows, or write fun quotes directly onto the paper.
- Use white paint pens for contrast.
- Draw small doodles along the edges.
- Write the menu right on the runner.
Pro Tip: Provide colored markers so guests can doodle or write messages to each other during the party.
18. Custom Napkin Rings
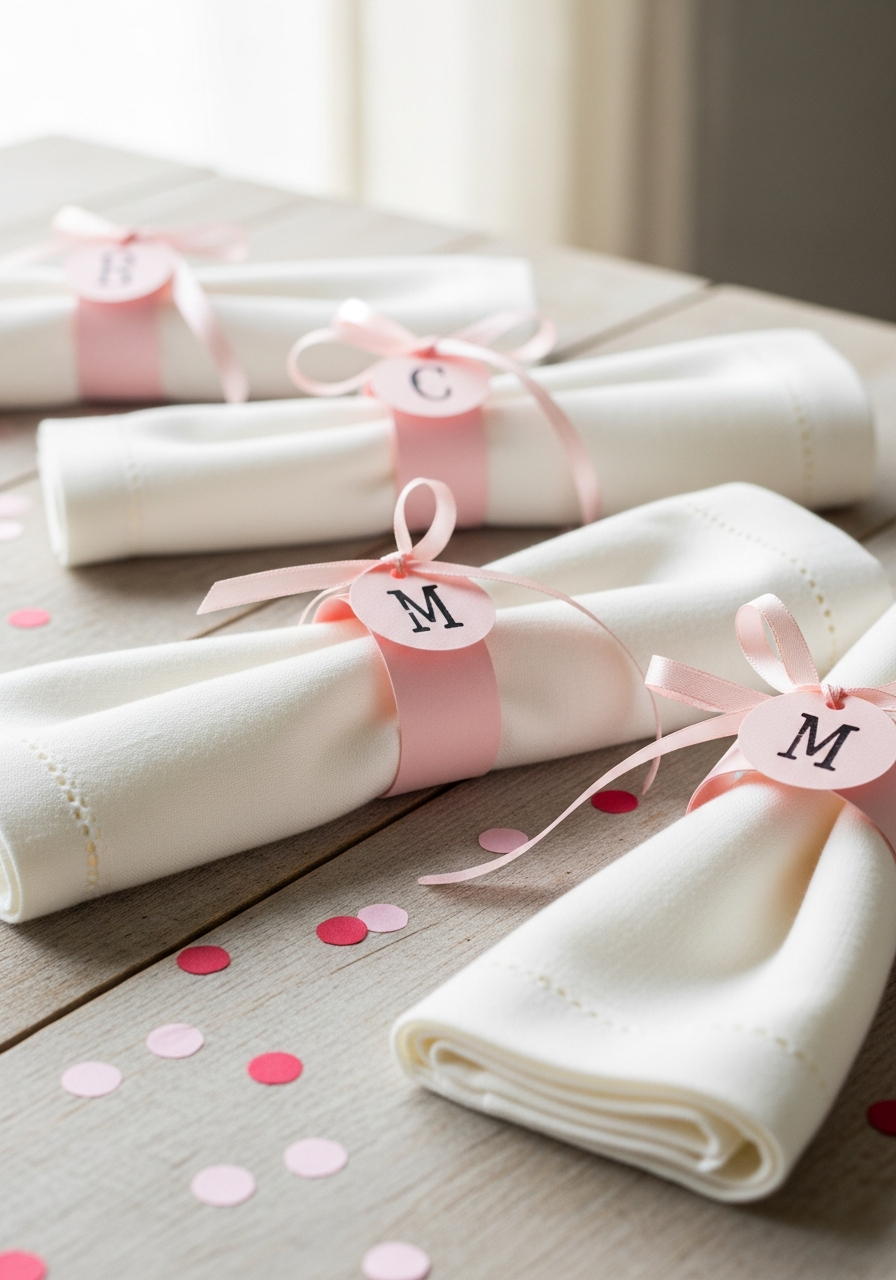
Cut strips of cardstock or ribbon. Secure the ends to form a ring around the napkin. Use a stamp or write each guest’s initial or name on the ring for a personalized touch at the table setting.
- Use thick ribbon or metallic paper.
- Glue a small paper heart on top.
- Roll the napkin neatly before ringing.
Pro Tip: If using paper, use a durable metallic paper so the rings hold their shape through the evening.
19. Chalkboard Table Signs

Buy small, standing chalkboard signs. Use chalk or chalk markers to write sweet Galentine sayings, directions, or labels for food dishes. Place them strategically around the room.
- Use bright pink chalk markers.
- Write clearly and simply.
- Place one near the drink station.
Pro Tip: Season the chalkboard before writing by rubbing the side of a piece of chalk all over it, then wiping it off.
20. Labeled Candy Jars
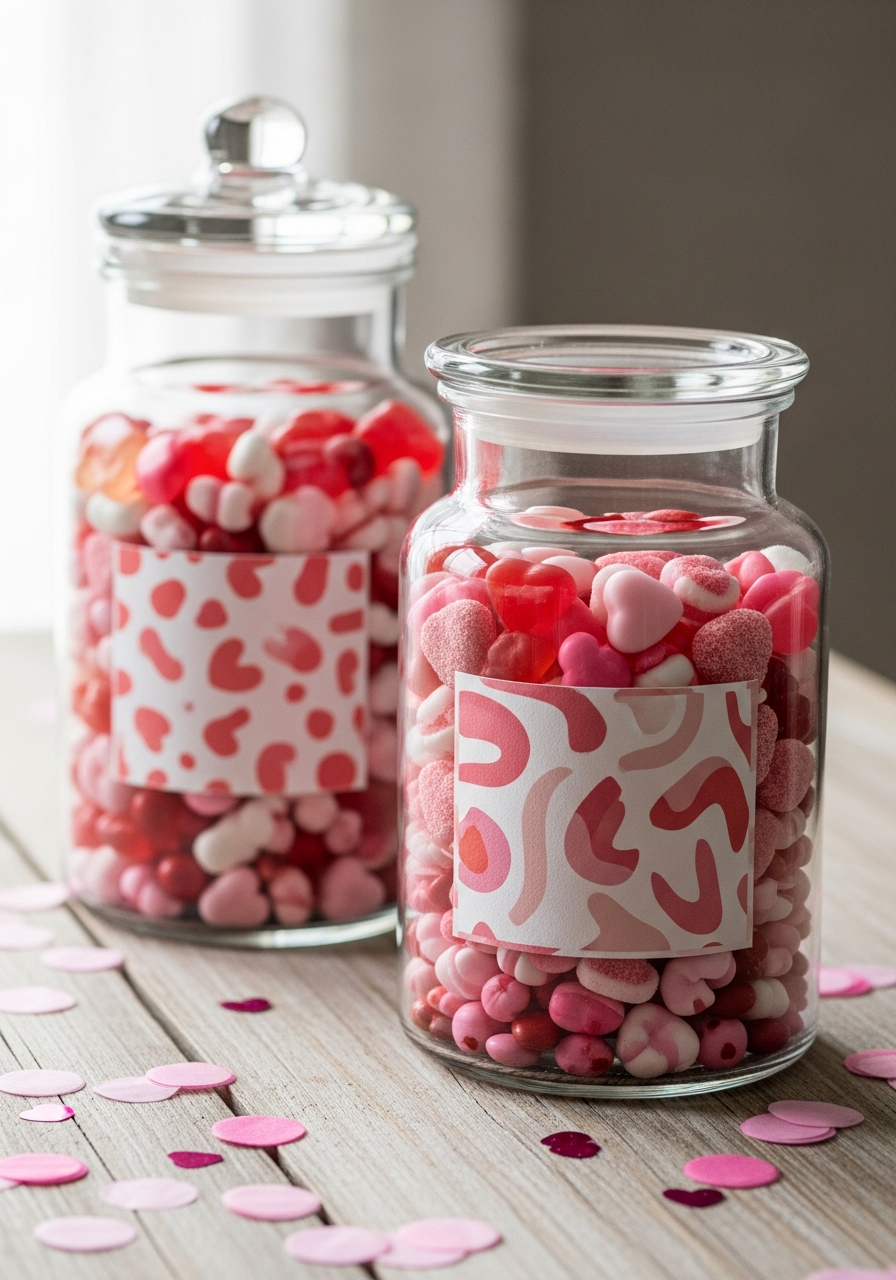
Fill clear glass jars with pink and red candies (M&Ms, gummies, conversation hearts). Create custom labels that say “Sweet Friends” or “Besties Only” and tape them to the front of the jars.
- Use apothecary jars for height.
- Mix colors and textures of candy.
- Use ribbon to attach the label.
Pro Tip: Use scoops or tongs in the jars to keep things sanitary, especially if guests are serving themselves.
21. Streamer Dessert Backdrop

Hang long, vertical strips of pink and red crepe paper or plastic streamers behind the main dessert table. This instantly draws the eye and makes the food look like the main event.
- Hang them close together for a full look.
- Twist some streamers for texture.
- Use different shades of pink.
Pro Tip: If you tape the streamers to a cardboard tube first, you can easily hang the entire backdrop with just two hooks.
22. Heart Balloon Cake Topper
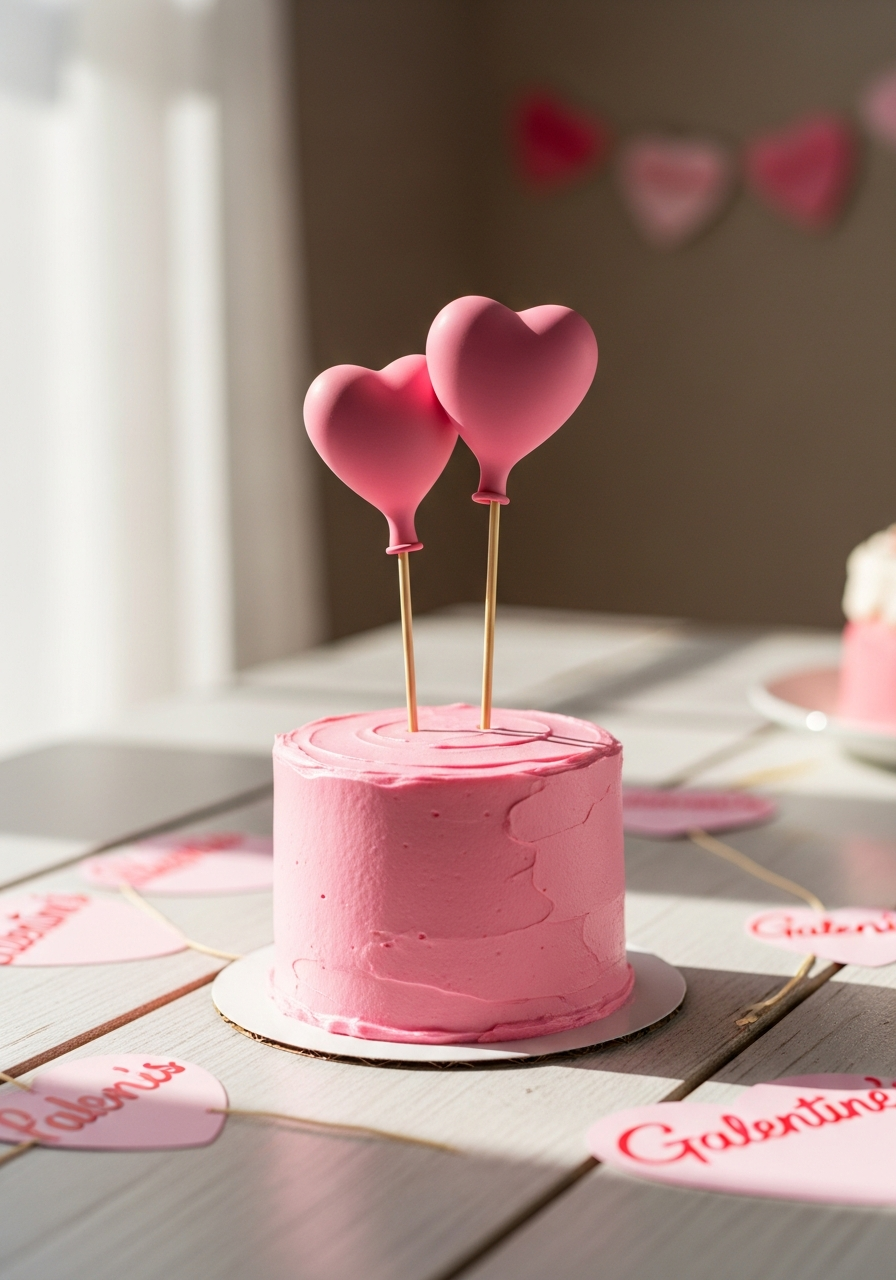
Use two tiny, uninflated heart-shaped balloons or cut two small paper hearts. Attach them to thin wooden skewers or thick straws. Stick them into the cake for a quick, charming topper.
- Use shiny foil hearts.
- Make the sticks different heights.
- Add a small banner between the sticks.
Pro Tip: Use hot glue to attach the paper hearts firmly to the skewers so they don’t flop over.
23. Quote Cupcake Toppers
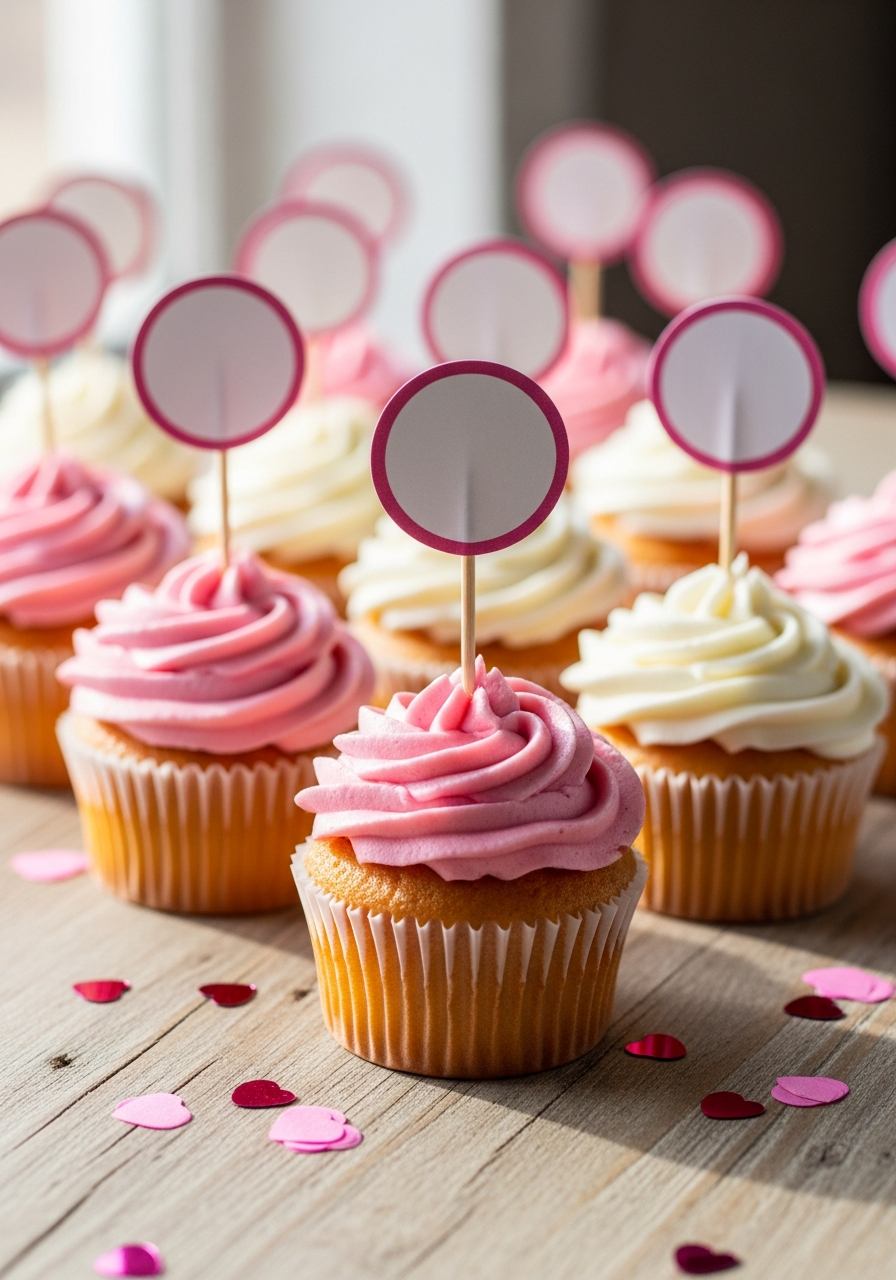
Print or write tiny, funny “bestie” quotes onto small circles of paper. Glue these circles onto toothpicks and stick one into each cupcake. This is easy diy galentines party decor.
- Use glitter paper backing.
- Keep the quotes very short.
- Use food-safe glue.
Pro Tip: Use a circle punch to quickly cut out perfect, uniform toppers without needing scissors.
24. Ombré Paper Fan Wall
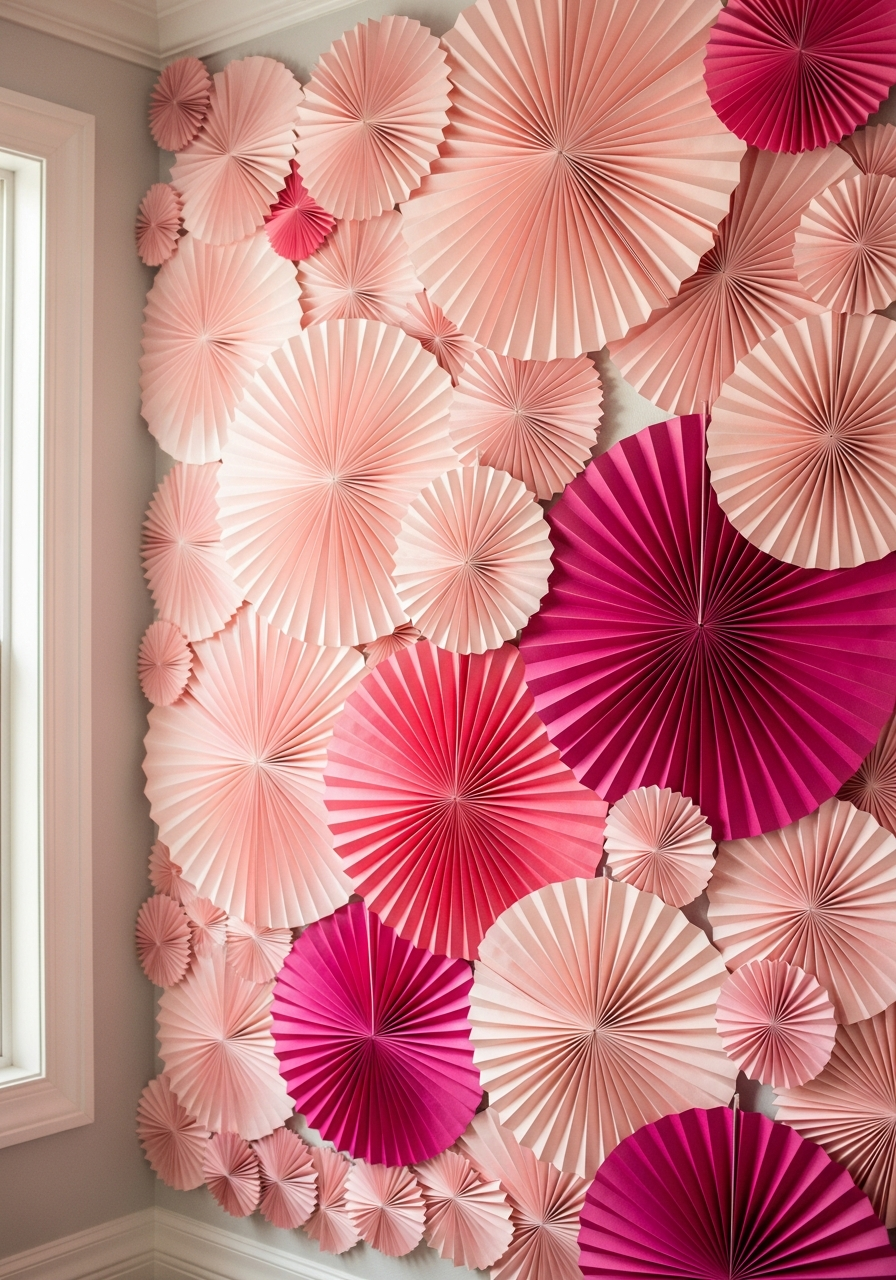
Buy or fold paper fans in various sizes and shades of pink, from blush to magenta. Arrange them on a wall, overlapping slightly, to create a textured, colorful ombré effect.
- Use varying fan sizes.
- Cluster them tightly together.
- Start light pink at the top, dark at the bottom.
Pro Tip: Use removable adhesive strips (like Command Strips) to attach the fans to the wall without causing damage.
25. Heart Drink Stirrers
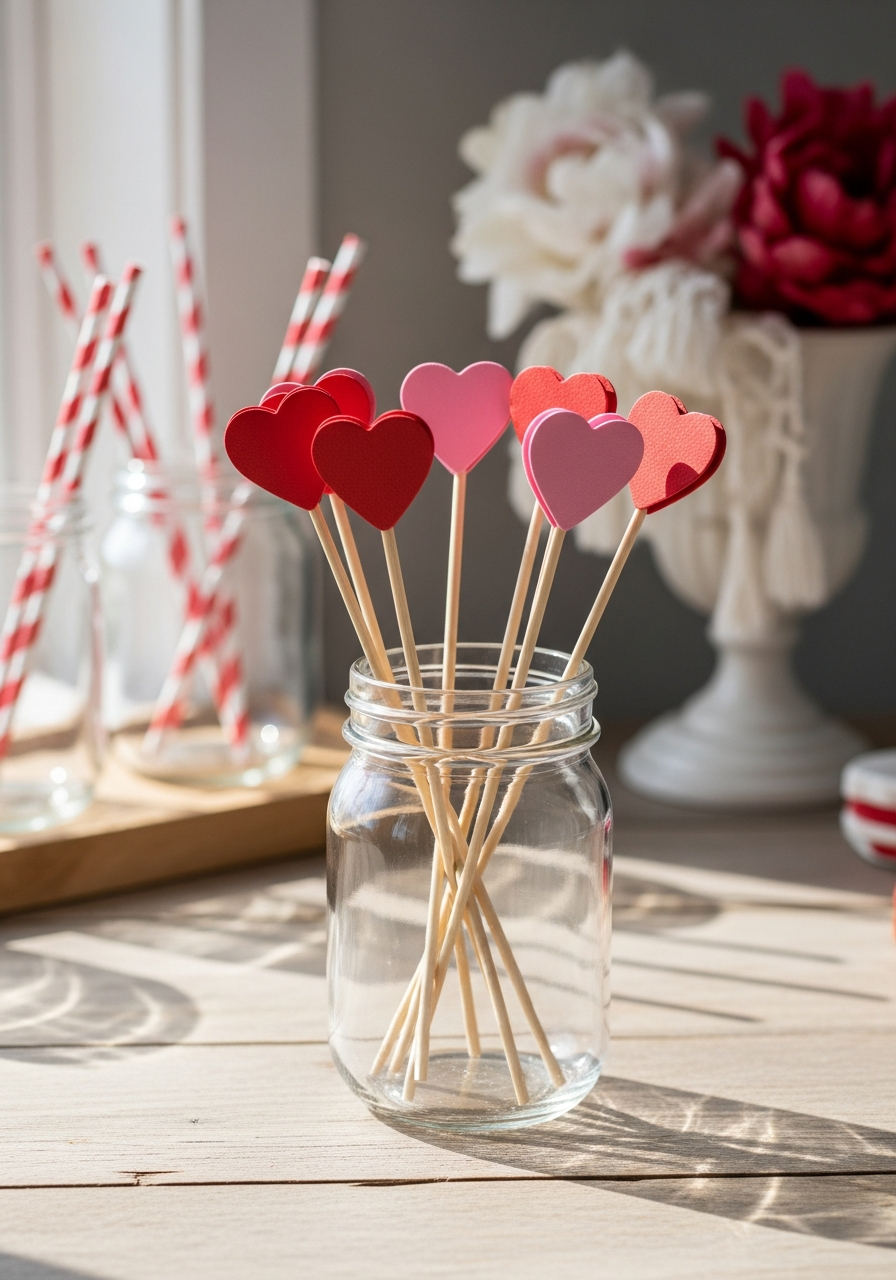
Purchase wooden coffee stirrers or plastic swizzle sticks. Cut small hearts from cardstock or foam and hot glue them to the top of the sticks. Place them in a jar near the drink station.
- Use metallic gold paper.
- Ensure the glue is fully dry.
- Make them tall enough for the glasses.
Pro Tip: Use foam hearts instead of paper; they are more durable and won’t wilt if they touch the drink condensation.
26. Fairy Light Bar Cart
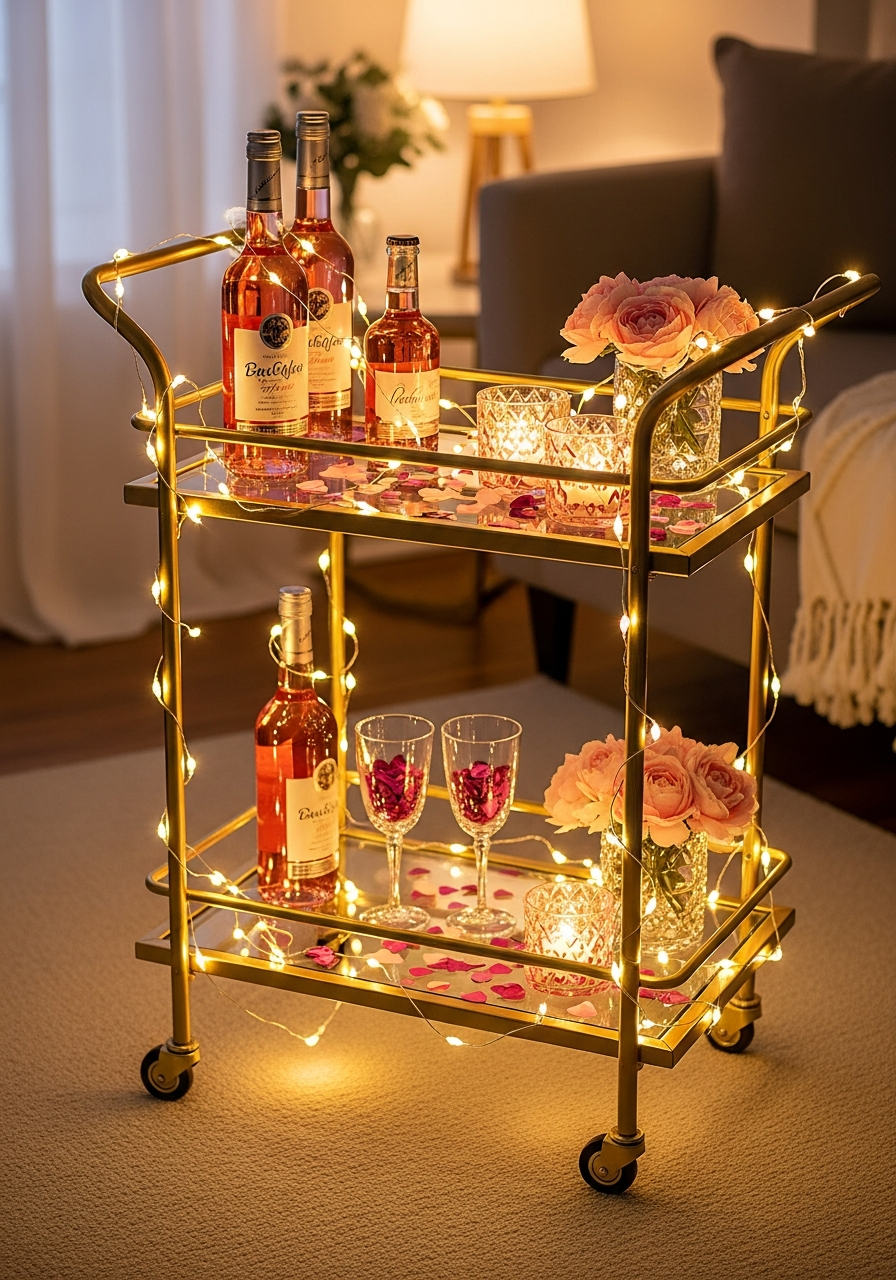
If you have a bar cart or rolling shelf, wrap battery-operated fairy lights around the handles, bottles, and shelves. The soft glow adds a cozy, magical feel to the drink area.
- Use warm white lights.
- Hide the battery packs neatly.
- Add a small vase of flowers.
Pro Tip: Use small pieces of clear tape to secure the light strings so they don’t constantly slide off the cart.
27. Handwritten Menu Board
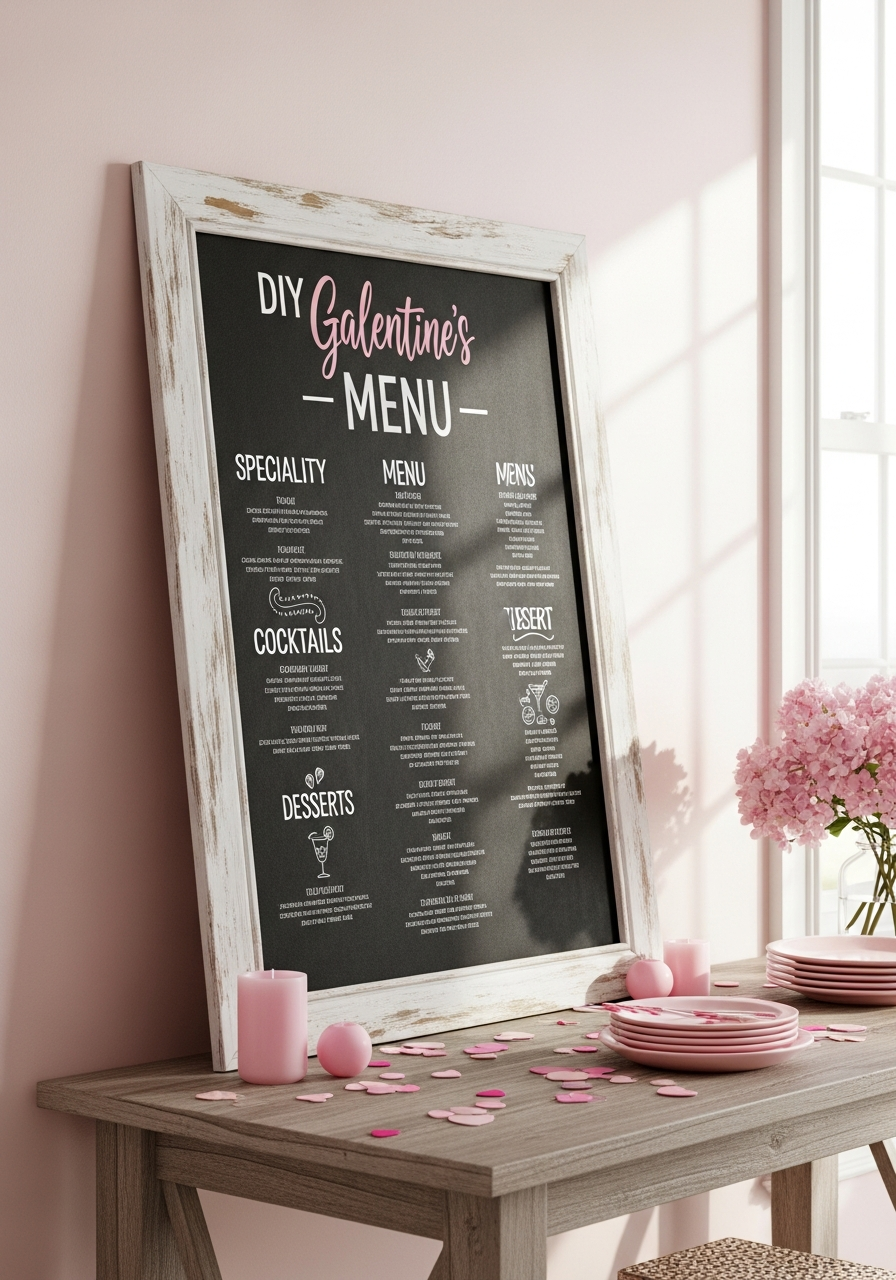
Take a large piece of poster board, a mirror, or a large frame. Write out the signature cocktails, snacks, and desserts clearly using nice handwriting or stencils for stylish signage.
- Use black board and white chalk marker.
- Add small heart doodles.
- Keep the font simple and readable.
Pro Tip: Practice writing the menu on scrap paper first to ensure all the items fit neatly on the board.
28. Drink Station Signage
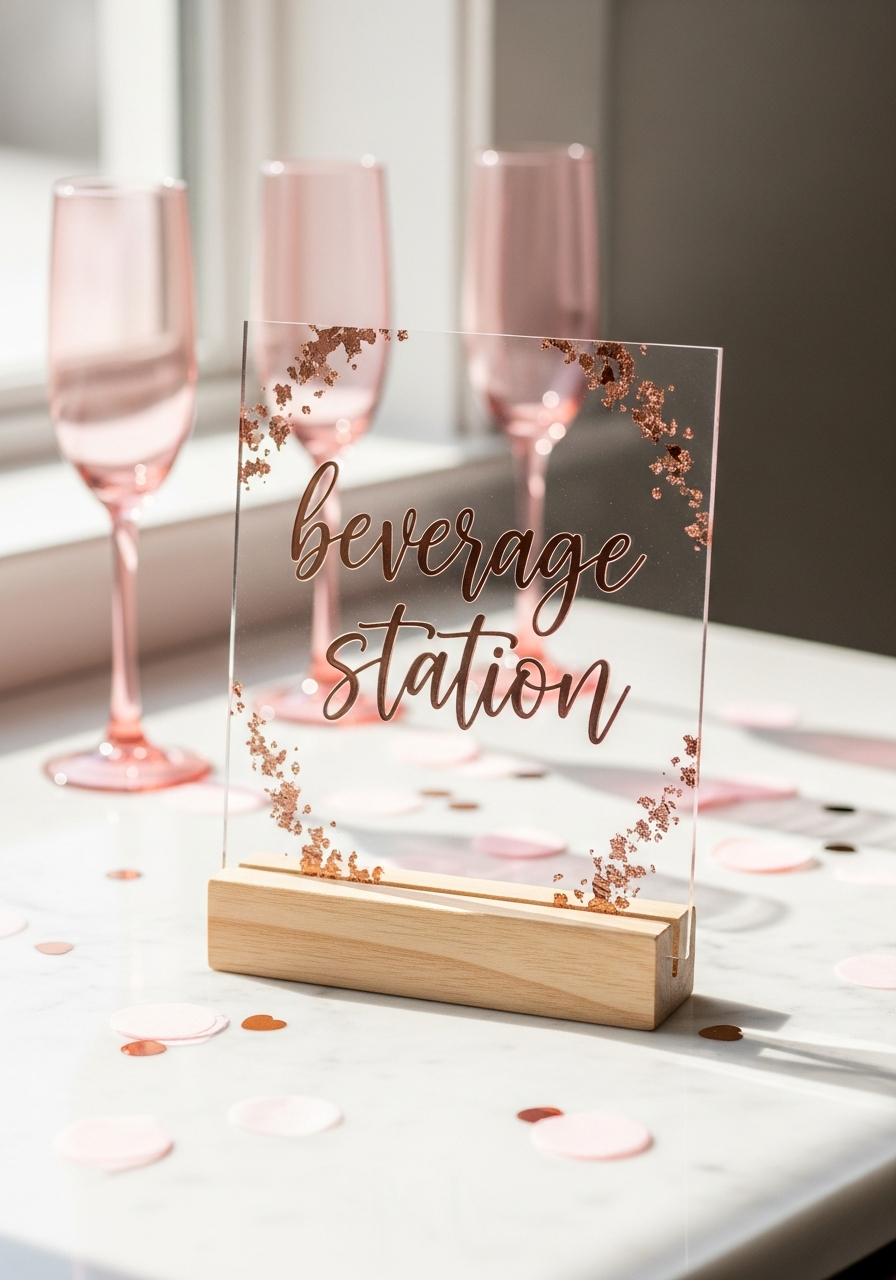
Create a simple sign that labels the beverage area, such as “Bestie Bar” or “Galentine’s Sips.” Frame it or mount it on a stand near the drinks. This helps guide guests.
- Use a funny, catchy phrase.
- Print it in a bold, pink font.
- Place it at eye level.
Pro Tip: Use a free online design tool (like Canva) to create a professional-looking sign you can print at home.
29. Themed Paper Straw Flags
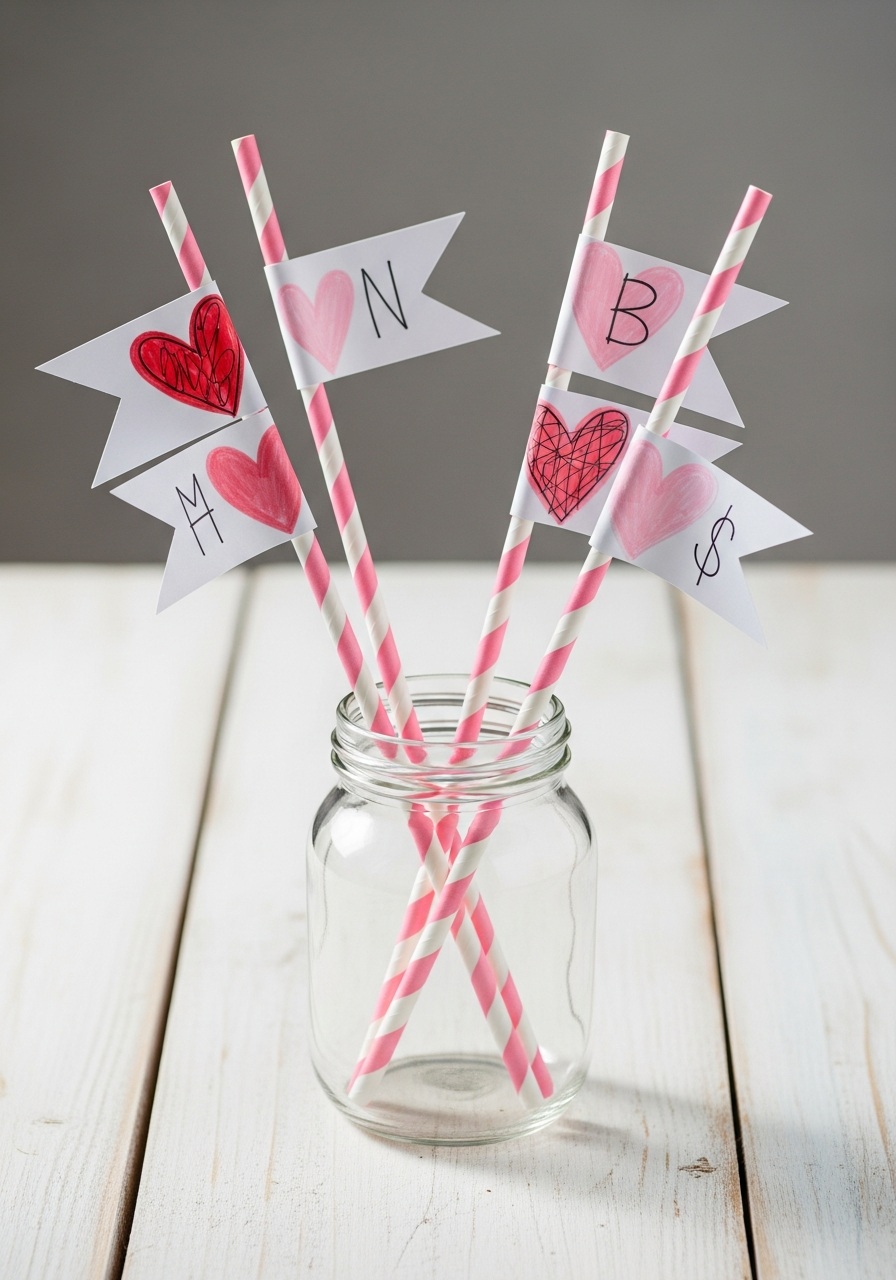
Buy striped paper straws in pink and white. Cut small rectangles of paper, fold them over the straw, and cut a small triangle out of the end to create a flag shape. Write initials or hearts on them.
- Use washi tape to secure the flags.
- Write the guest’s initial on the flag.
- Use biodegradable straws.
Pro Tip: Use a tiny bit of glue stick inside the flag fold to prevent the paper from slipping down the straw into the drink.
30. Personalized Glassware
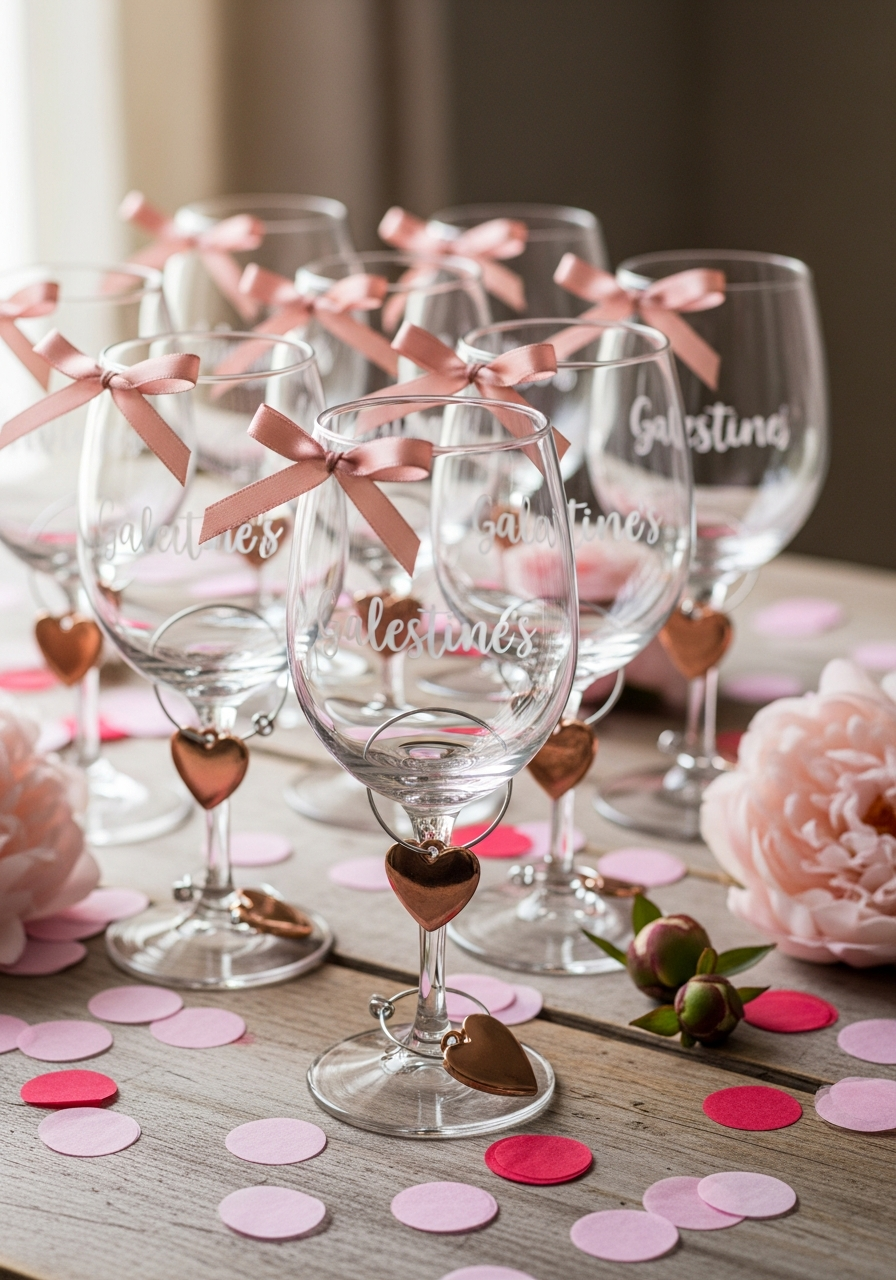
Use wine charms, small ribbon tags, or even simple stickers to label each glass with a guest’s name or a fun nickname. This prevents drink mix-ups and adds a personal touch.
- Use metallic markers on glass.
- Tie a ribbon with a name tag.
- Use different colored charms.
Pro Tip: If using markers, ensure they are oil-based paint markers, which are less likely to smudge when condensation forms on the glass.
31. Flower Crown Station
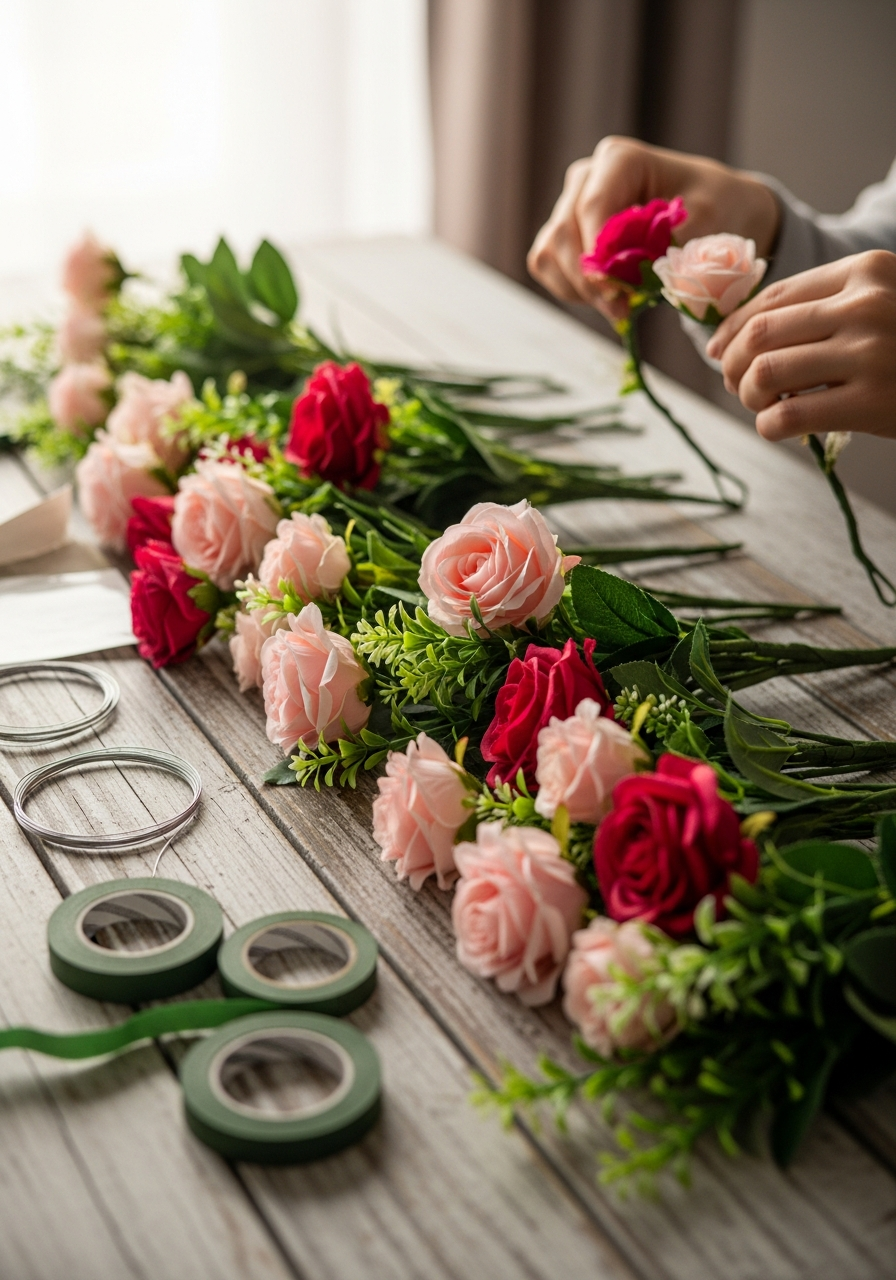
Set up a small area with supplies: wire, floral tape, and faux flowers (roses, greenery). Provide simple instructions so guests can make their own wearable decorations.
- Use affordable silk flowers.
- Provide scissors and wire cutters.
- Keep the instructions very clear.
Pro Tip: Pre-cut the wire into head-sized loops beforehand so guests only have to focus on attaching the flowers.
32. Bracelet Display Decor
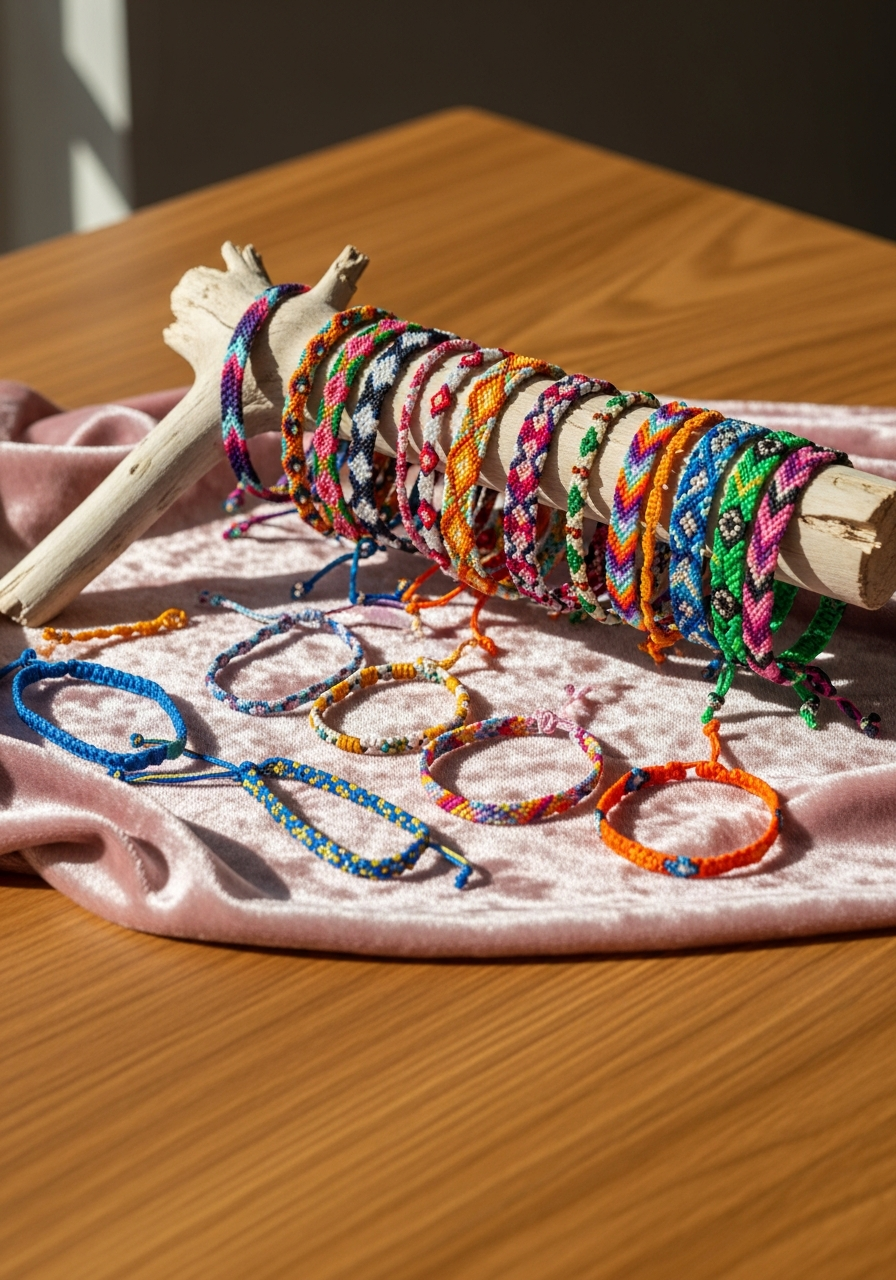
If you or your guests make friendship bracelets, display them creatively. Hang them from a small branch, drape them over a framed sign, or lay them out on a velvet cloth. They serve as colorful, interactive decor.
- Use bright, neon thread.
- Hang them from a jewelry stand.
- Make a few for guests to take.
Pro Tip: Use a small, painted wooden dowel rod suspended between two jars to create a simple bracelet rack.
33. Shared Memory Board
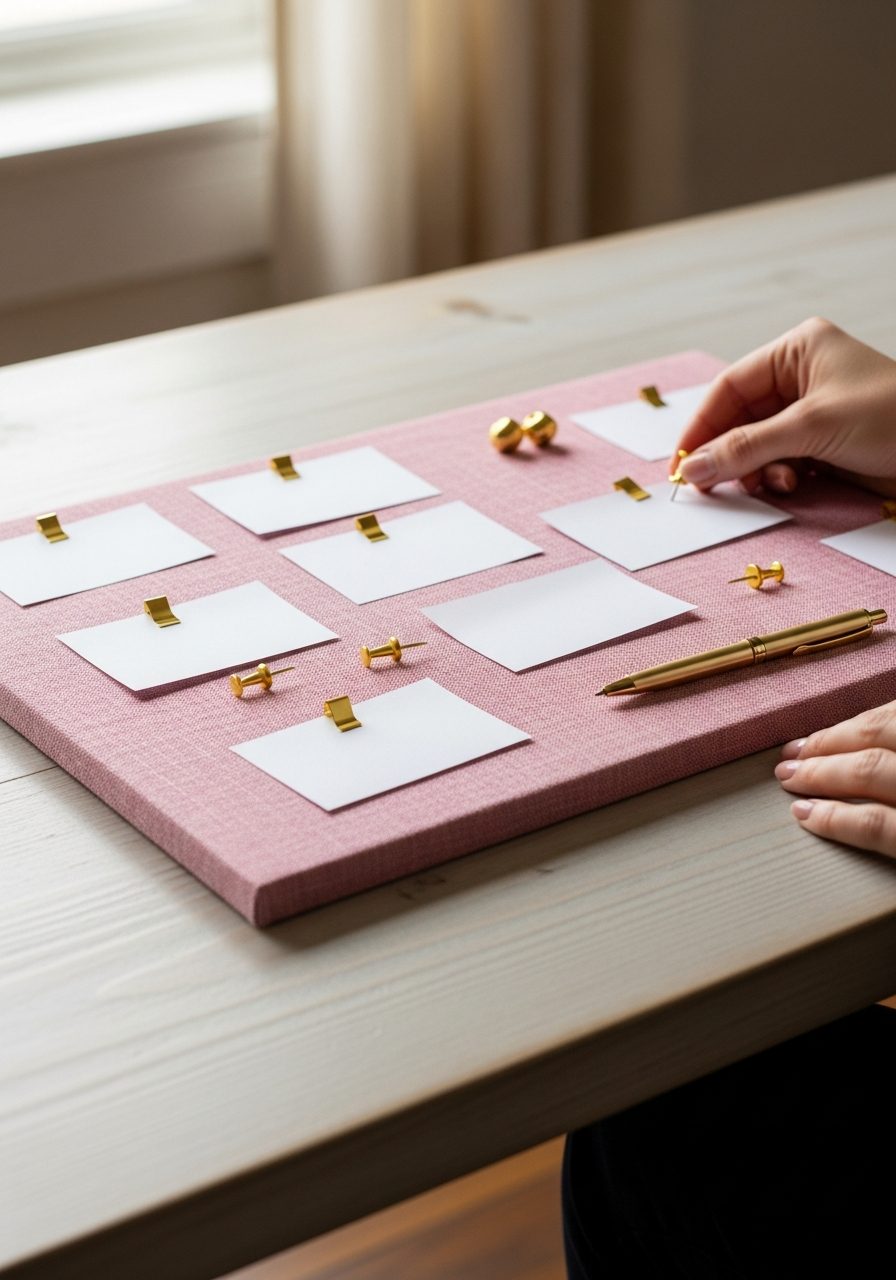
Cover a cork board or foam core with pink fabric. Provide small note cards and pens. Encourage guests to write down a favorite memory they share with the host or the group and pin it to the board.
- Use colorful push pins.
- Provide different colored pens.
- Place it near the entrance.
Pro Tip: Start the board with a few pre-written memories to encourage the first few guests to participate quickly.
34. Compliment Jar
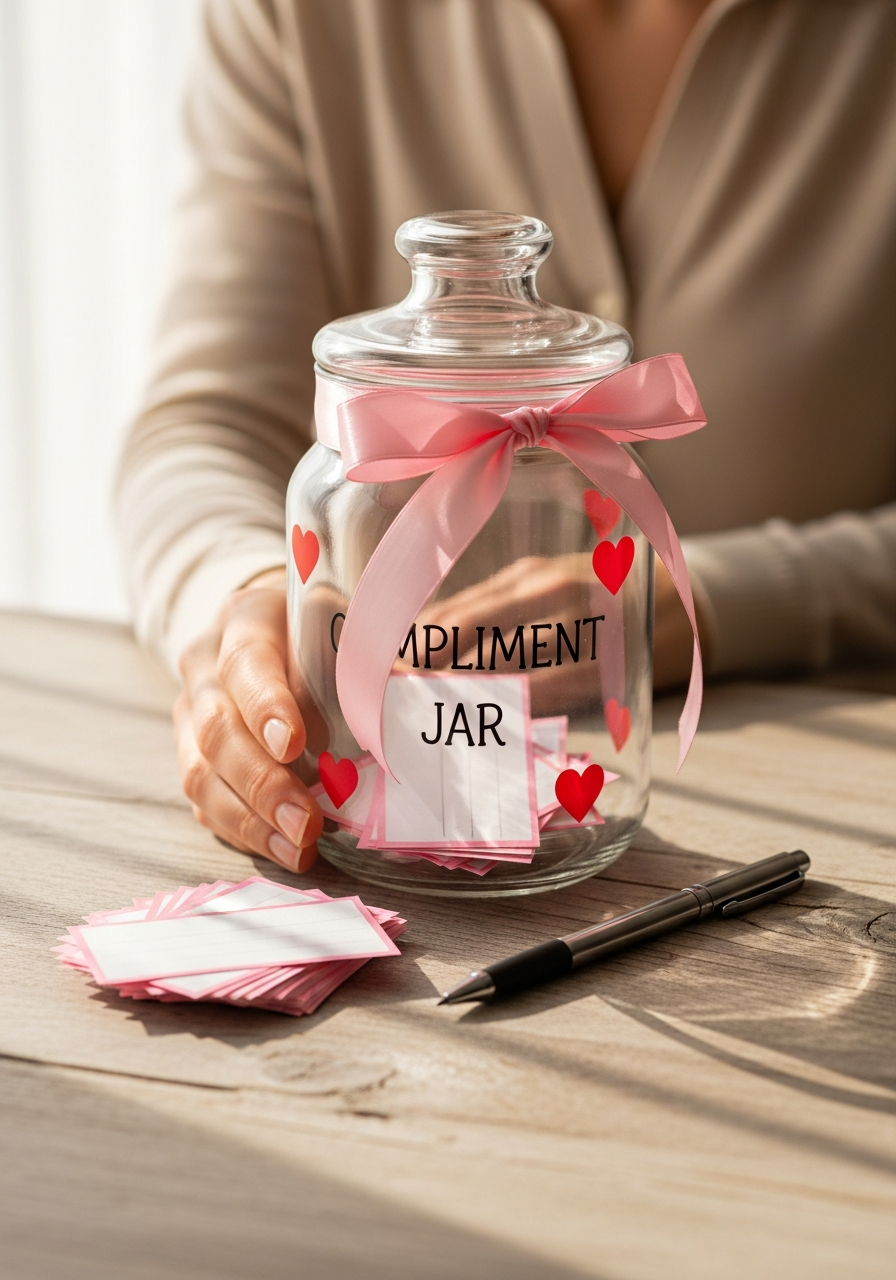
Decorate a large glass jar or container with ribbons and heart stickers. Provide slips of paper and pens. Ask guests to write a compliment for every other guest and drop them in. Read them aloud later.
- Use a jar with a wide mouth.
- Decorate the lid with glitter.
- Use colored paper slips.
Pro Tip: Label the jar clearly with instructions so guests know exactly what they are supposed to write and why.
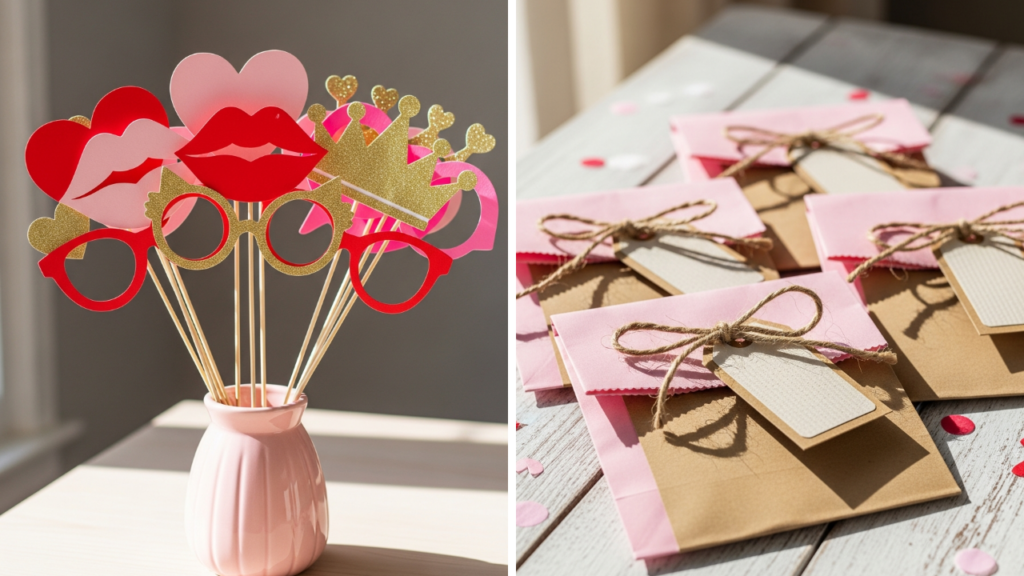
35. Cardstock Photo Props
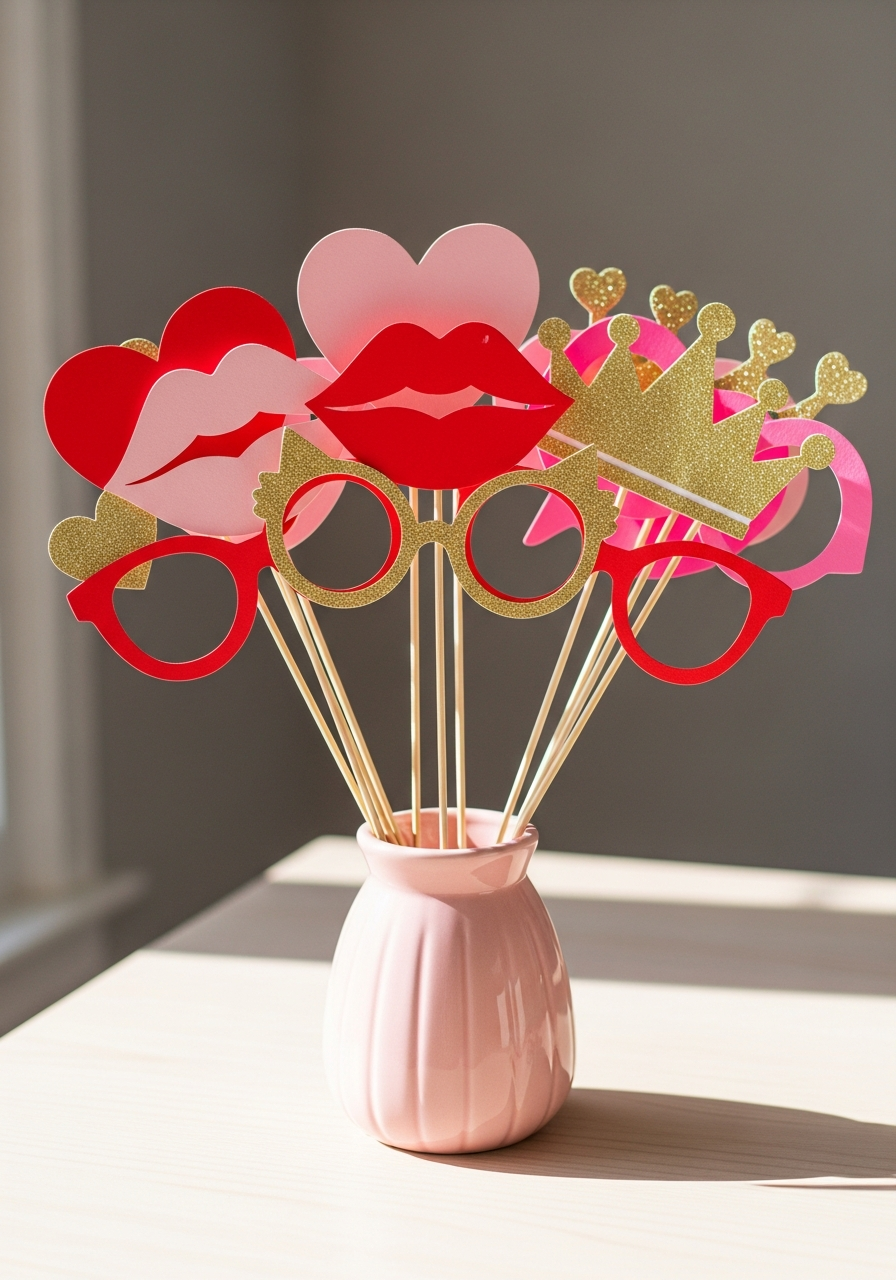
Print out templates for lips, hearts, crowns, and funny glasses. Cut them out from thick cardstock and attach them firmly to wooden skewers or dowels. Keep them in a cute vase near the photo backdrop.
- Use glitter foam sheets.
- Make sure the sticks are long.
- Include a few silly phrase bubbles.
Pro Tip: Reinforce the back of the cardstock where the stick attaches using a piece of duct tape for extra durability.
36. Mirror Heart Decals
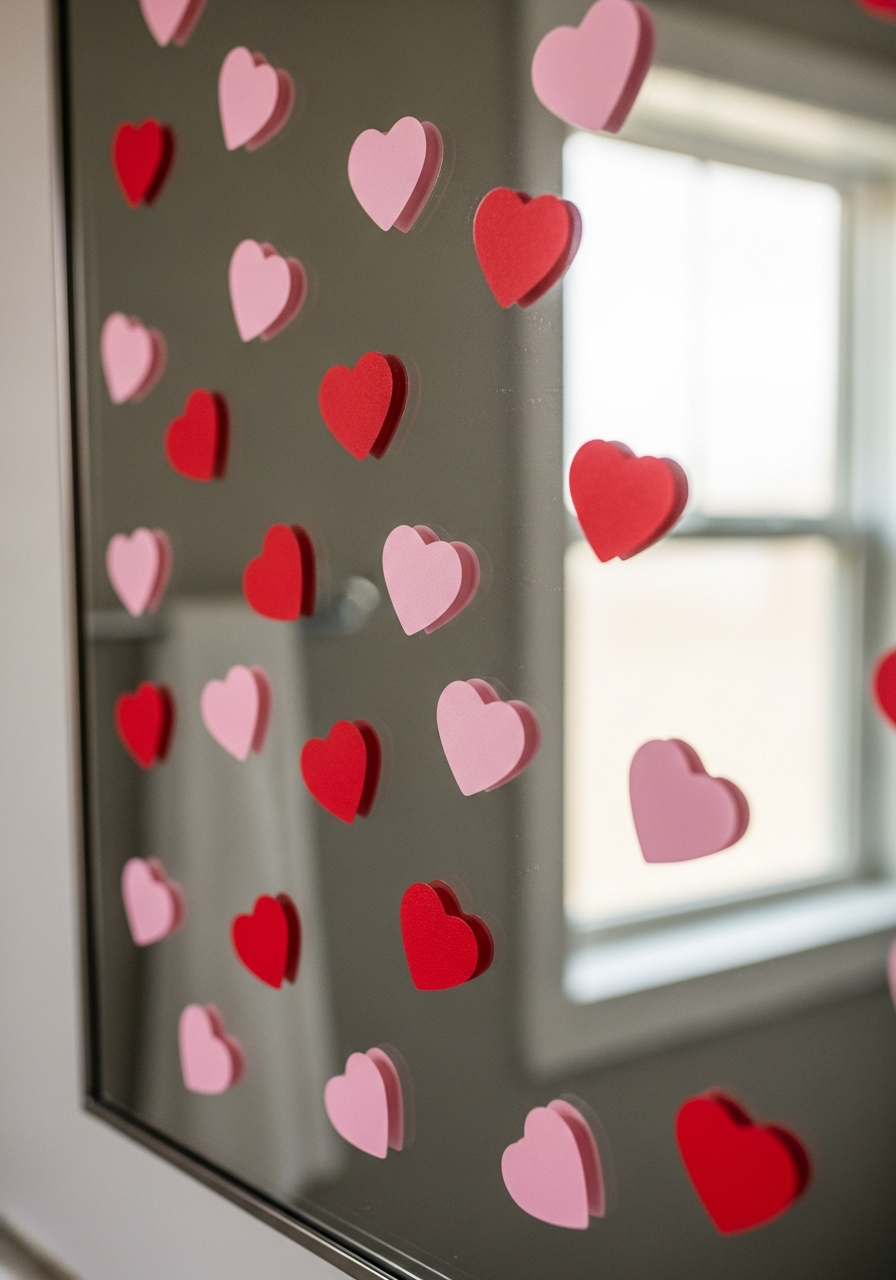
Cut small heart shapes from removable vinyl or contact paper. Stick them randomly around any mirrors in the party space (like the bathroom or entryway). They add a festive touch for selfies.
- Use shiny silver or gold vinyl.
- Keep the hearts small.
- Place them near the edges of the mirror.
Pro Tip: Test a small piece of the contact paper on the mirror first to ensure it peels off cleanly without leaving residue.
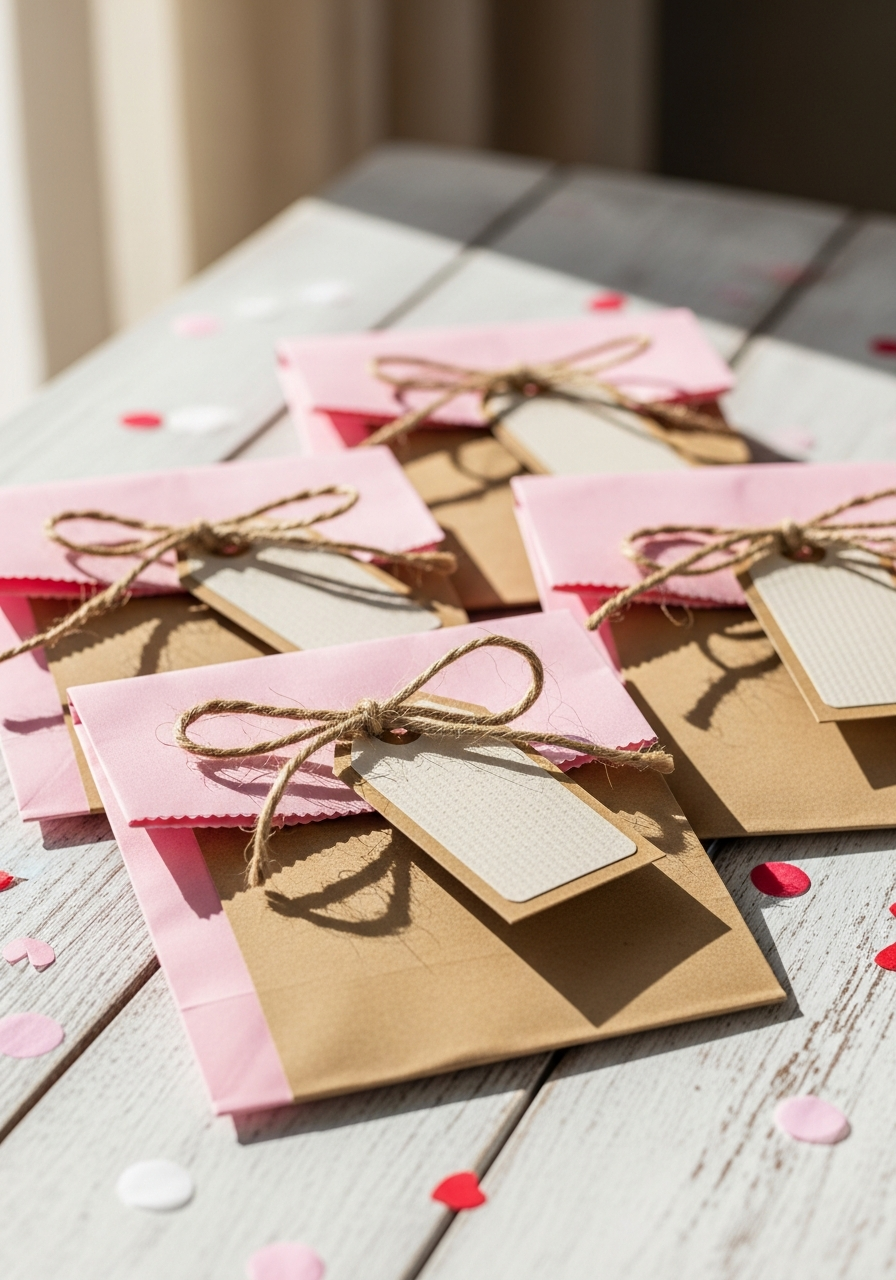
37. Envelope Message Wall
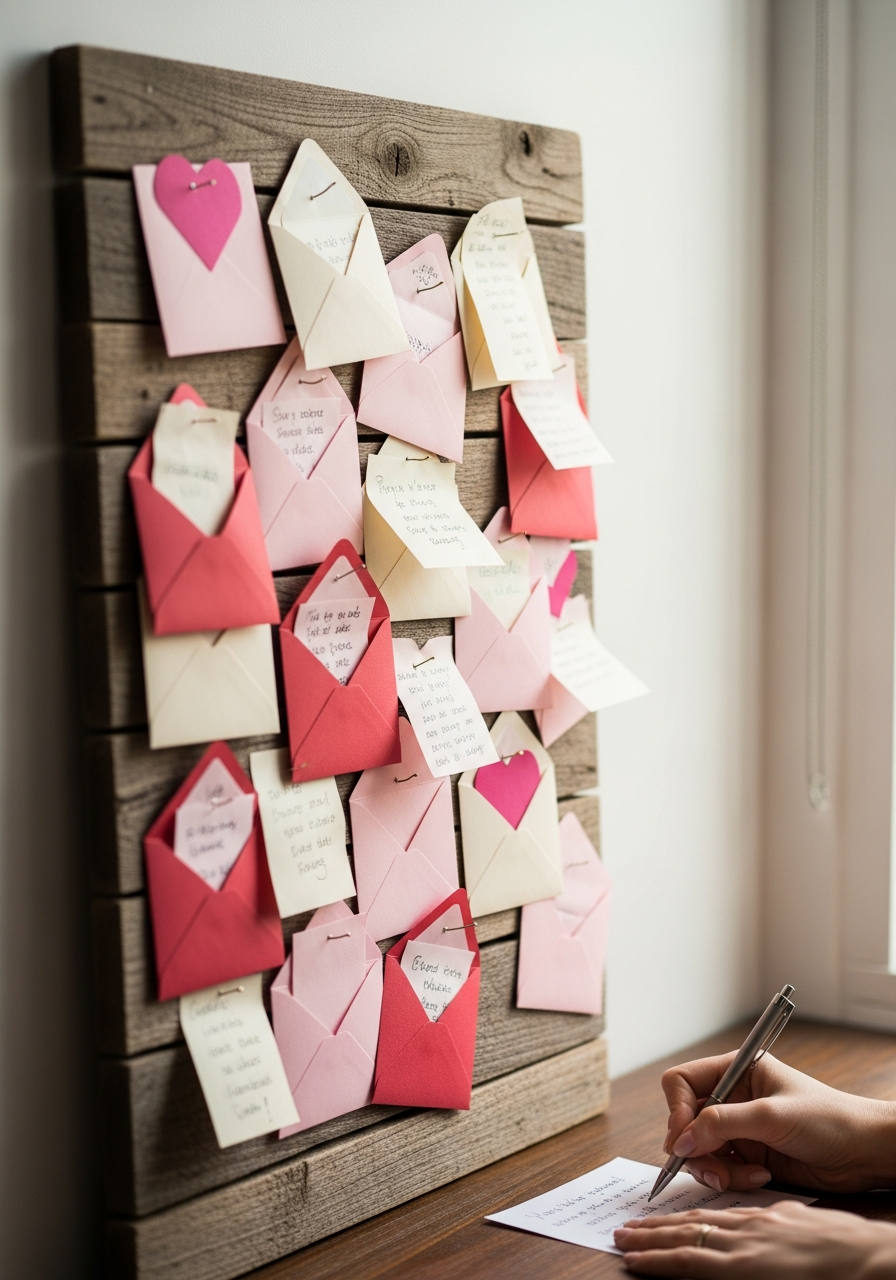
Hang small pink and red envelopes on a wall. Write each guest’s name on an envelope. Provide pens and paper so guests can write private, sweet messages to each other throughout the night.
- Use mini craft envelopes.
- Arrange them in a heart shape.
- Provide metallic pens.
Pro Tip: Use sticky tack instead of tape to attach the envelopes to the wall, making it easier for guests to grab them.
38. Fabric & Light Backdrop
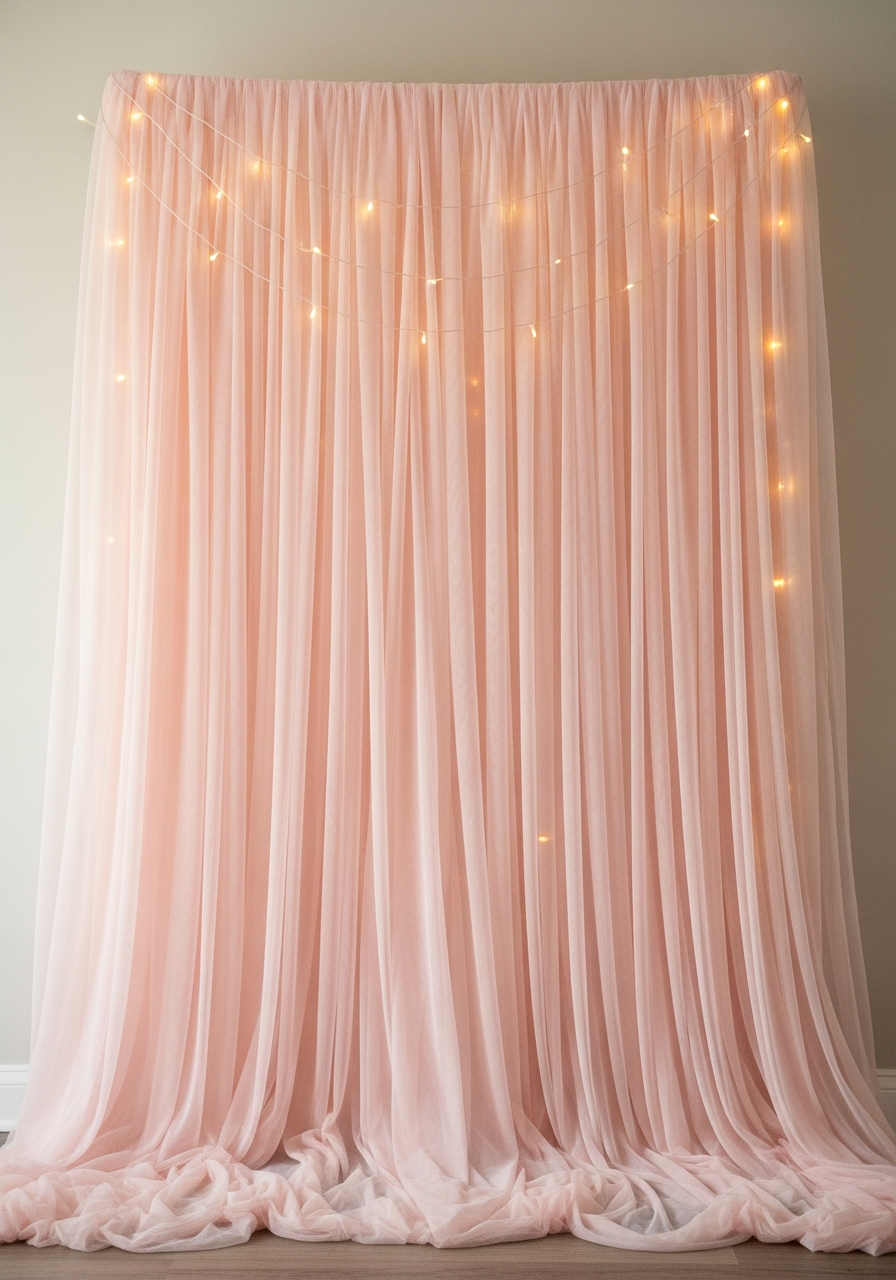
Drape a large piece of soft pink or blush fabric (like tulle or satin) smoothly over a wall or stand. Hang strands of fairy lights behind the fabric so they softly glow through the material.
- Use sheer or light fabric.
- Gather the fabric slightly at the top.
- Use warm white lights.
Pro Tip: Use safety pins to secure the fabric to the top edge if you are using a curtain rod or stand.
39. Ceiling Heart Mobiles
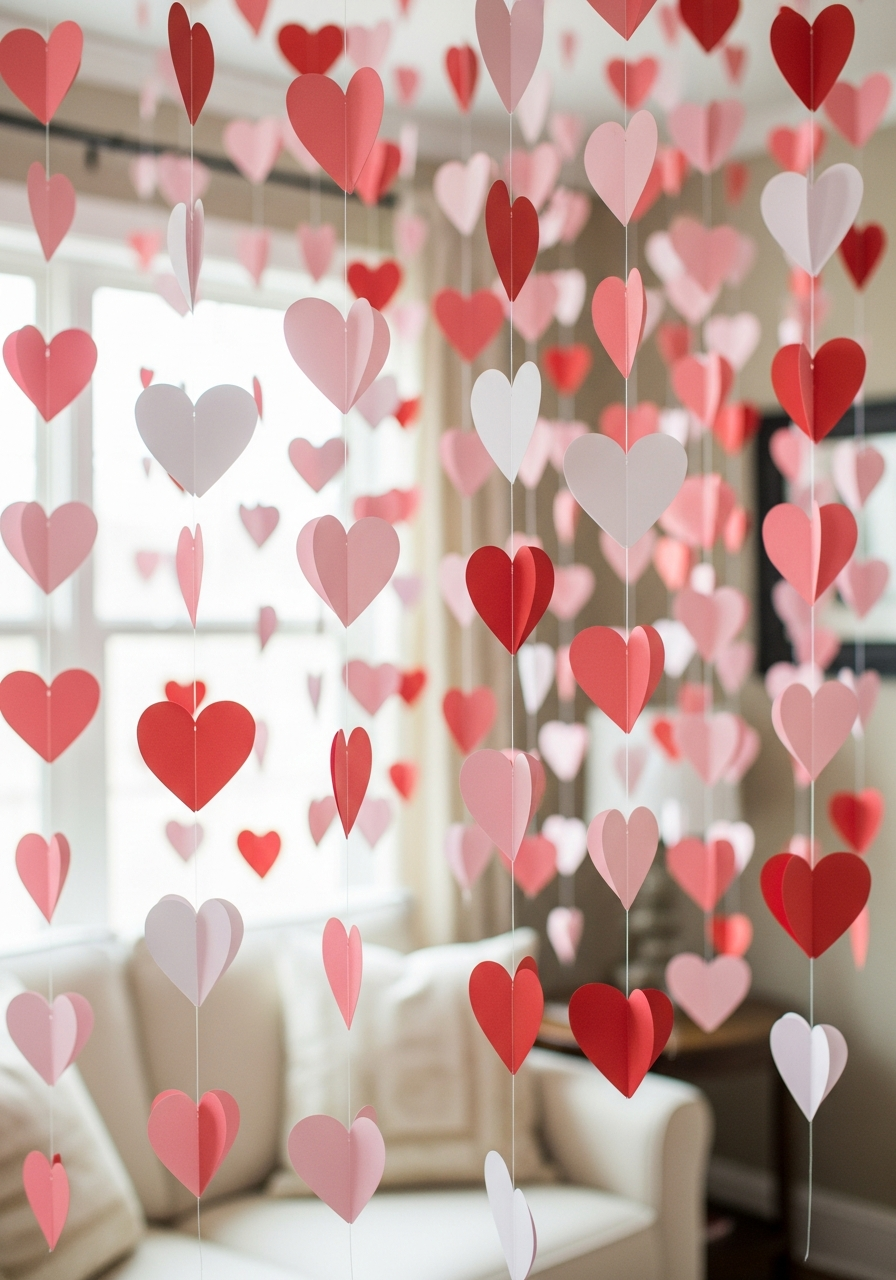
Cut out many paper hearts in various sizes. Use fishing line or clear thread to hang them from the ceiling or light fixtures at different lengths. This creates a whimsical, floating effect.
- Use clear thread for invisible hanging.
- Vary the heart colors.
- Hang them over the dining table.
Pro Tip: Attach the fishing line to the ceiling using small, clear adhesive hooks (like Command Hooks) for easy removal.
40. Power Quote Collage
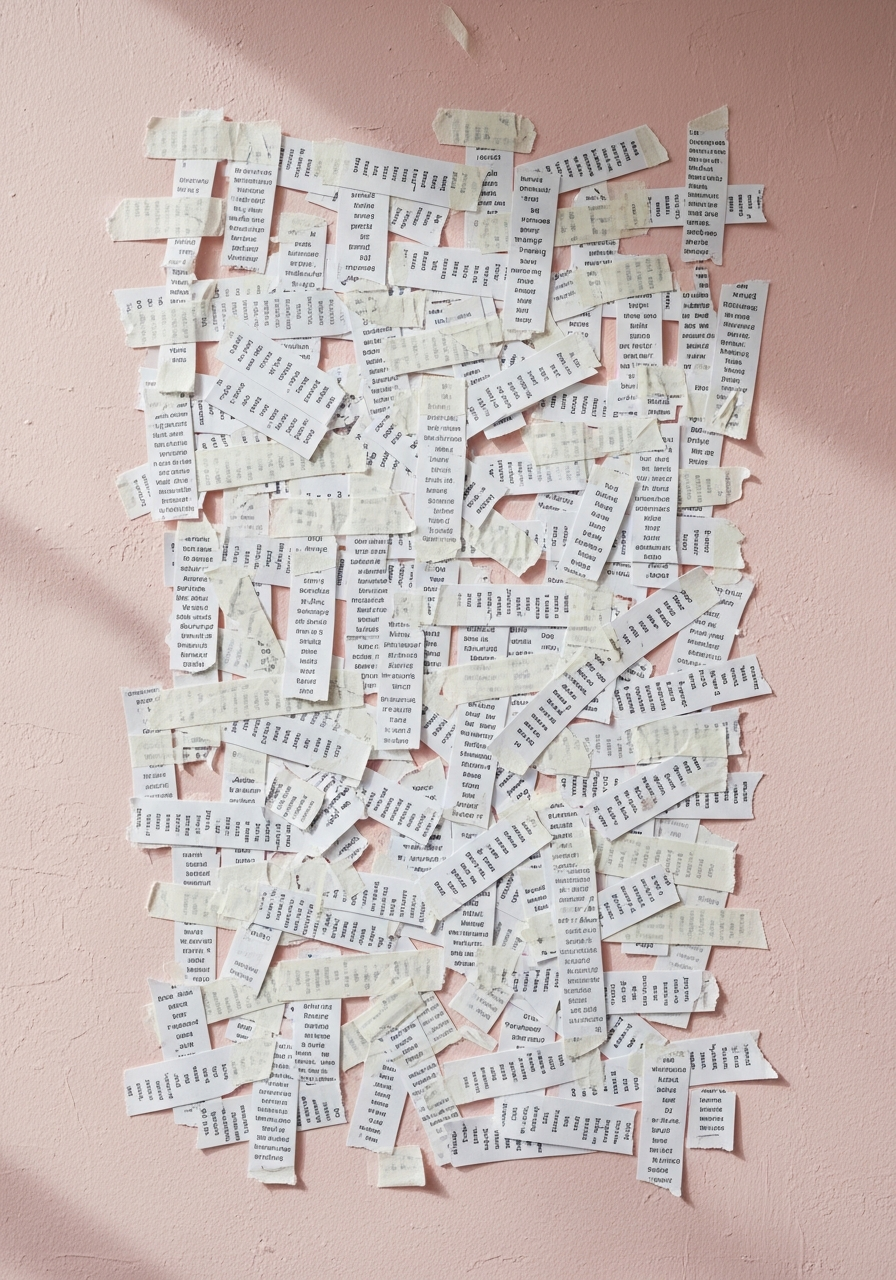
Print out empowering, fun quotes about friendship and women (e.g., “Sisters Before Misters”). Use tape to arrange them tightly on a wall, mixing different fonts and sizes for visual interest.
- Use black and white prints.
- Mix in some pink paper.
- Arrange them like puzzle pieces.
Pro Tip: Use a level when hanging the prints to ensure the collage looks intentional and not messy.
41. Favor Bags With Tags
Purchase small paper bags (kraft or pink). Fill them with treats or small items. Punch a hole in a small cardstock tag and tie it to the bag handle with twine. Write a thank you note on the tag.
- Use simple brown paper bags.
- Stamp a heart onto the tag.
- Fill them with lip balm or candy.
Pro Tip: Pre-stamp all the tags before the party so you only have to tie them onto the bags at the last minute.
42. Custom Mini Gift Boxes
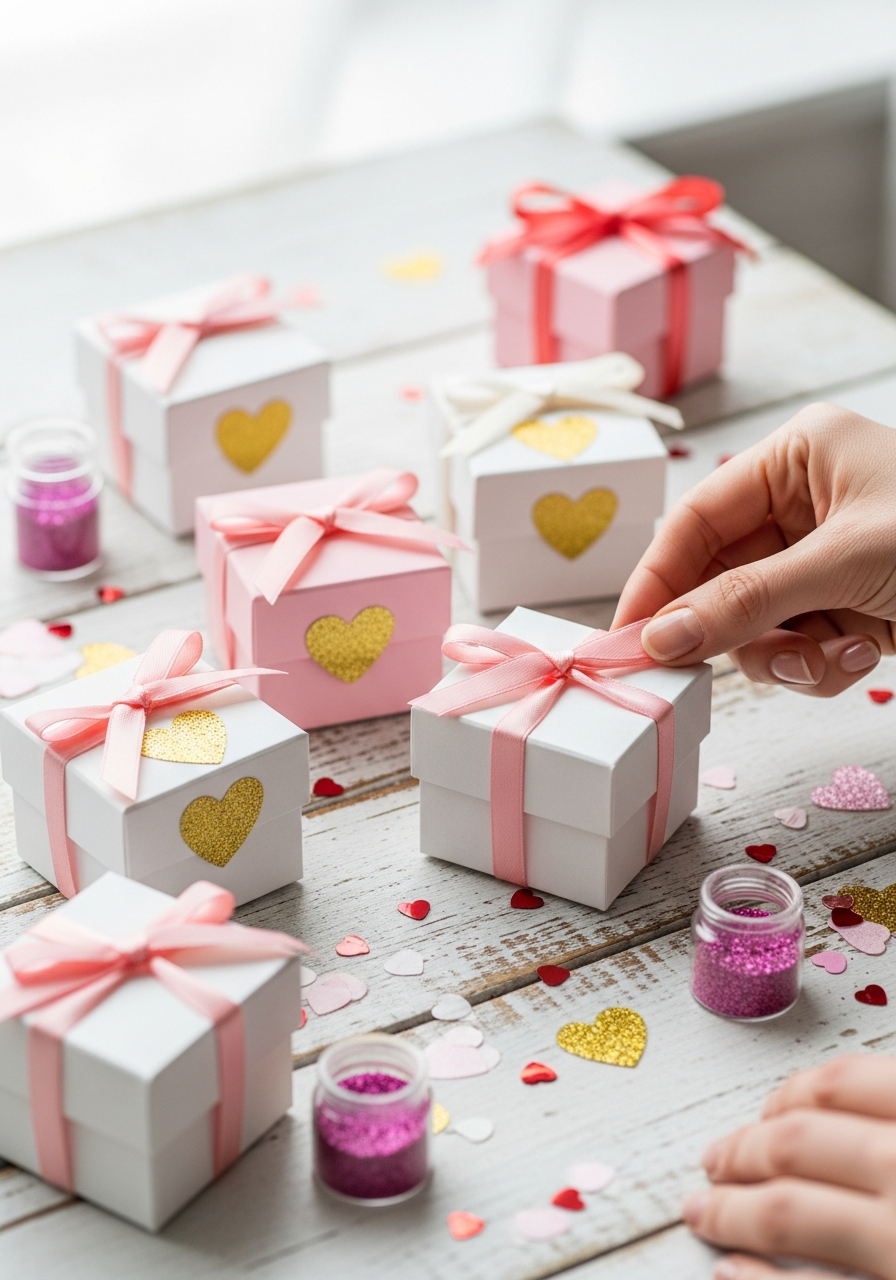
Buy small, plain white or pink cardboard boxes. Decorate them with heart stickers, glitter, or ribbon. Write each guest’s name on the top and place them near the exit as a thank-you gift.
- Use metallic markers for names.
- Tie a simple velvet ribbon.
- Fill with baked goods.
Pro Tip: Use a small address label printer to print names neatly if your handwriting is not consistent.
43. Candle Favor Display
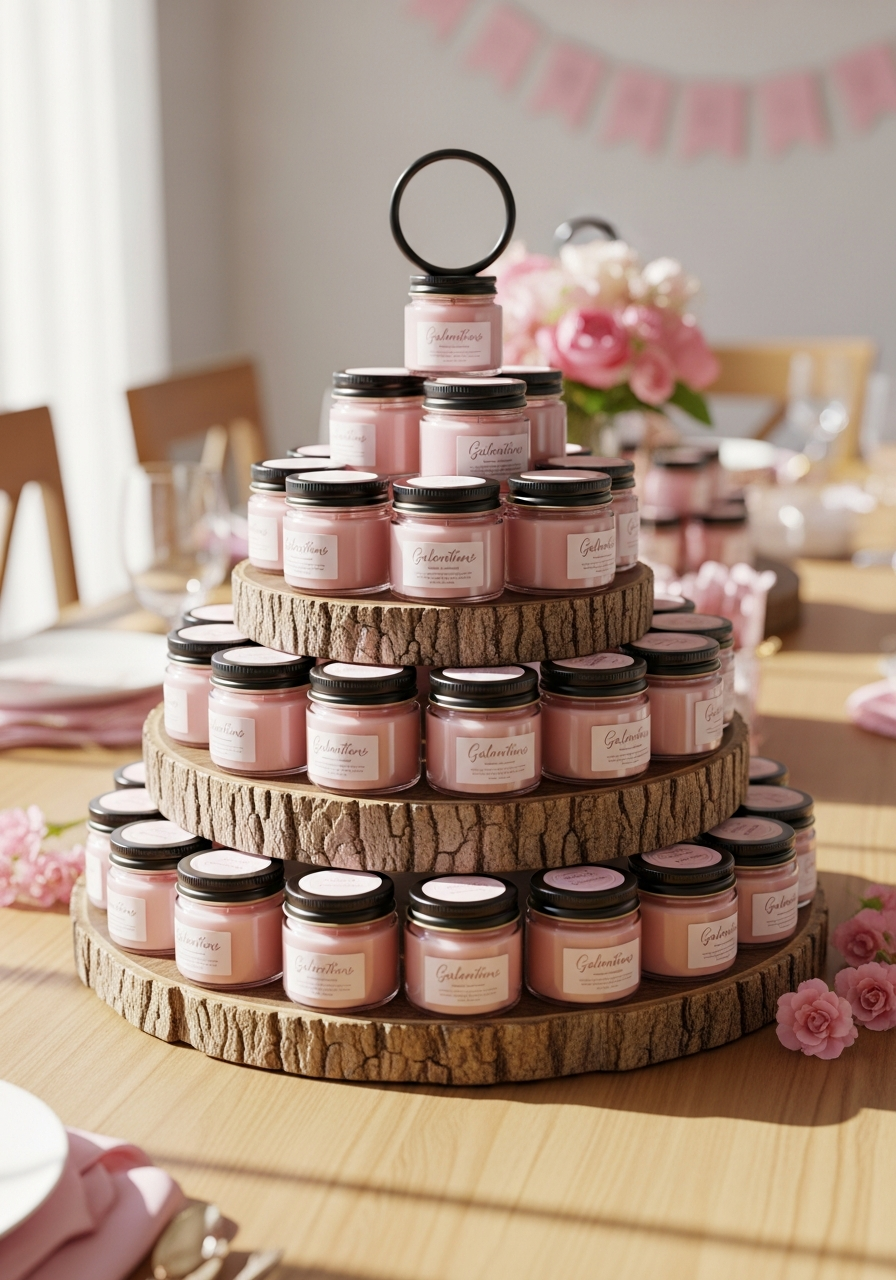
If giving small candles as favors, arrange them beautifully on a display table. Use tiered cake stands or simple crates to create height. Add a sign that says “Take One.”
- Use small, scented candles.
- Wrap them in pink tissue paper.
- Decorate the table with confetti.
Pro Tip: Tie a small, personalized thank-you note around each candle with twine before displaying them.
44. Party Game Signage
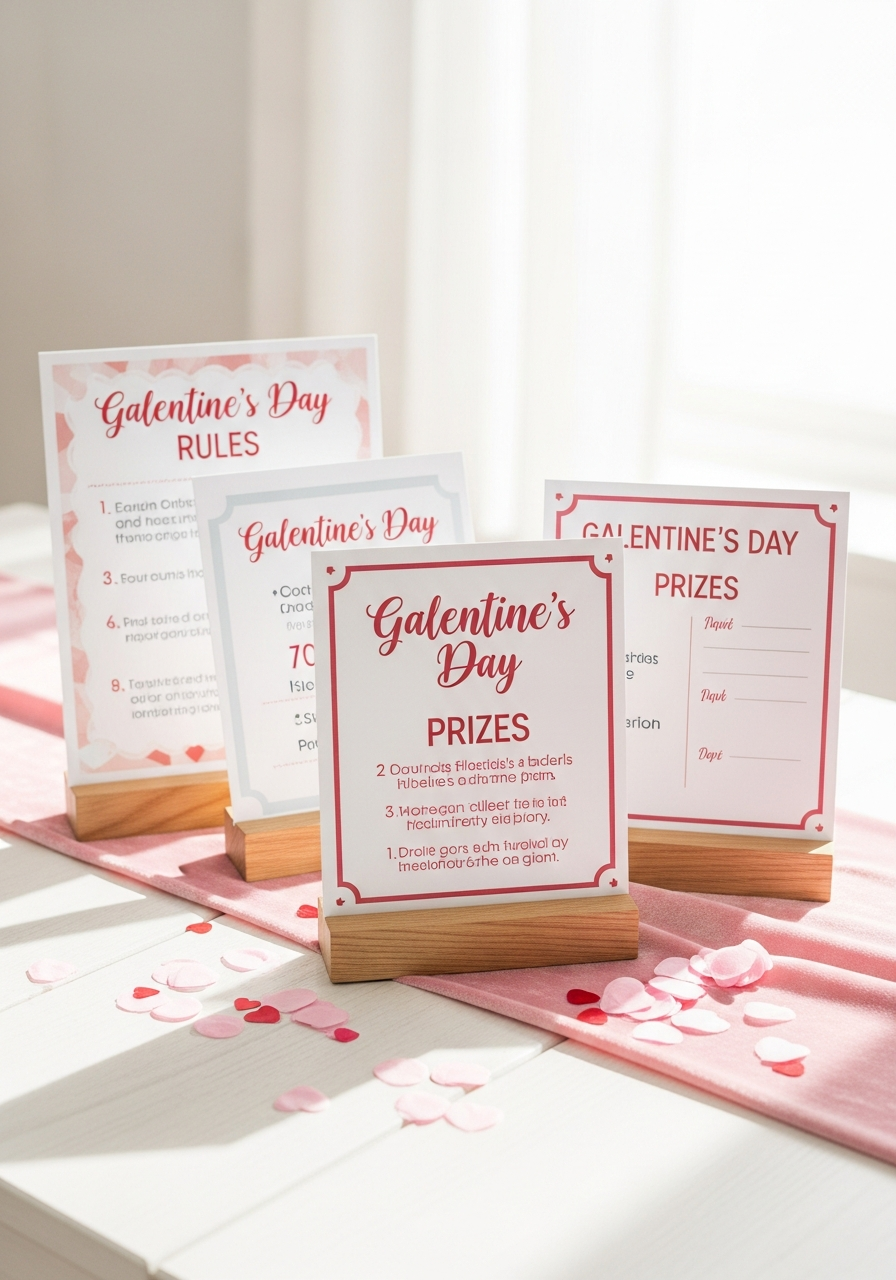
If you plan to play games (like Galentine’s Bingo or trivia), create clear, fun signs explaining the rules or listing the prizes. This makes the activities feel more organized and official.
- Use bright colors on the signs.
- Keep the rules simple.
- Place the sign near the game area.
Pro Tip: Laminate the game signs if you plan to reuse them for future parties or events.
45. Painted Wooden Hearts
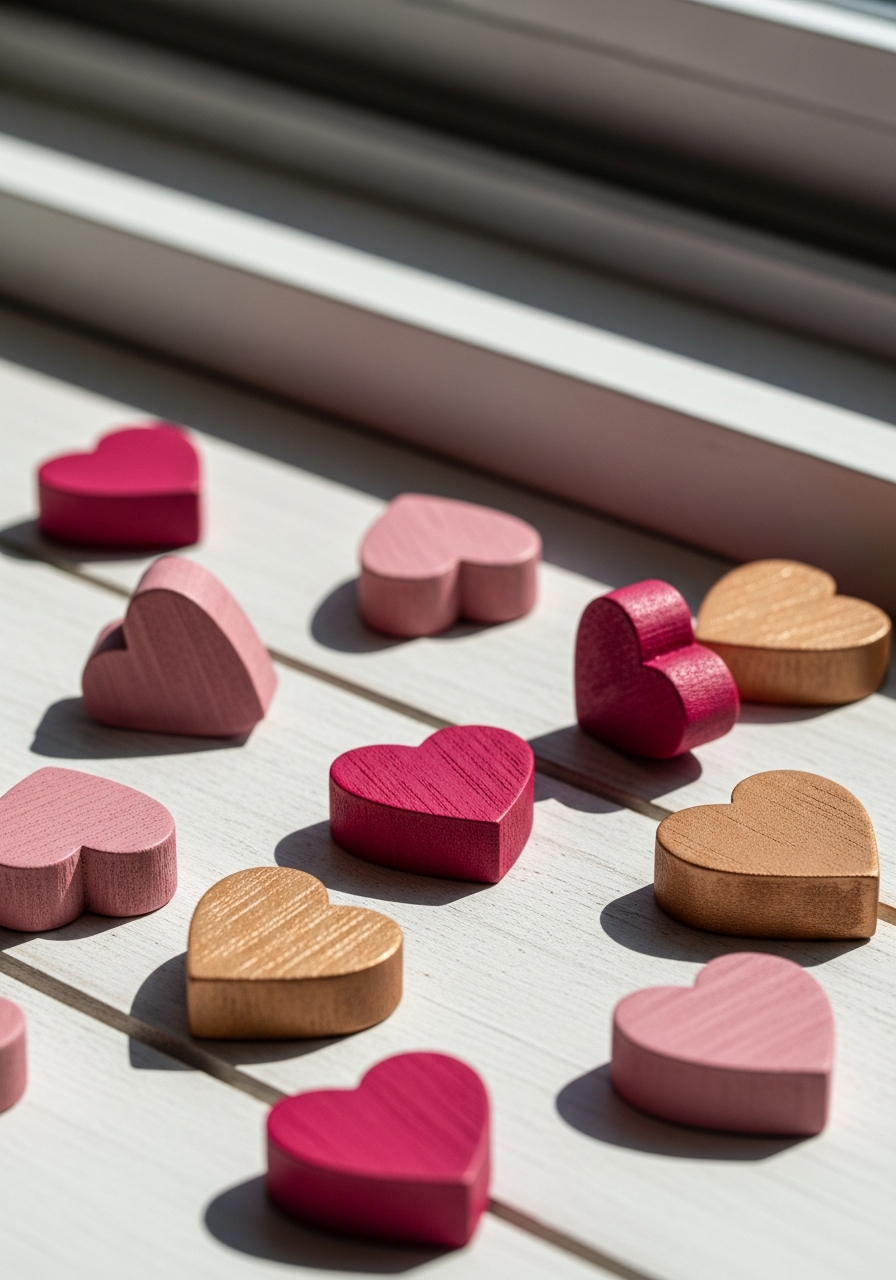
Buy small, unfinished wooden hearts from a craft store. Paint them in various shades of pink, red, and gold. Scatter them across the tables, shelves, and window sills for small bursts of color.
- Use glossy acrylic paint.
- Add a layer of glitter sealant.
- Use them as coasters.
Pro Tip: Use metallic gold paint on the edges of the hearts to give them a finished, high-end look.
46. Floral Embroidery Hoops
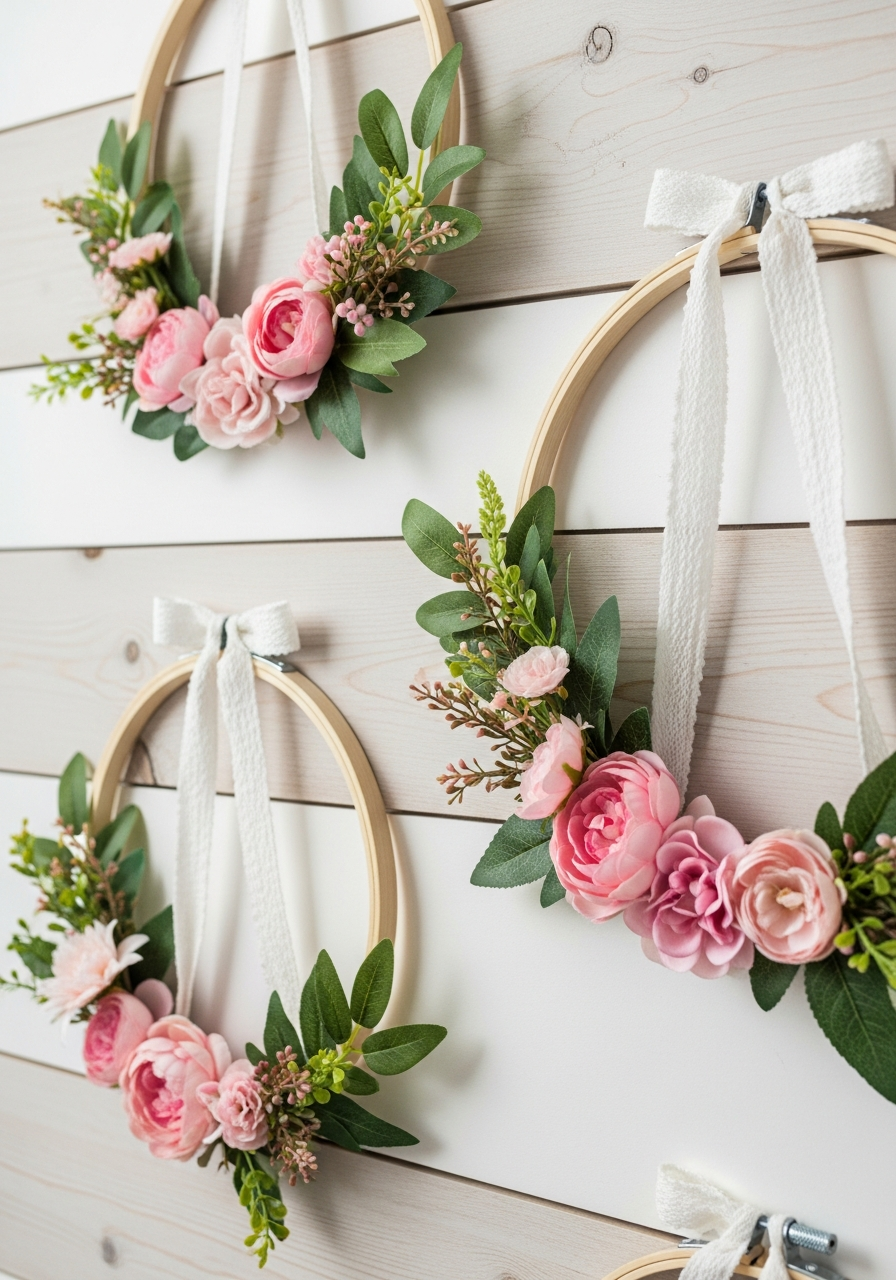
Take wooden embroidery hoops and wrap them partially with faux greenery and pink flowers. Hang them on the wall using ribbon, creating a rustic, romantic piece of wall art.
- Use different sized hoops.
- Secure flowers with floral wire.
- Hang them in a cluster of three.
Pro Tip: Paint the wooden hoops white or gold before adding the flowers to make the colors pop more brightly.
47. Ribbon Chair Backs
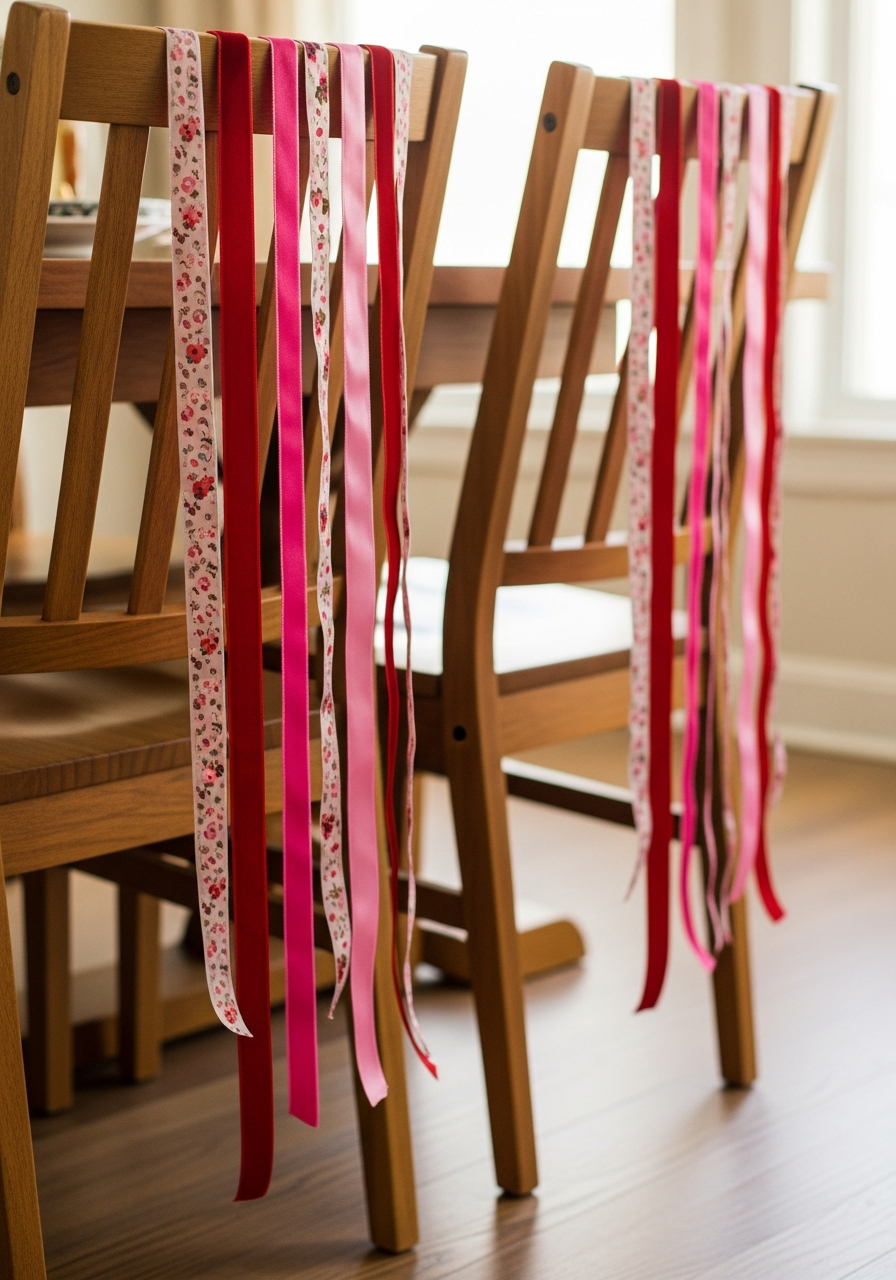
Take long strips of pink, red, or patterned ribbon. Tie them simply to the back of each dining chair, letting the ends hang down to the floor. This is a very easy way to dress up simple chairs.
- Use satin or sheer ribbon.
- Tie a big, simple bow.
- Use the same ribbon as the centerpieces.
Pro Tip: Cut the ribbon ends diagonally to prevent fraying and give them a more polished appearance.
48. Handmade Entry Wreath
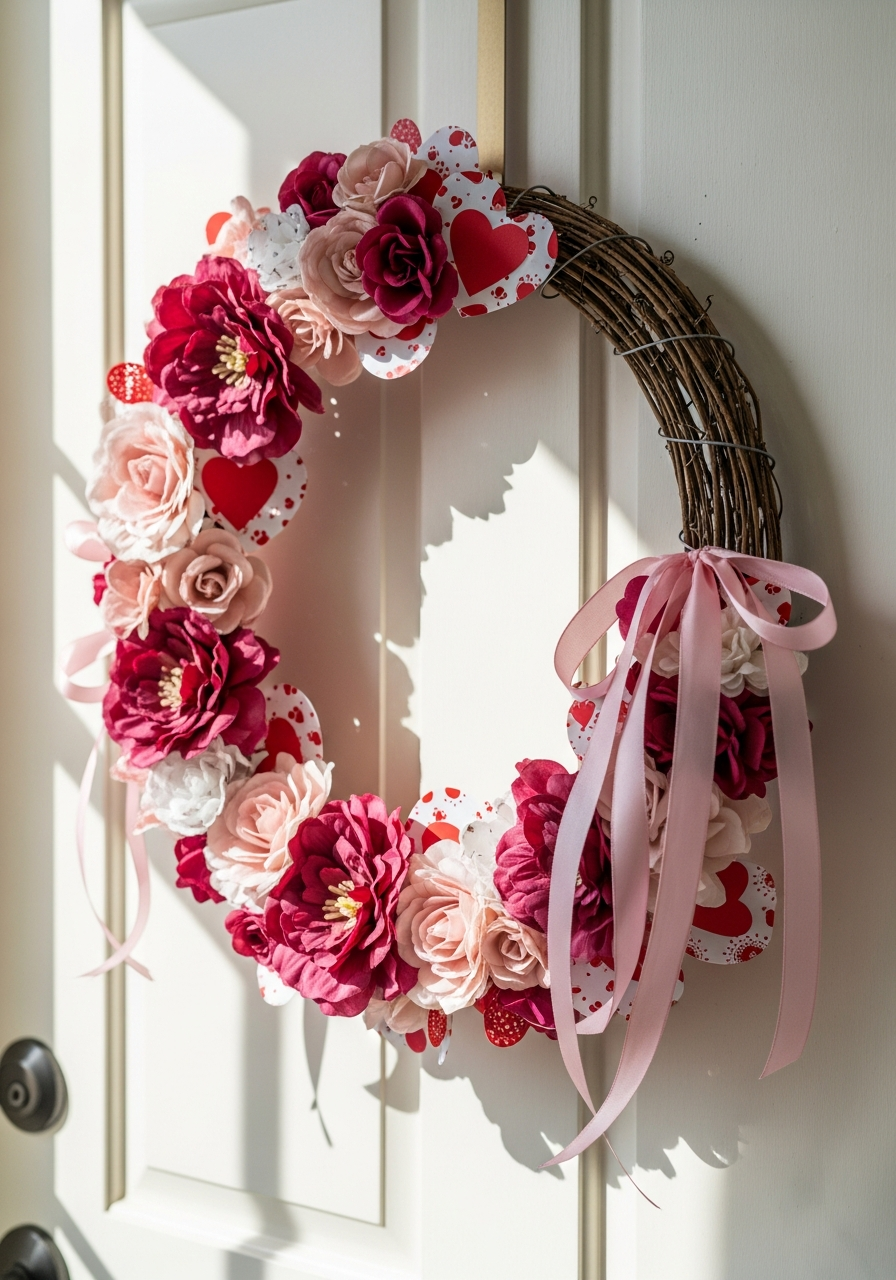
Purchase a plain foam or wire wreath form. Use hot glue to attach faux flowers, small paper hearts, and ribbon loops in Galentine colors. Hang it on the front door to welcome guests.
- Use a mix of textures.
- Add a large “Hello” sign.
- Keep the colors light and airy.
Pro Tip: Use a simple burlap base for the wreath to provide a rustic contrast to the pink hearts and flowers.
49. Confetti Balloons
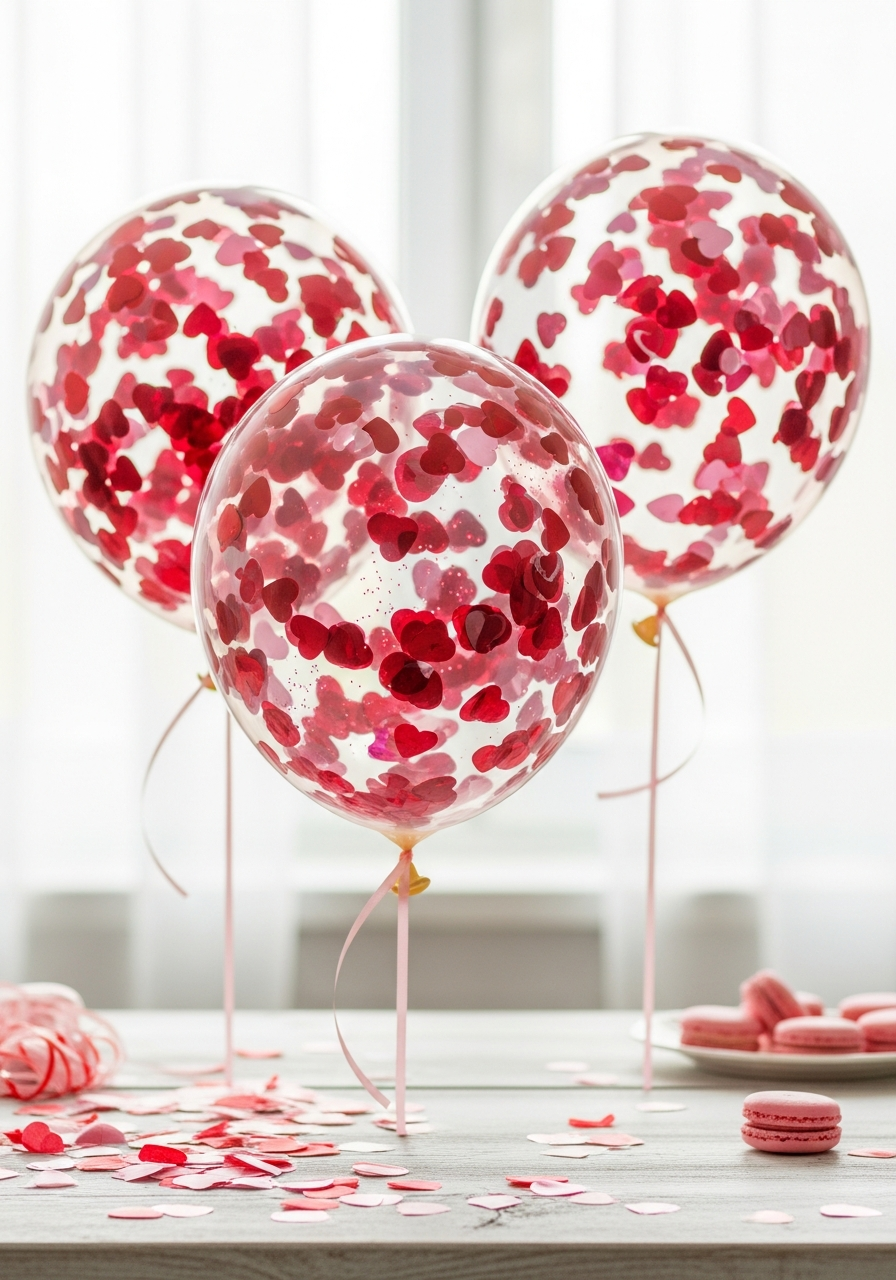
Before inflating clear balloons, drop in a handful of heart-shaped paper or glitter confetti. Inflate them with helium or air. The confetti sticks to the sides, creating a sparkly decoration.
- Use extra large clear balloons.
- Rub the balloon to create static.
- Use only lightweight confetti.
Pro Tip: Use a funnel to easily pour the small confetti pieces into the neck of the uninflated balloon.
50. Handmade Welcome Sign
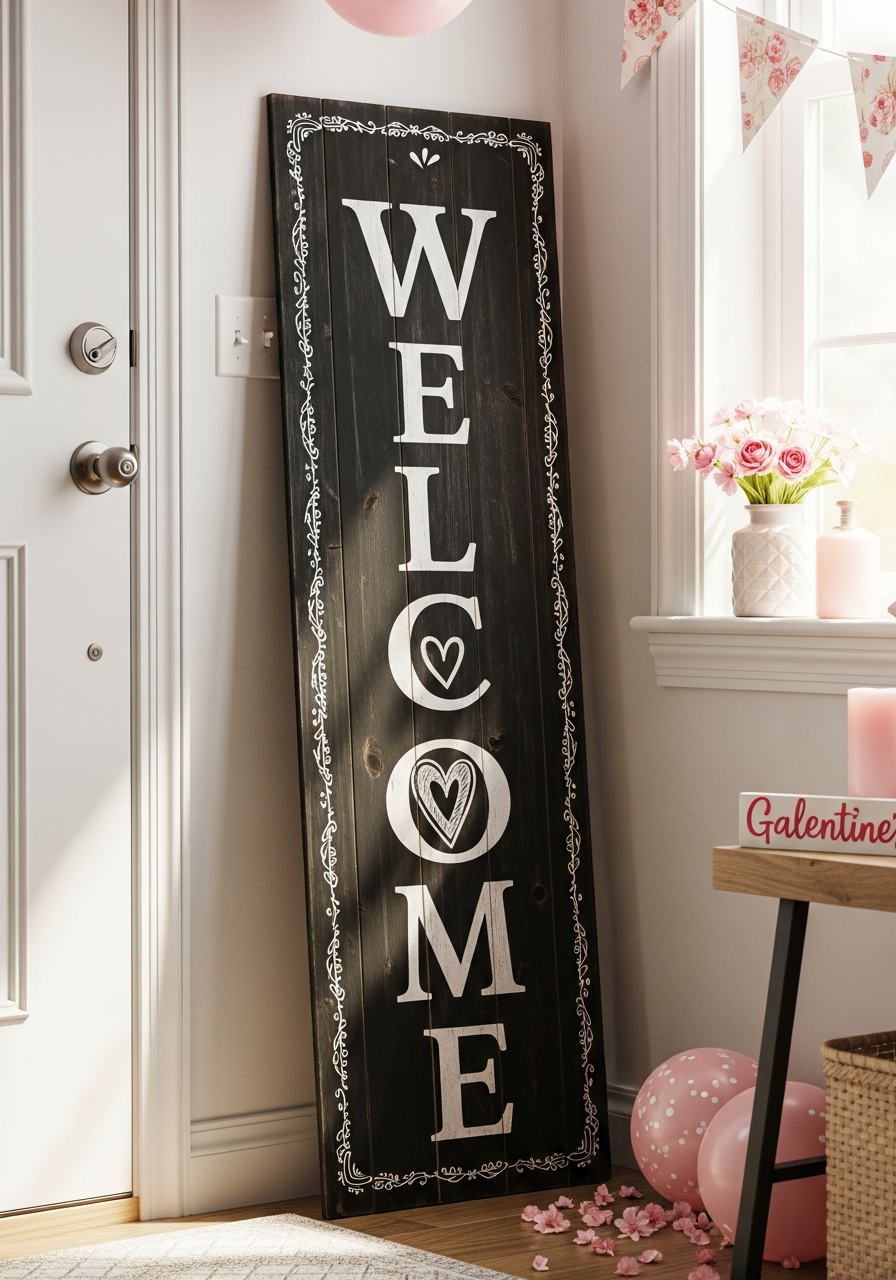
Use a piece of wood, chalkboard, or poster board to create a large sign that says “Happy Galentine’s Day!” or “Welcome Besties.” Place it right at the entrance to set the mood immediately.
- Use stencils for neat letters.
- Decorate the edges with hearts.
- Place it on an easel.
Pro Tip: Use contrasting colors (like white paint on dark wood) so the welcome message is easy to read from a distance.
You now have 50 amazing ideas for galentines party decorations diy projects.
These simple touches will make your party feel personal and full of love without stressing your budget.
Which project are you tackling first? Comment below, share this list with your co-host, and don’t forget to Pin your favorites!
This post may contain affiliate links: full affiliate disclosure.