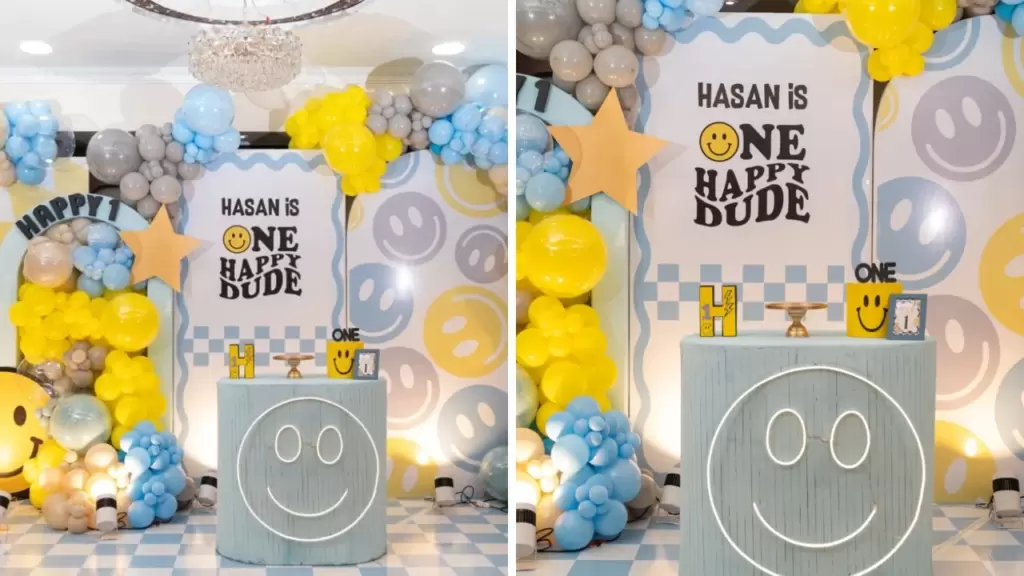
The 'One Happy Dude' theme is surging in popularity as a refreshing, retro-inspired alternative for celebrating a first birthday.
This aesthetic seamlessly blends 70s groovy vibes with modern 'cool kid' style, relying heavily on iconic smiley face graphics and bold checkered patterns.
Use these classic motifs to create a laid-back yet vibrant atmosphere that feels both nostalgic and trend-forward.
Iconic Backdrops and Photo Ops
1. Retro Layered Backdrop Station
Credit: @alanadecor / Instagram
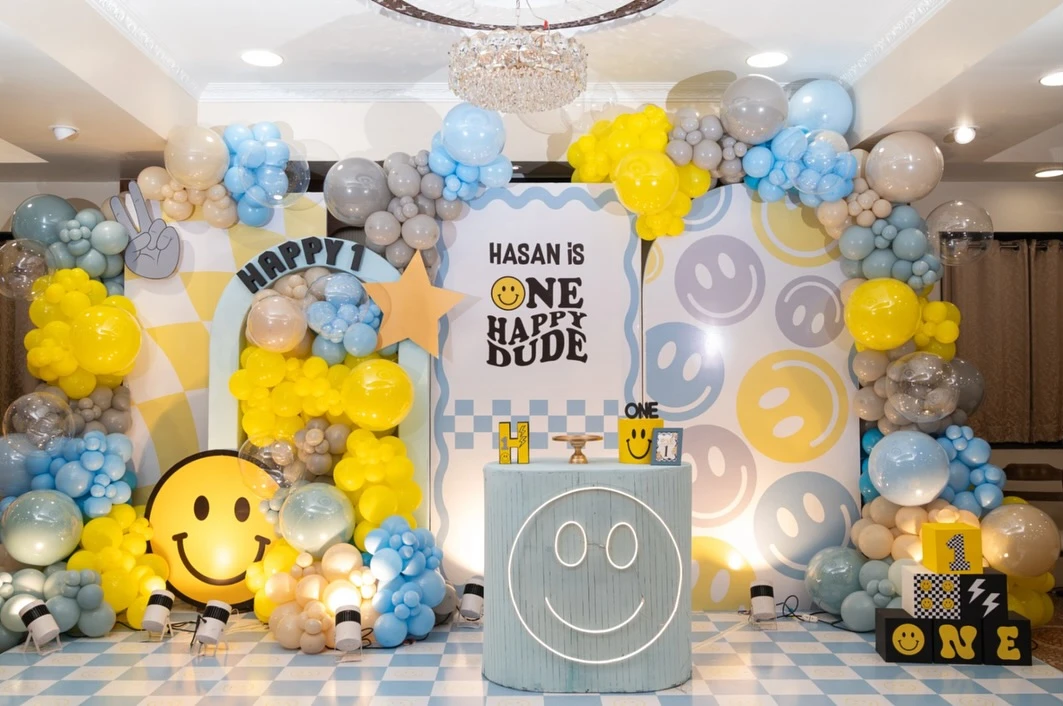
Build a multi-dimensional photo area by layering different backdrop panels, such as warped checkered patterns and oversized smiley faces.
This approach adds depth to the scene, making the space feel more curated rather than using a single flat sheet.
Secure the panels at slightly different depths to allow room for balloon clusters to weave between the layers.
Credit: @alanadecor / Instagram
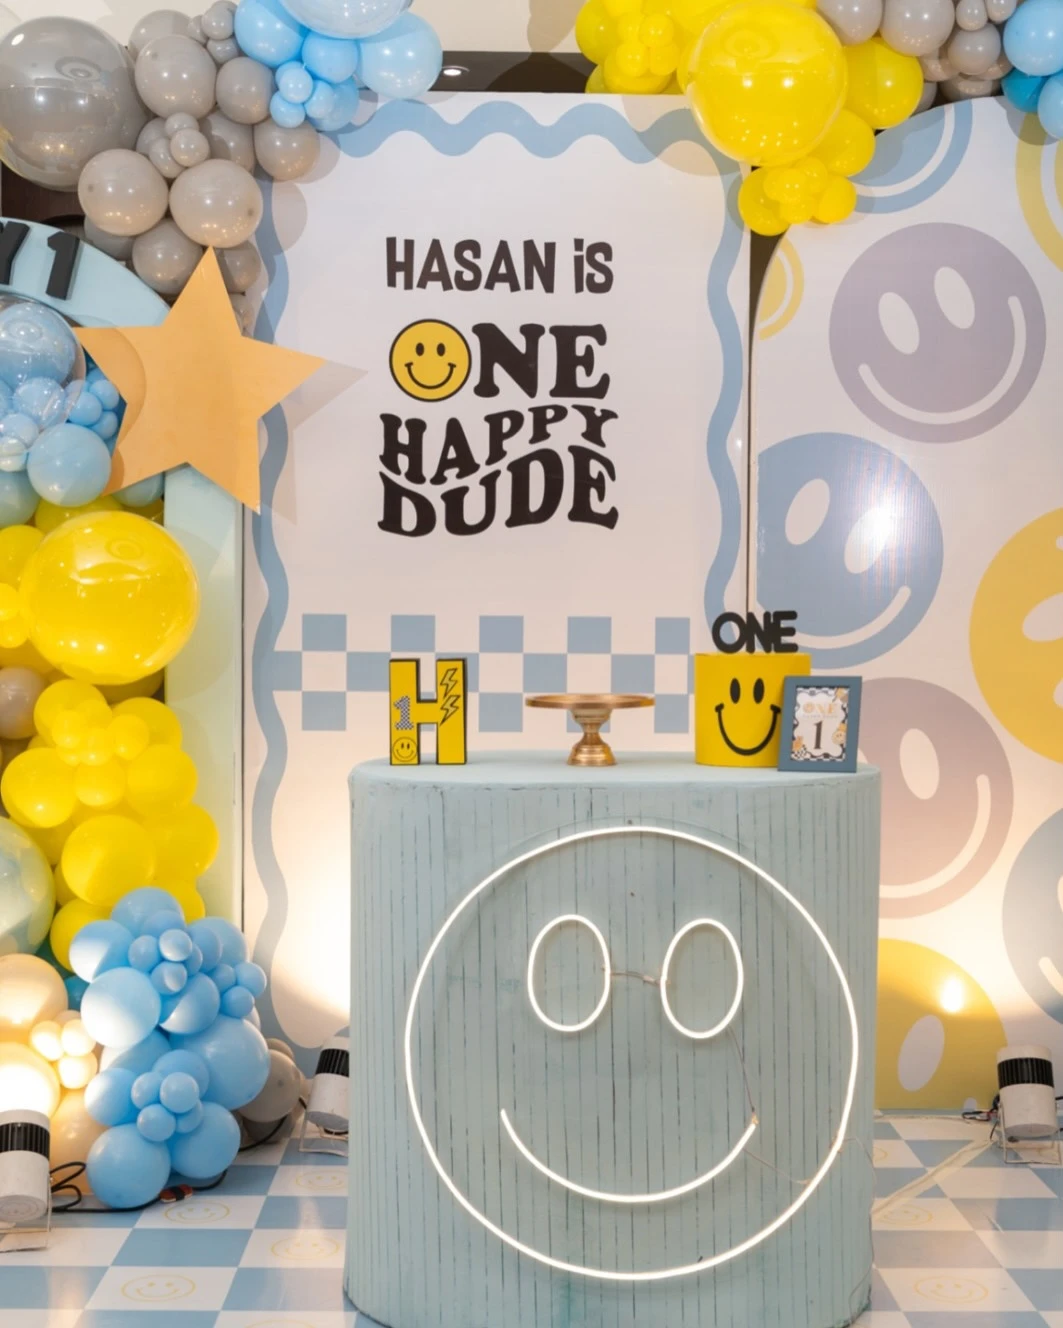
Place a fluted pedestal in front of the main sign to serve as a designated spot for the smash cake or a framed milestone photo.
Attaching a neon smiley face to the pedestal adds a modern glow that highlights the central display area without needing extra floor lighting.
If a custom pedestal is out of budget, wrap a sturdy cardboard cylinder in fluted paper or painted dowels for a similar texture.
2. Multi-Functional Arch Wall Display
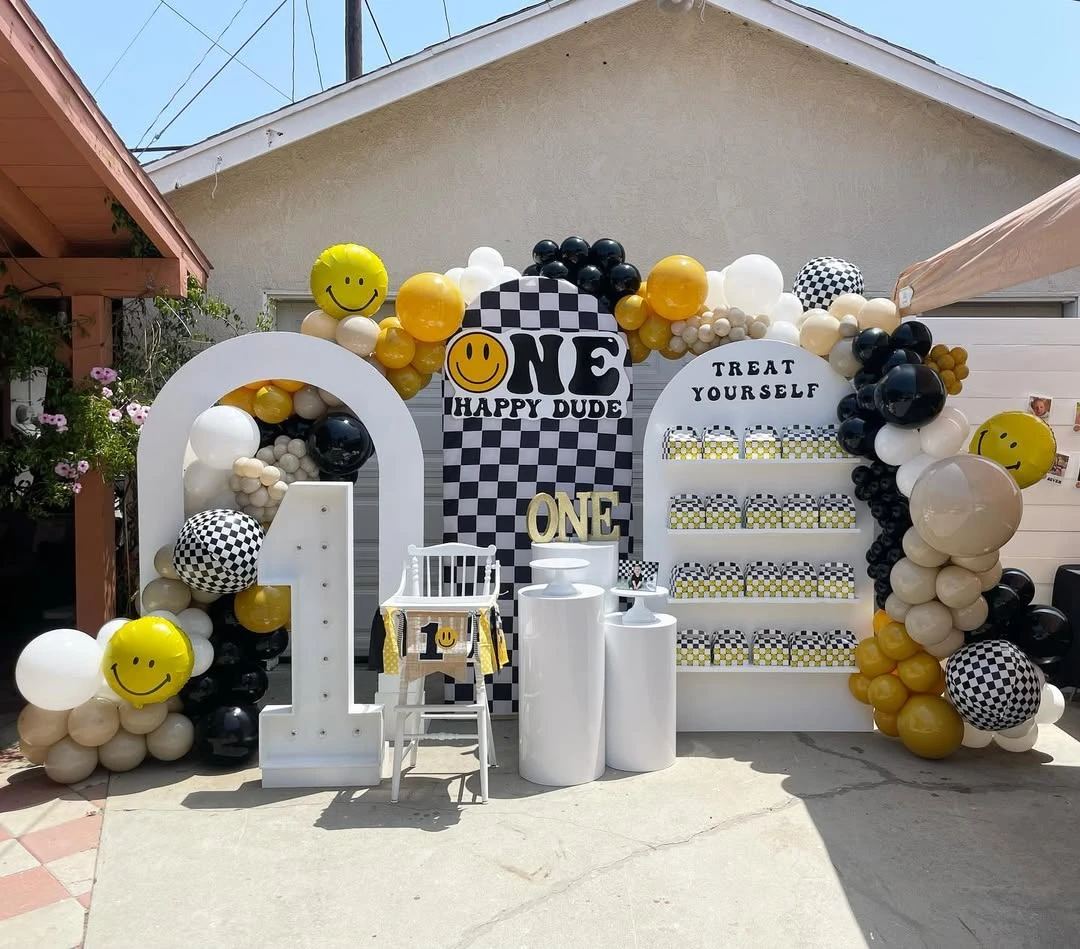
Credit: @__learnwithuribe__ / Instagram
Combine a focal point backdrop with a functional treat wall to maximize space and visual impact.
Using varying heights and shapes—like the checkered rectangle and white arches—creates visual interest while the white pedestals provide a clean surface for the cake without cluttering the scene.
For a budget-friendly version, use foam board for the arches and adhesive checkered vinyl for the center panel; secure everything with sandbags if hosting outdoors to prevent wind from tipping the display.
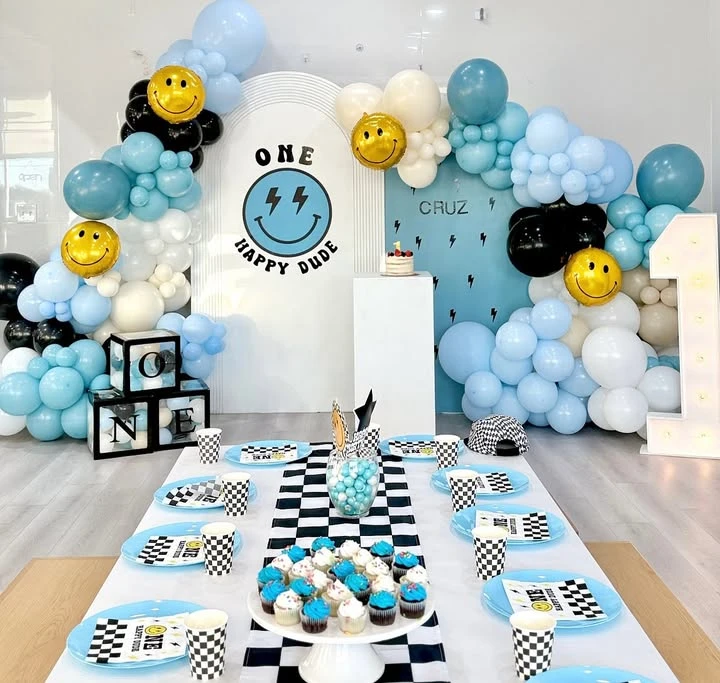
Credit: @peeknplay_frisco / Instagram
Build a multi-layered focal point using diverse textures and heights to create a structured photo station that anchors the party theme.
Pairing a fluted white arch with a flat blue panel creates visual depth, making the central retro smiley face graphic and custom name lettering stand out.
Secure a balloon garland across the top and sides, and pair the setup with a checkered table runner to integrate the theme’s signature pattern into the photo area.
3. Checkered Arch Focal Point
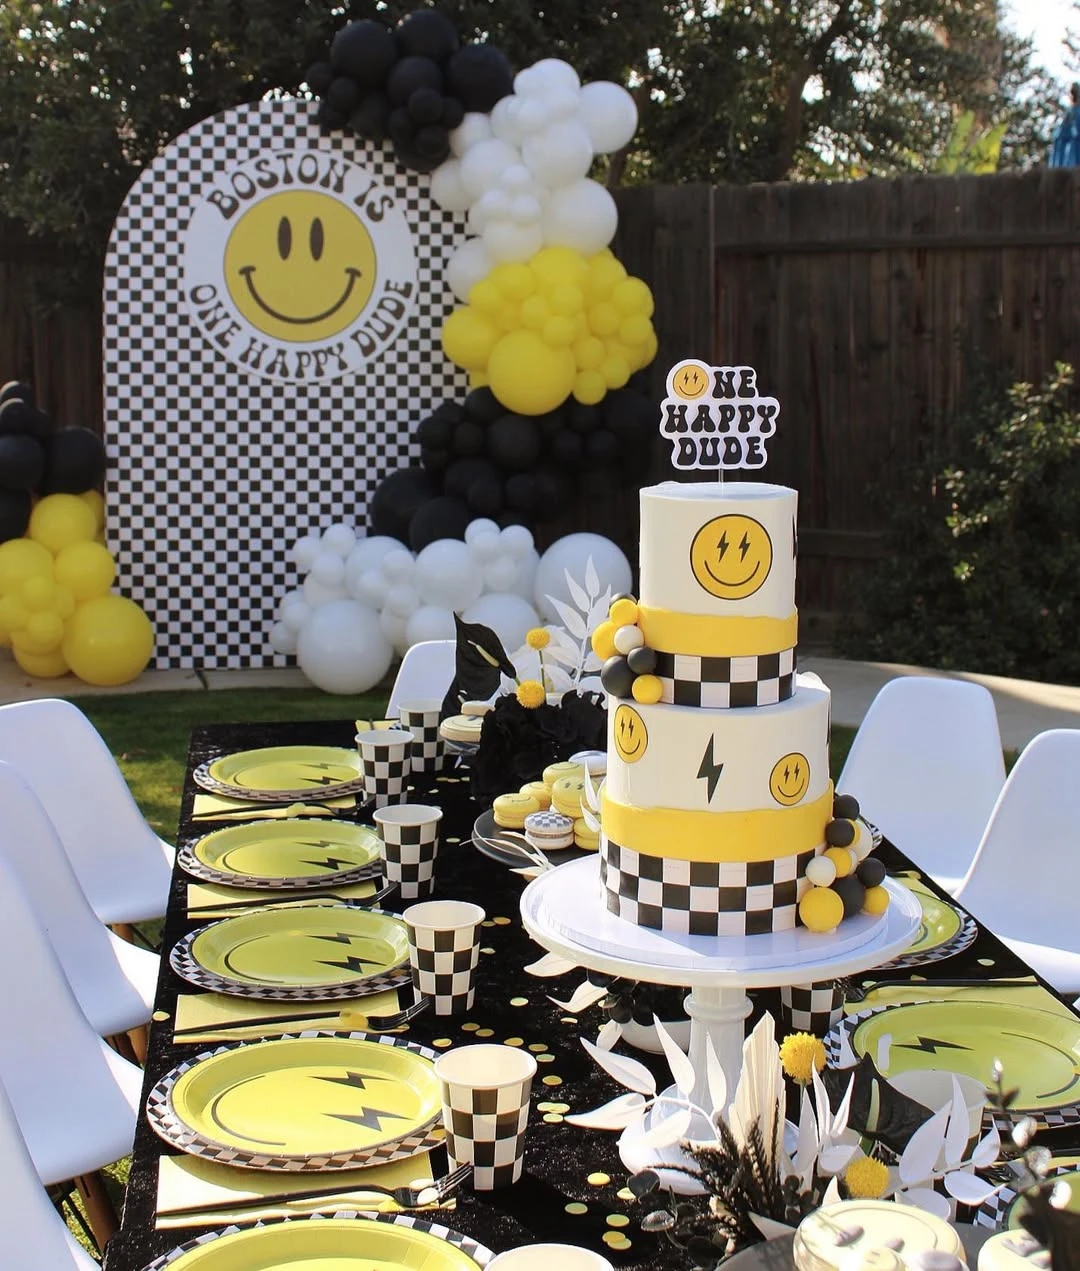
Credit: @loveofcharacter / Instagram
Anchor the party space with a large-scale checkered arch that features the child’s name and the signature smiley face.
This setup provides a clear theme indicator and a dedicated spot for family portraits that feels modern and cohesive.
If building a DIY arch, use matte paint or vinyl for the finish to prevent camera flash glare during indoor photo sessions.
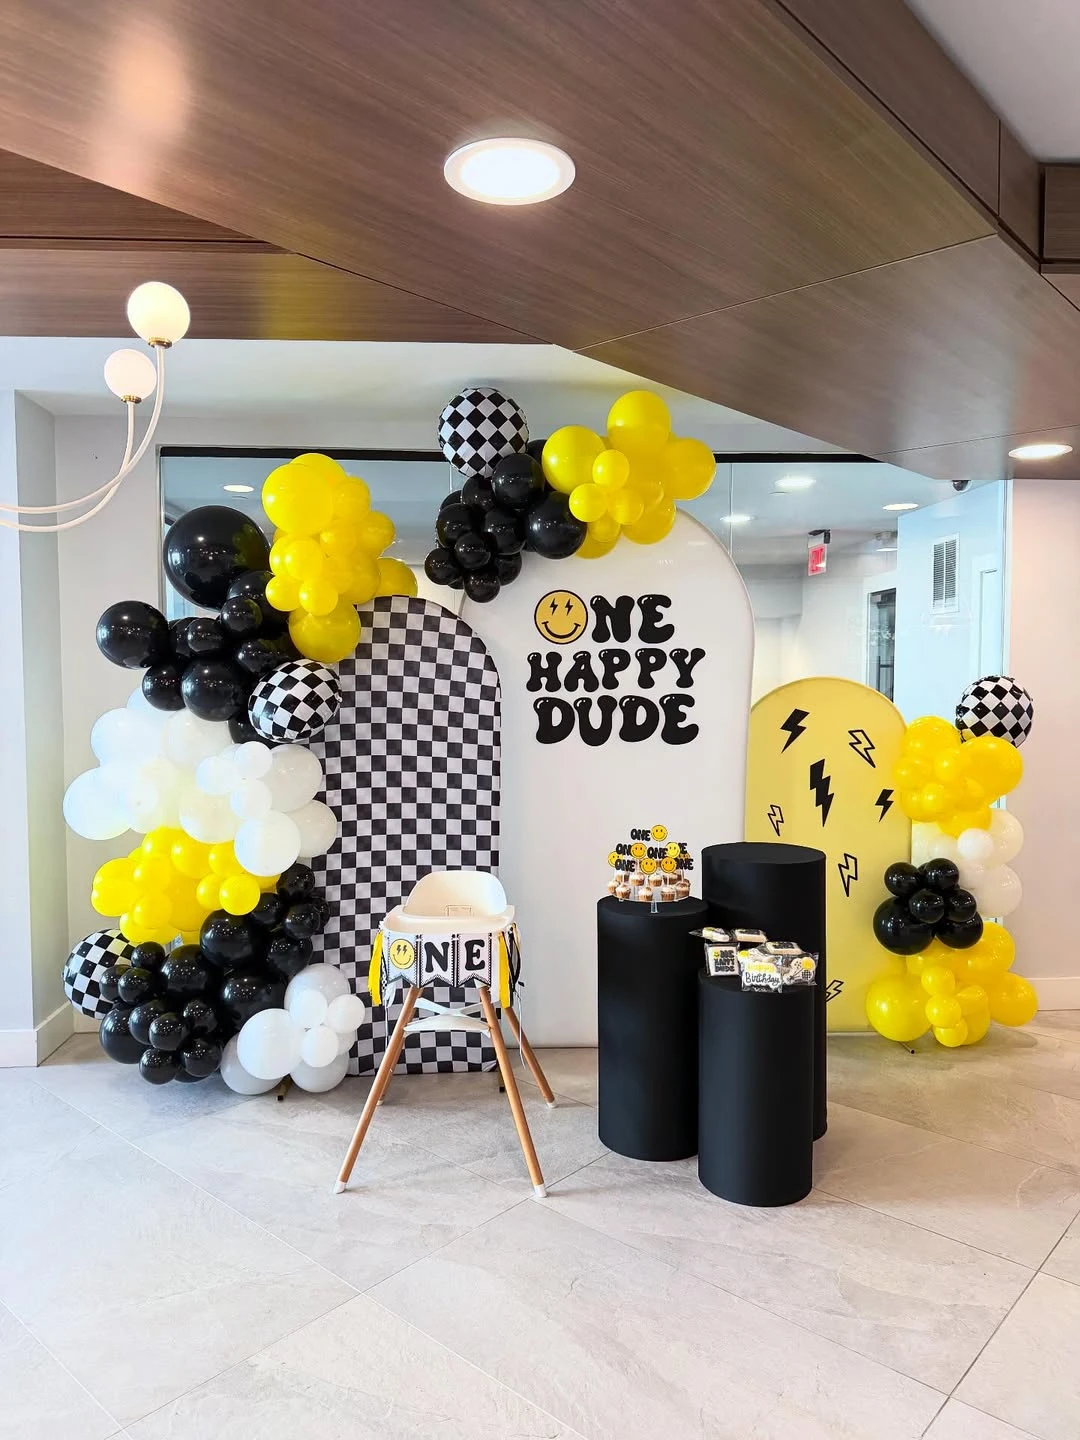
Credit: @_vcreativee / Instagram
Anchor the party space with a multi-panel backdrop that uses varying heights and patterns to create a dedicated photo area.
Mixing a checkered pattern with a solid white text panel and a yellow accent panel provides a balanced background that looks polished in pictures.
Secure the panels with sandbags or heavy bases to prevent tipping, and place the high chair slightly off-center to keep the main text visible.
4. Graphic Arch Display
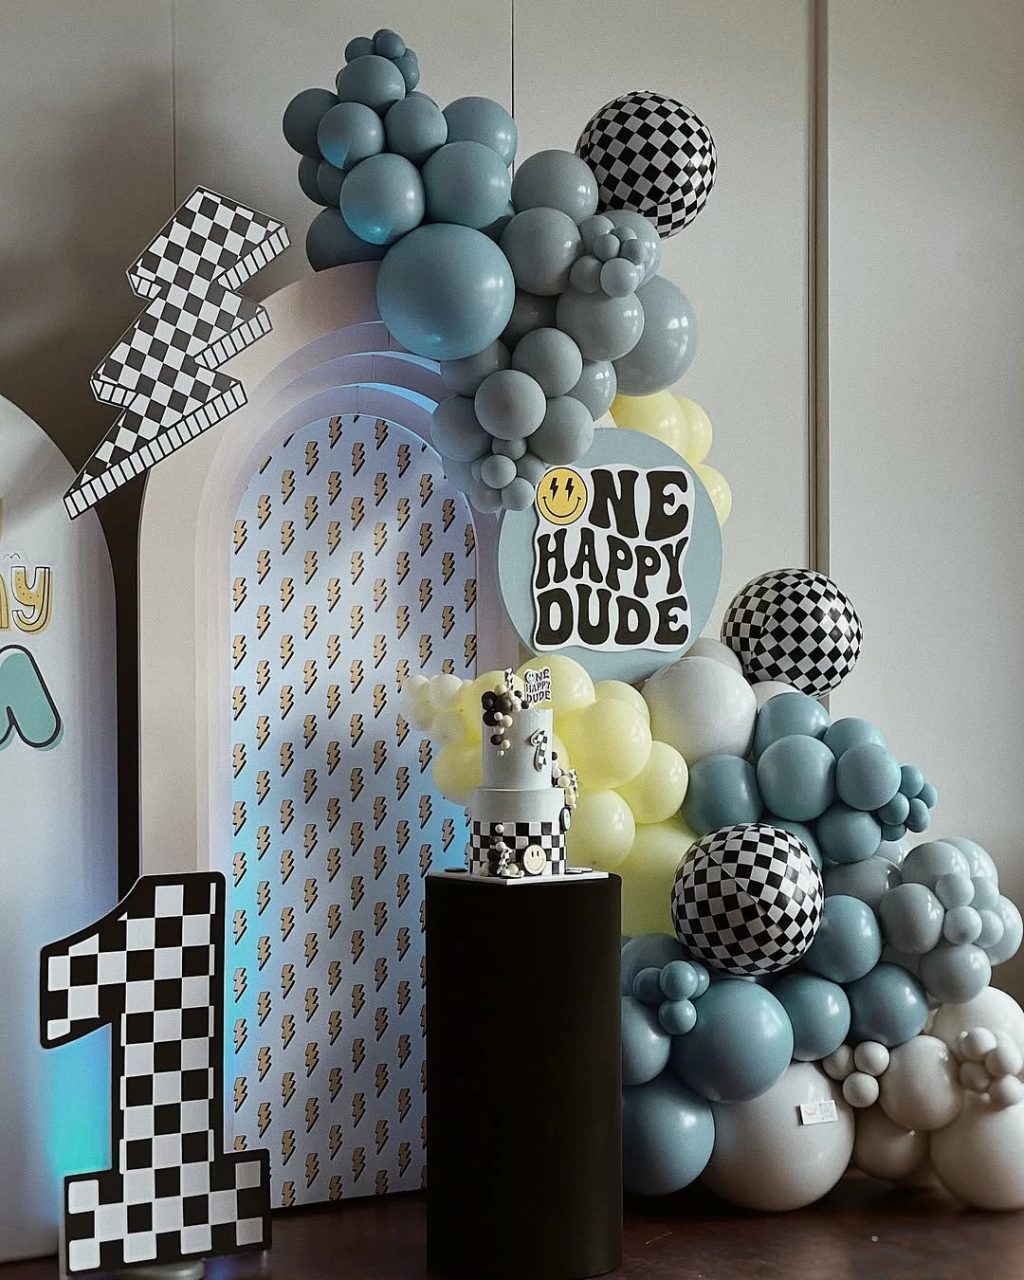
Credit: @thebaekehaus / Instagram
Combine a layered arch backdrop with custom decals to create a high-impact focal point for photos.
Using a mix of muted blue and pale yellow balloons alongside checkered foil accents provides a balanced, modern look that avoids the typical primary color palette of children’s parties.
For a budget-friendly version, use foam board for the lightning bolt and number cutouts and paint them with acrylics to match the specific muted tones of the theme.
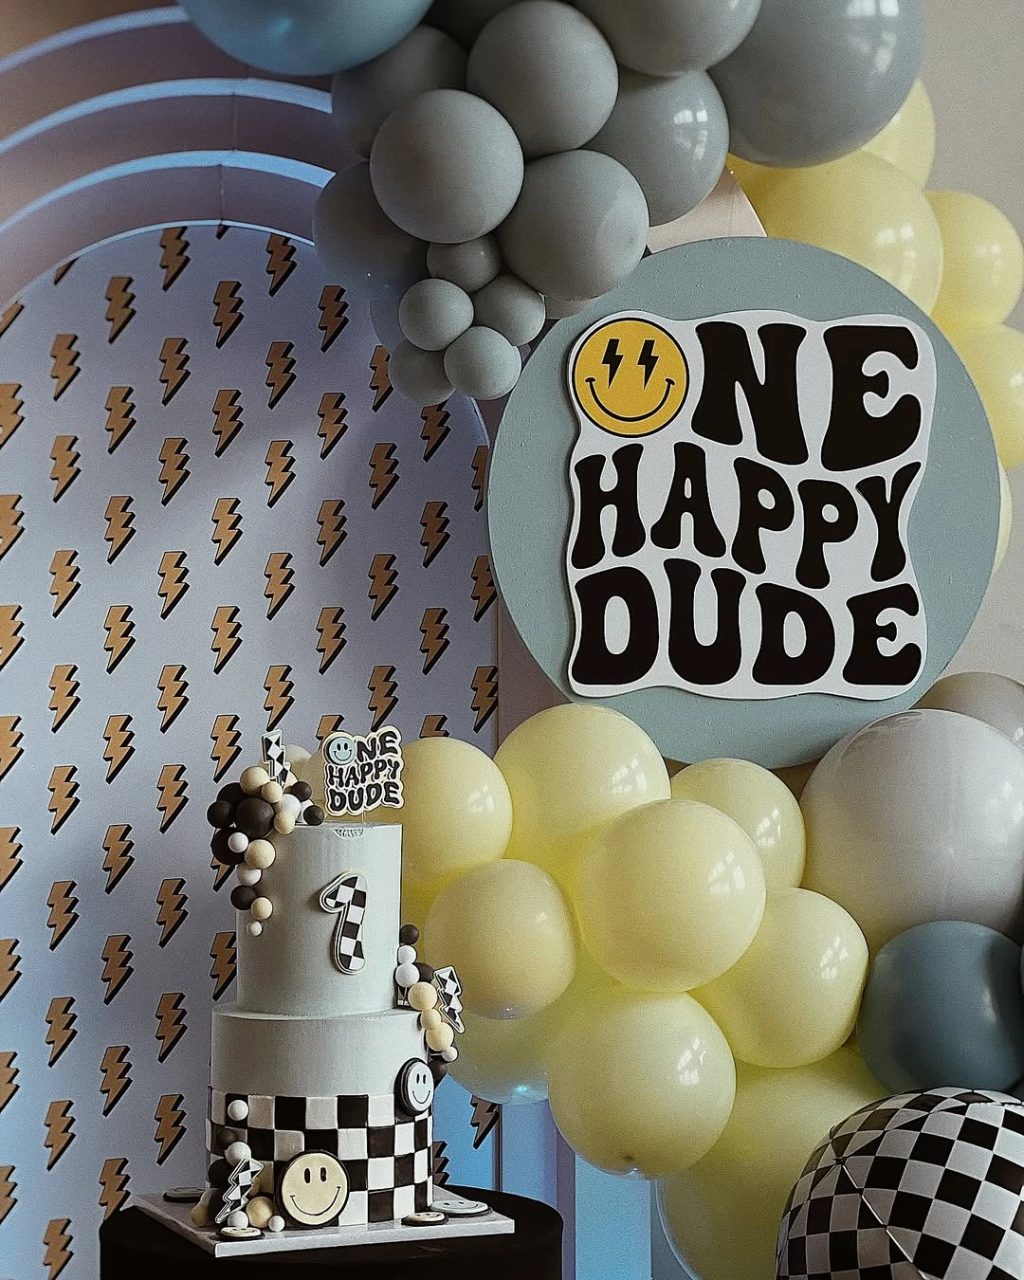
Credit: @thebaekehaus / Instagram
Focus on the cake placement by using a dark, solid-colored pedestal to make the lighter-toned cake and backdrop elements pop.
Positioning the cake slightly off-center allows the signage to remain visible in the background for perfectly framed smash cake photos.
Ensure the signage is secured at a height that will not be blocked by the child or the high chair during the photo session.
5. Custom Branded Play Zone
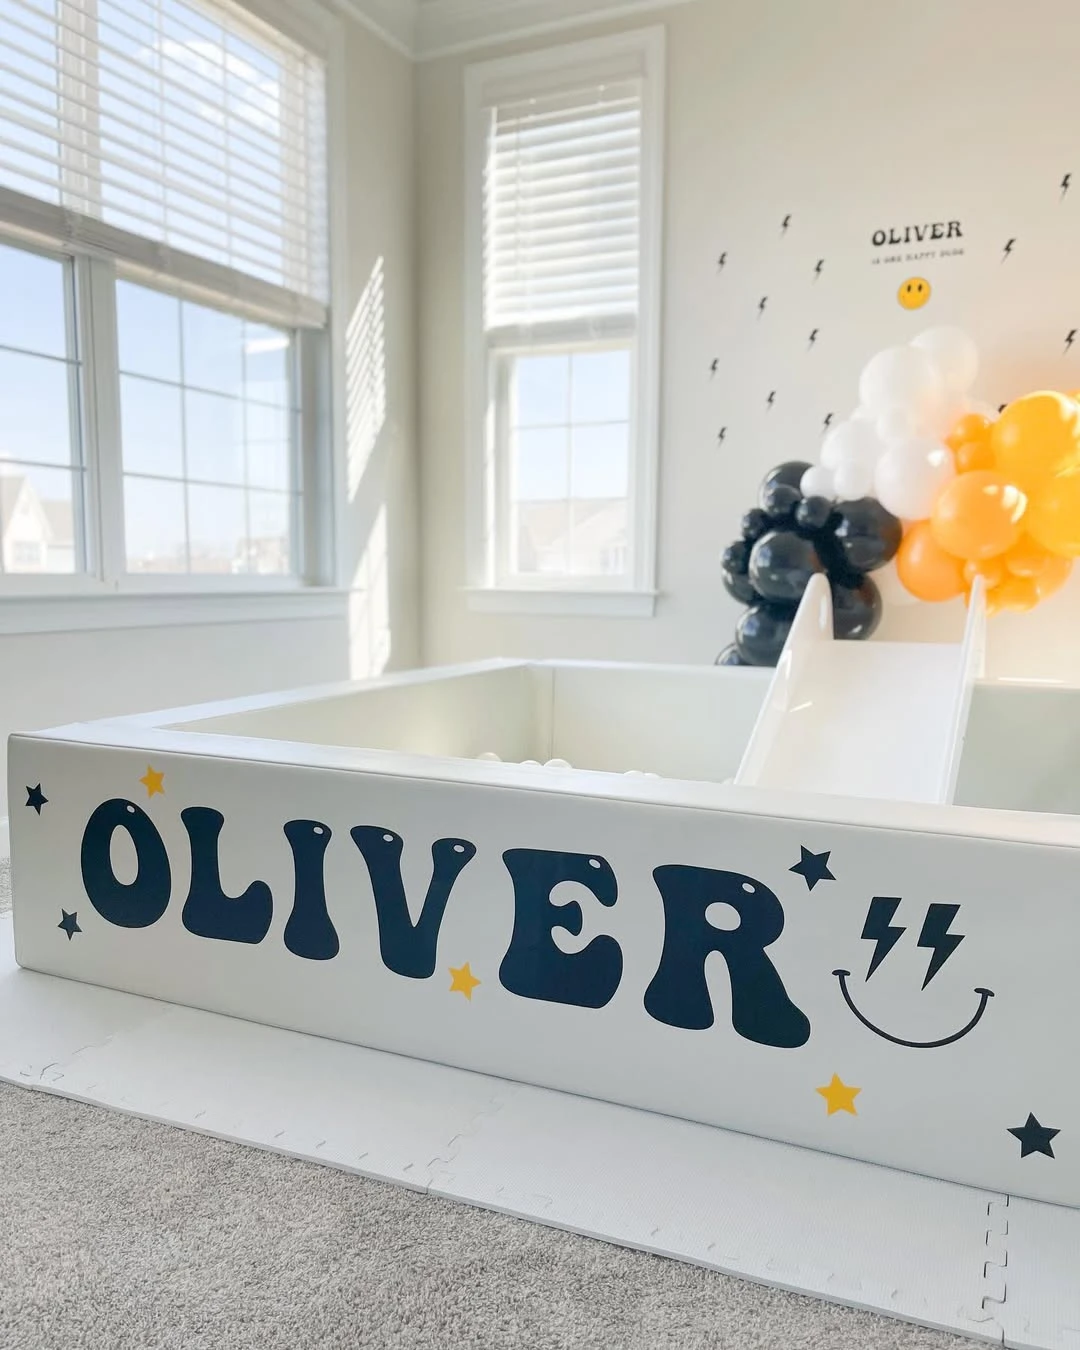
Credit: @abennettx0 / Instagram
Turn an active play area into a branded photo opportunity by adding vinyl lettering to a white ball pit.
This creates a dedicated space for toddlers to burn energy while maintaining the party’s retro aesthetic for photography.
Use black vinyl for the name and yellow for small accents like stars or lightning bolts to keep the design consistent with the wall decals.
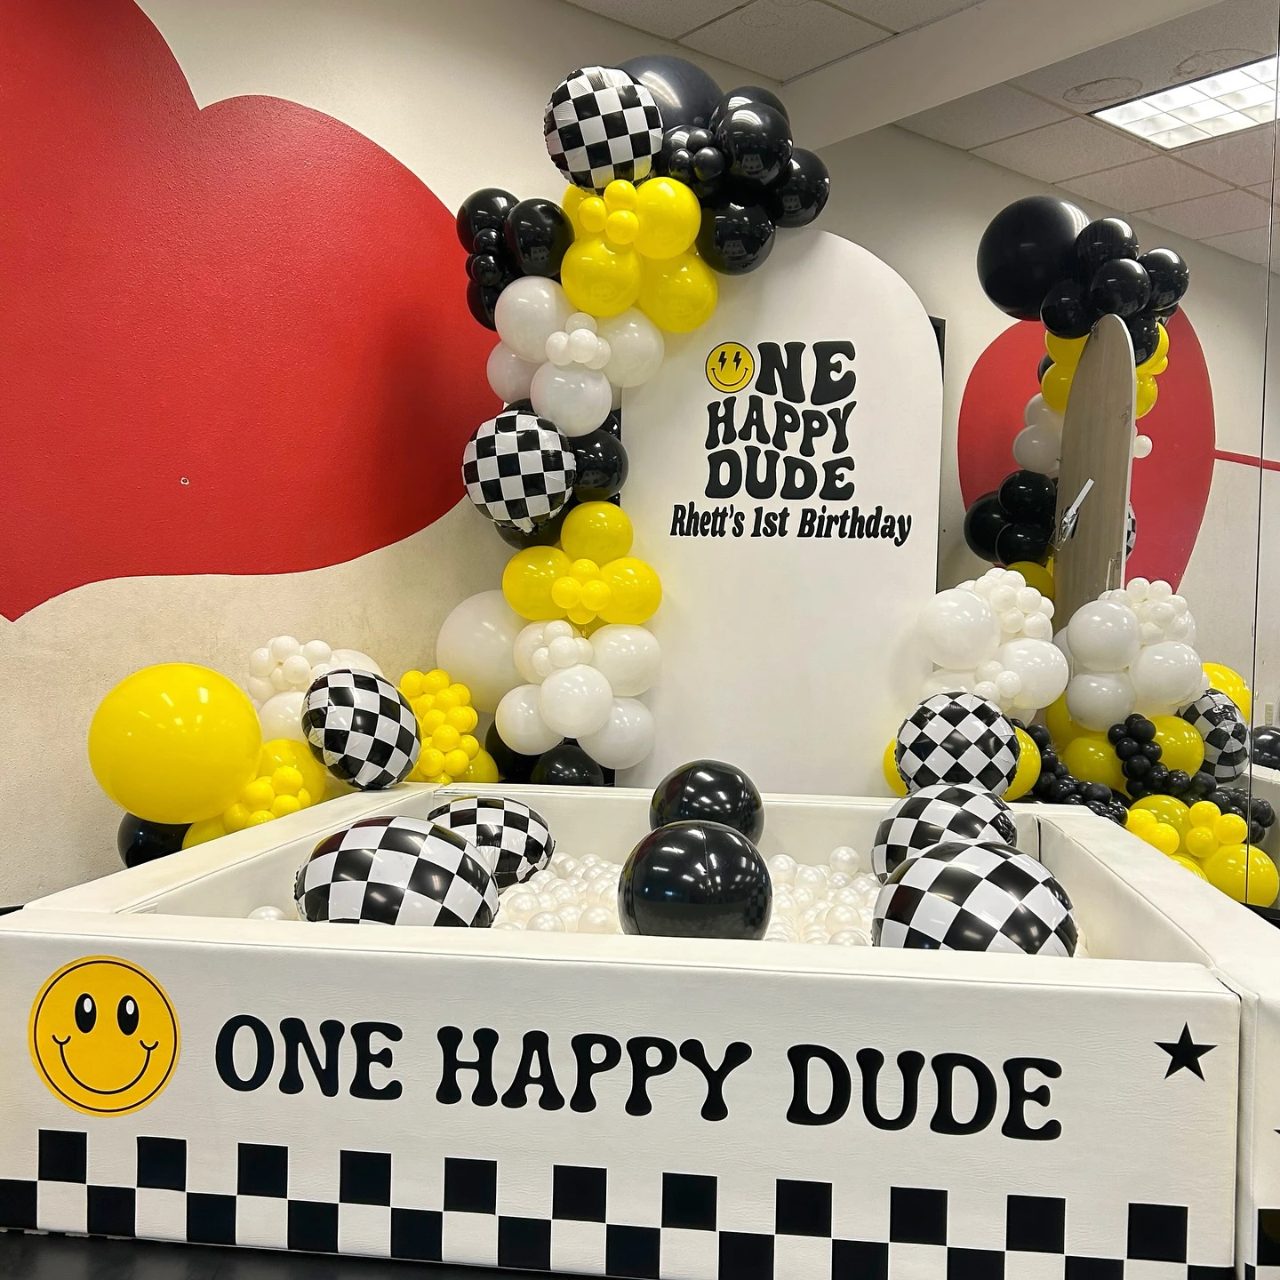
Credit: @vieballoons / Instagram
Combine active play and branding by setting up a custom ball pit as a central photo opportunity.
Using a white base for the pit allows the black checkered pattern and yellow smiley faces to stand out, creating a clean but high-energy look for the main party area.
Apply vinyl decals to a plain white ball pit and add checkered beach balls to the pit for extra texture and theme consistency.
6. Retro Sun Arches
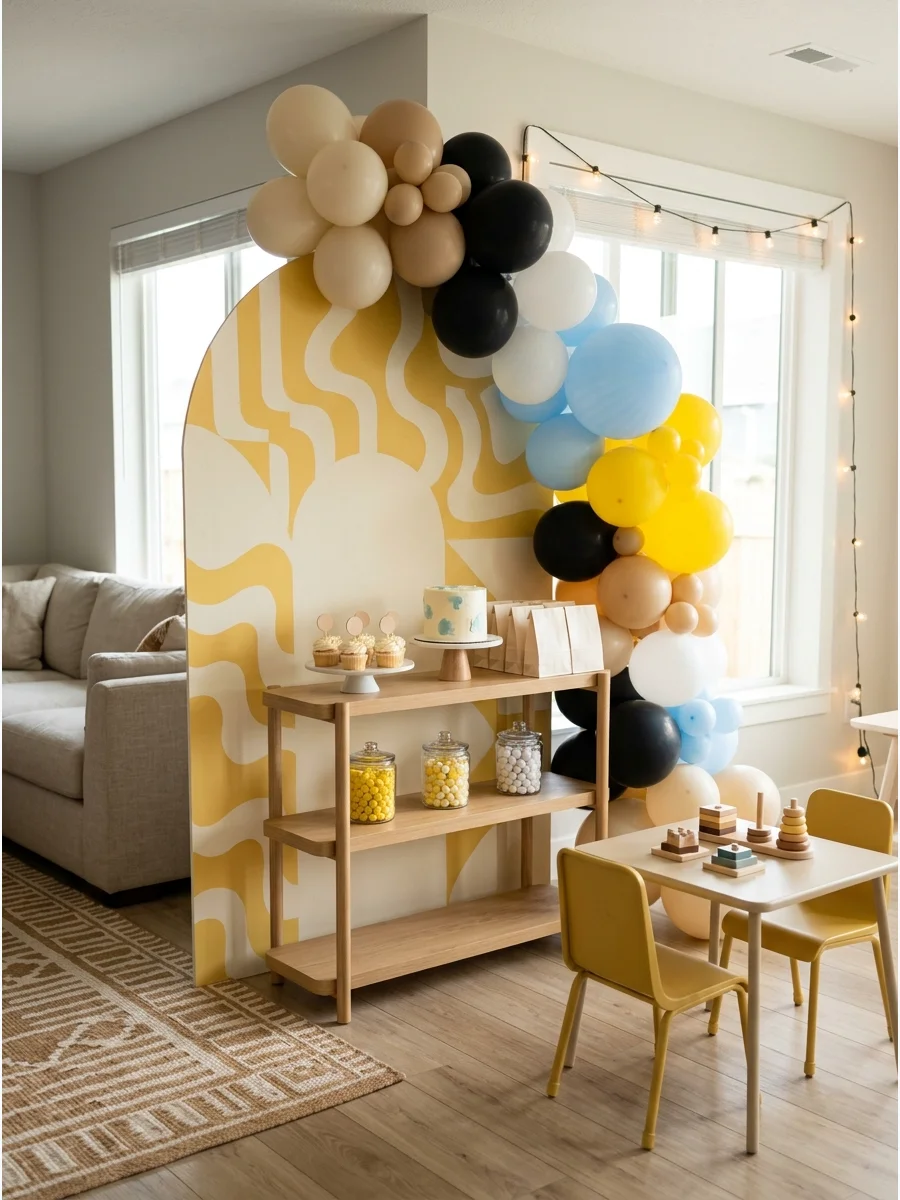
Install a custom arched panel featuring wavy sunbeams to create a central focal point for the dessert table or photos.
The bold, curved lines and cream-and-yellow palette provide a high-contrast visual that anchors the room and fits the retro aesthetic without cluttering the space.
Use a mix of balloon sizes in a side-swept garland to add texture, and ensure the panel is weighted at the base for stability near high-traffic walkways.
7. Checkered Soft Play Zone
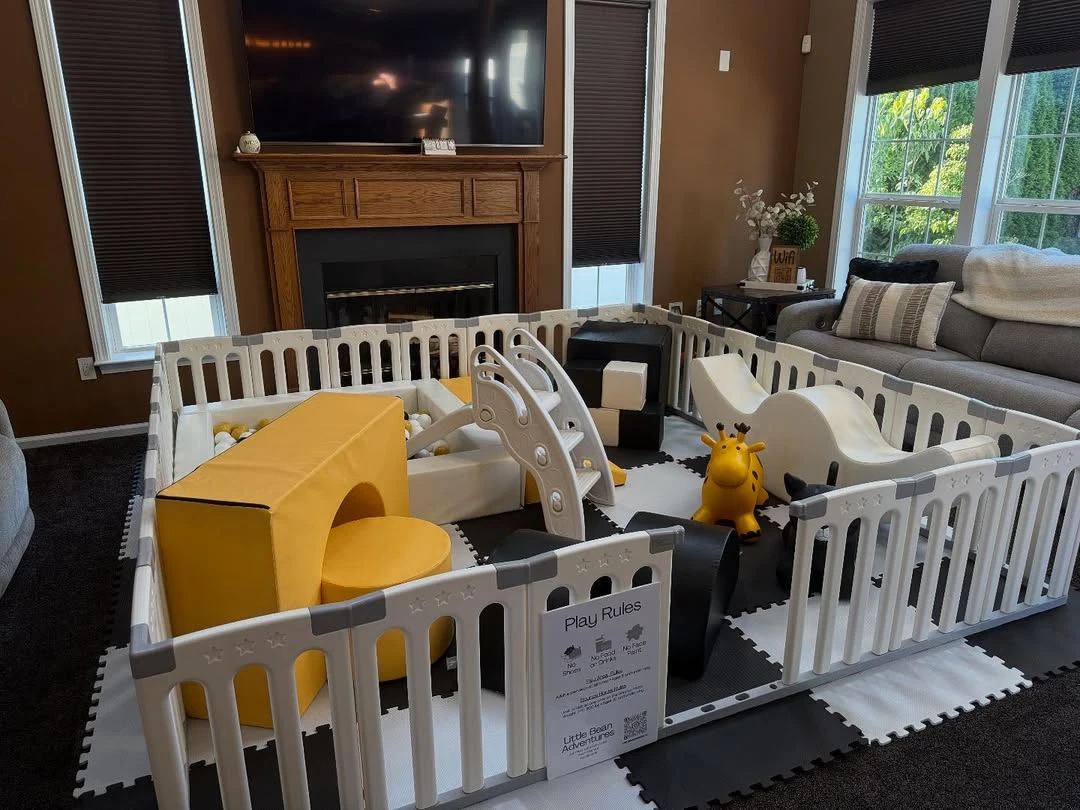
Credit: @littlebeanadventures_nj / Instagram
Set up a dedicated activity area that doubles as a visual centerpiece by using foam floor tiles in a black and white checkered pattern.
This provides a safe, on-theme space for toddlers to explore while maintaining the cool, retro aesthetic throughout the room.
Position the play zone in a central area with enough clearance for parents to sit nearby, ensuring it serves as both a functional play spot and a backdrop for photos.
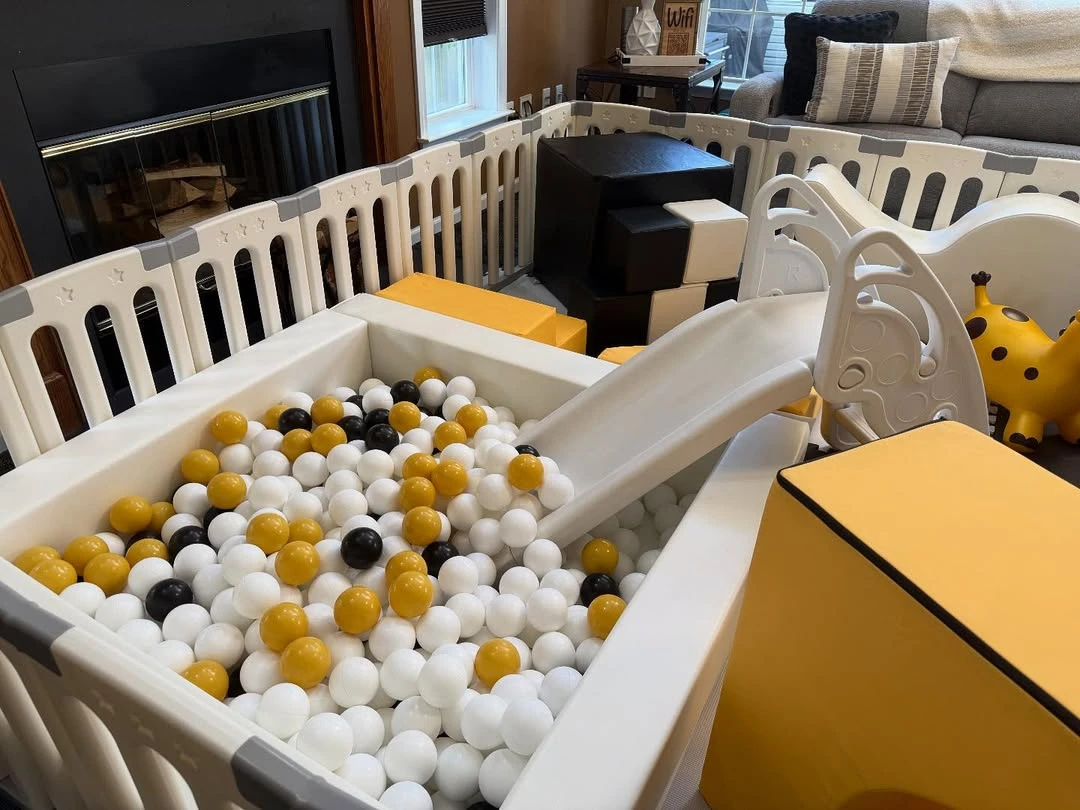
Credit: @littlebeanadventures_nj / Instagram
Coordinate the ball pit contents by selecting specific ball colors like mustard yellow, white, and black to match the party palette.
Using a white or neutral-colored ball pit container keeps the look modern and ensures the colorful balls stand out as a thematic detail.
If renting equipment, request a specific color mix for the balls to avoid the standard primary colors that might clash with the ‘One Happy Dude’ color scheme.
8. Easel Mounted Greeting Sign
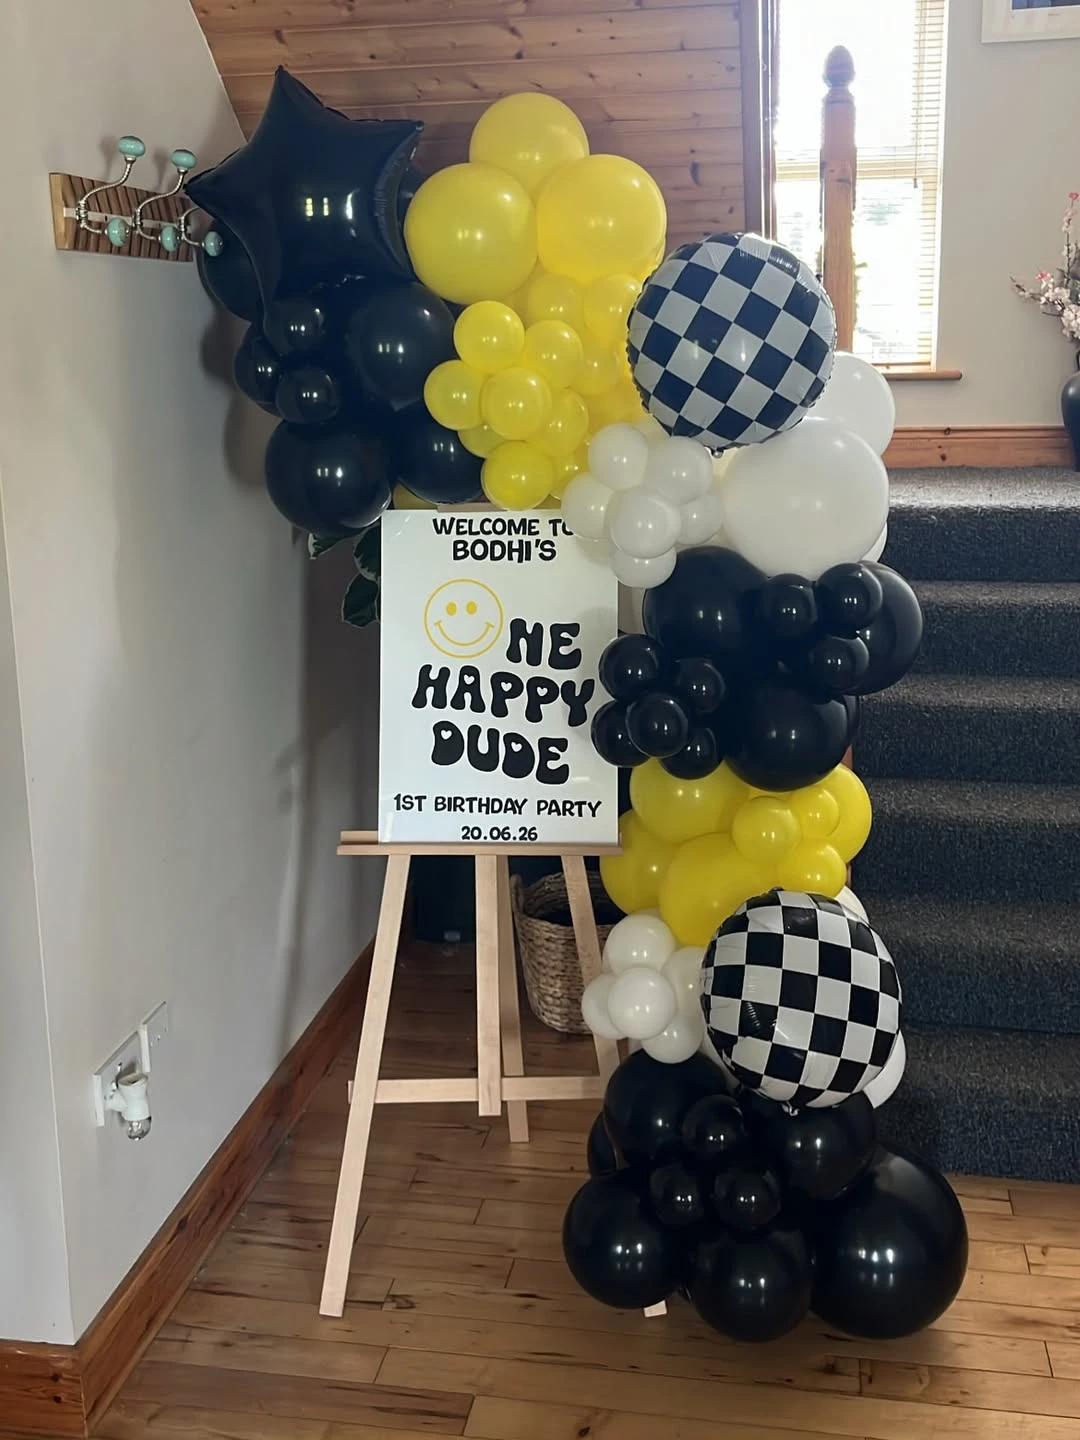
Credit: @balloonsbynicola / Instagram
Greet guests with a high-contrast welcome sign that establishes the retro aesthetic right at the front door.
The combination of a clean white sign with black groovy lettering and yellow smiley accents provides a clear focal point that works well in smaller home entryways.
Secure the balloon garland to the easel using removable adhesive hooks or zip ties, and mix in checkered foil balloons to break up solid color blocks.
9. Checkered and Bolt Panels
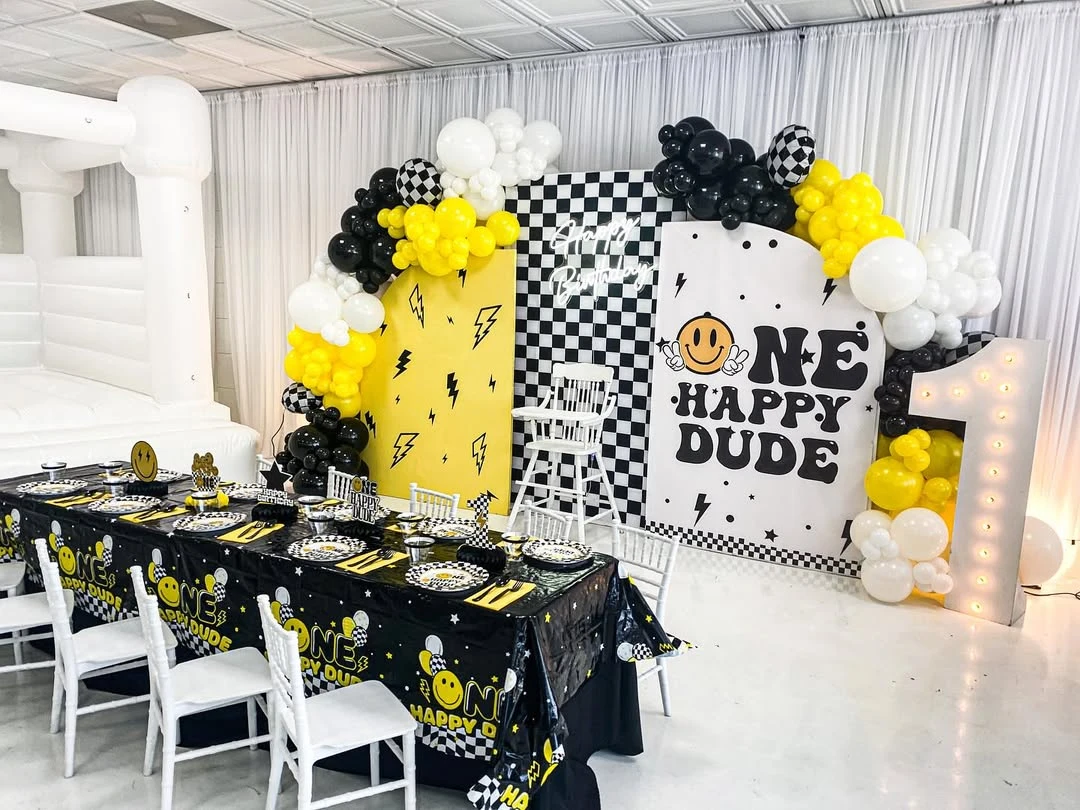
Credit: @honeybearpartyrentals / Instagram
Create a custom focal point by combining a large ‘One Happy Dude’ graphic panel with checkered and lightning bolt accents.
Mixing bold patterns with a central theme-specific graphic ensures the birthday boy is the center of attention during the smash cake or photo session.
Use removable vinyl decals for the lightning bolts and smiley faces to easily customize plain wooden or foam board panels without expensive custom printing.
10. Groovy Arch Photo Station
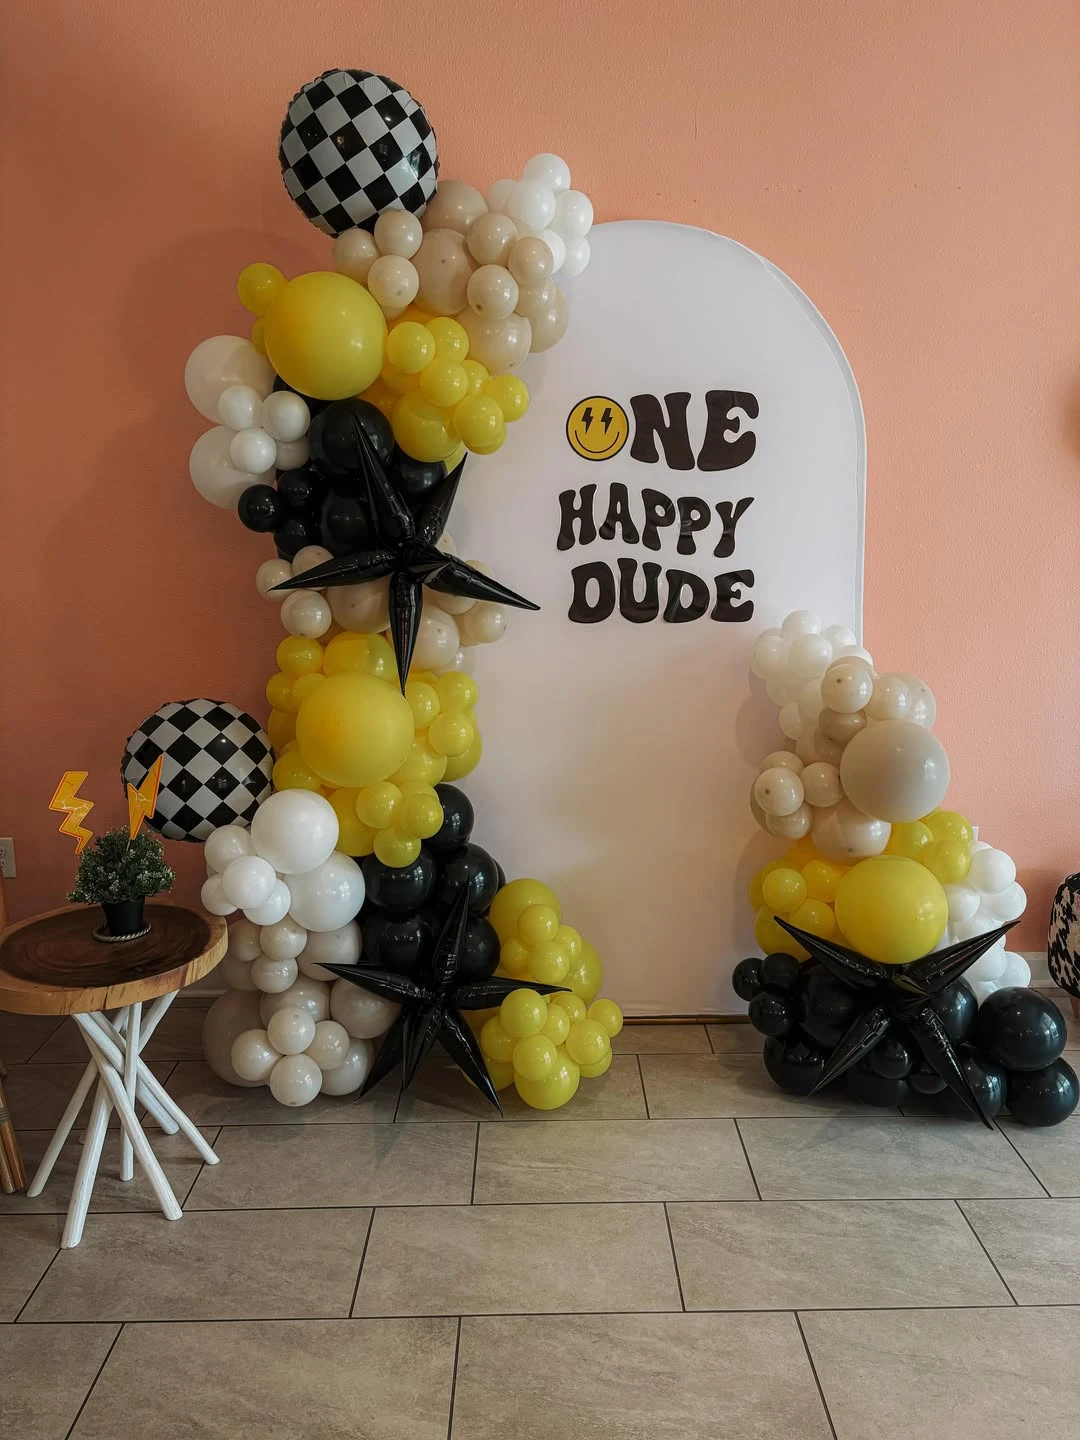
Credit: @t_and_tevents / Instagram
Build a focal point using a white arch backdrop paired with a custom vinyl decal in a retro font.
Mixing matte balloons in tan and cream with star-shaped and checkered accents creates a balanced, modern look.
Place the largest balloon clusters at the bottom and top left to frame the ‘One Happy Dude’ text without covering it.
11. Themed Active Play Installation
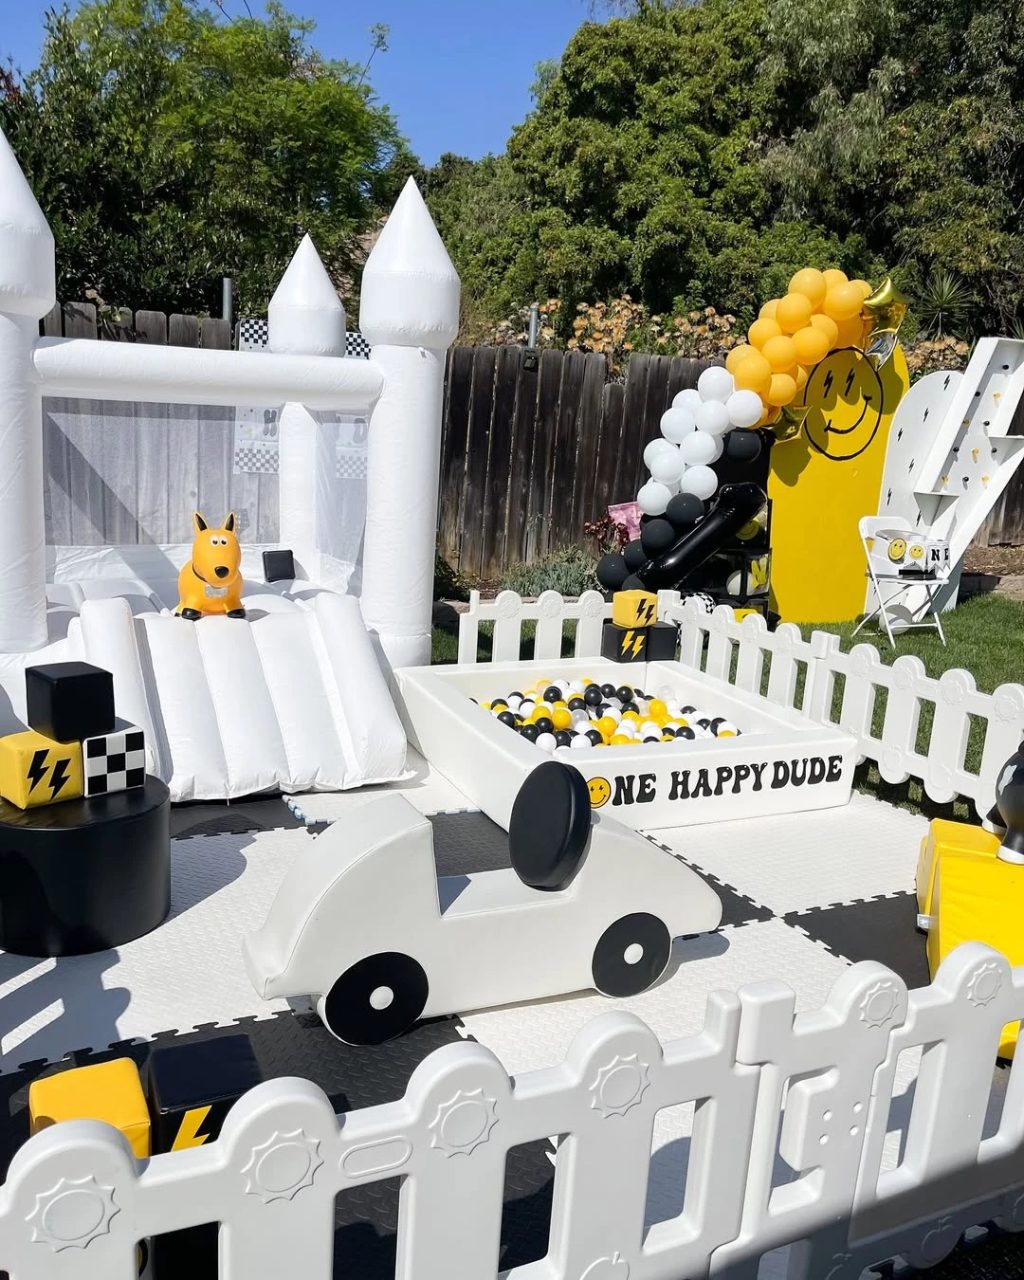
Credit: @playforeveryoung / Instagram
Transform a standard play area into a focal point by coordinating equipment colors with the retro theme.
A white bounce house and ball pit act as a clean canvas, allowing the yellow smiley faces and black-and-white checkered floor to stand out without visual clutter.
Use interlocking foam tiles to create a checkered floor that provides a safe surface for toddlers while reinforcing the visual aesthetic of the party.
12. Living Room Focal Point
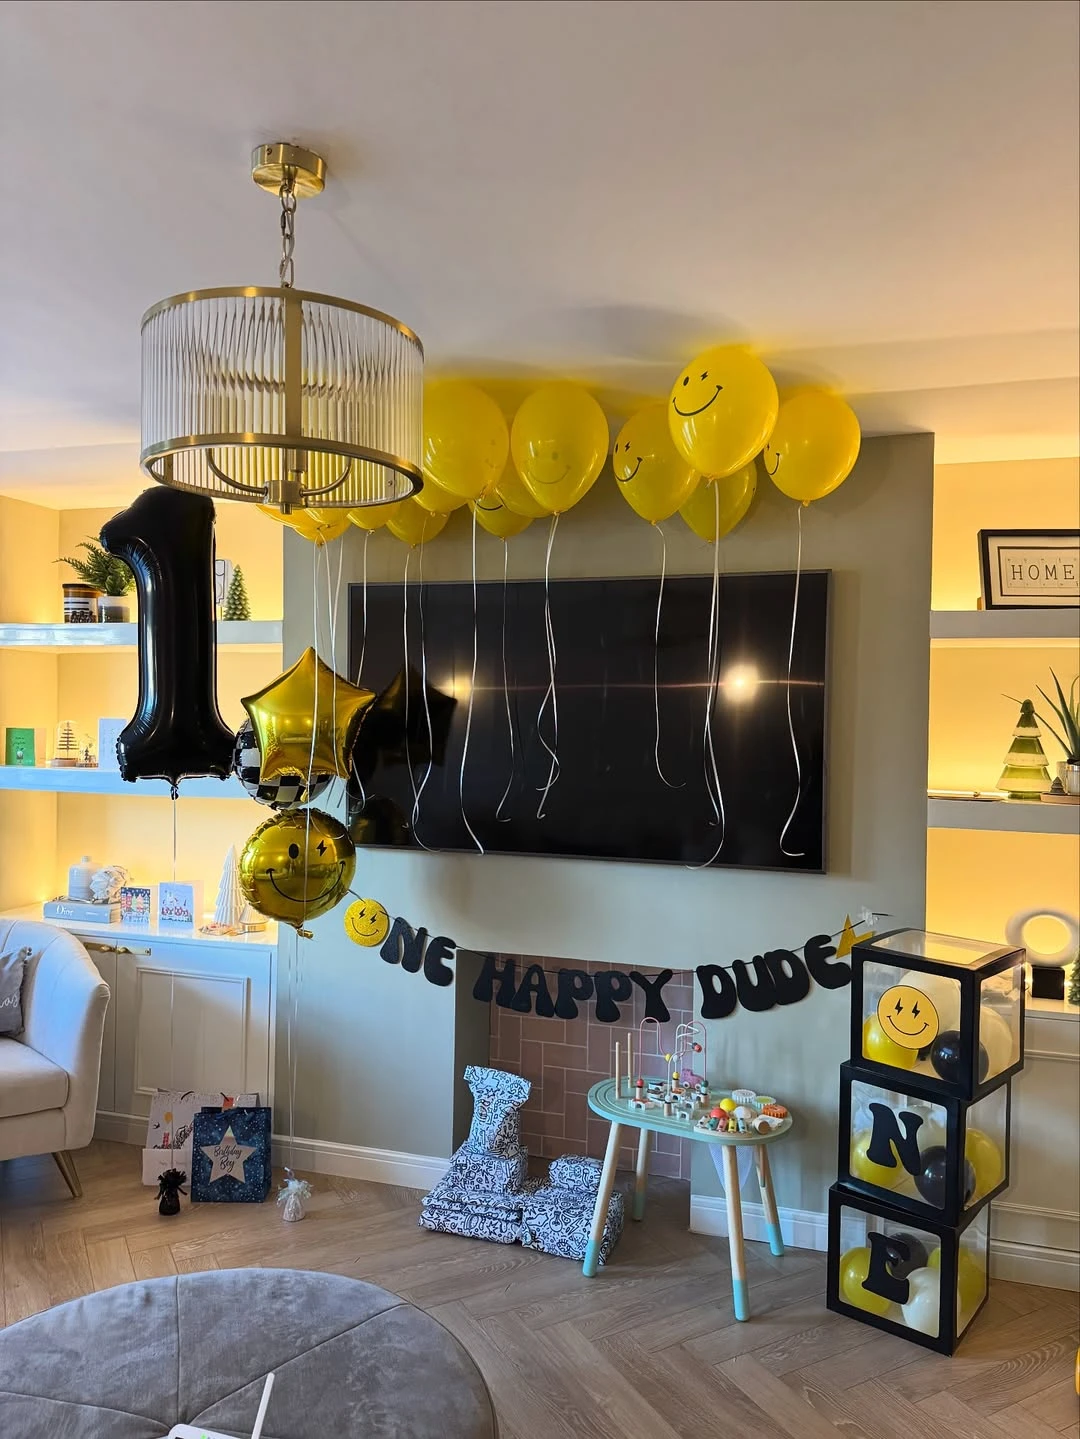
Credit: @thenelsonsatno70 / Instagram
Create a central celebration hub by layering a themed banner and balloon clusters over a high-traffic area like a media console or fireplace.
Utilizing existing furniture as a base allows for a full-impact display without the need for heavy equipment or professional installation.
Stack black-framed boxes filled with yellow and black balloons to create vertical interest and spell out the age or name of the birthday boy.
13. Layered Retro Arch Backdrop
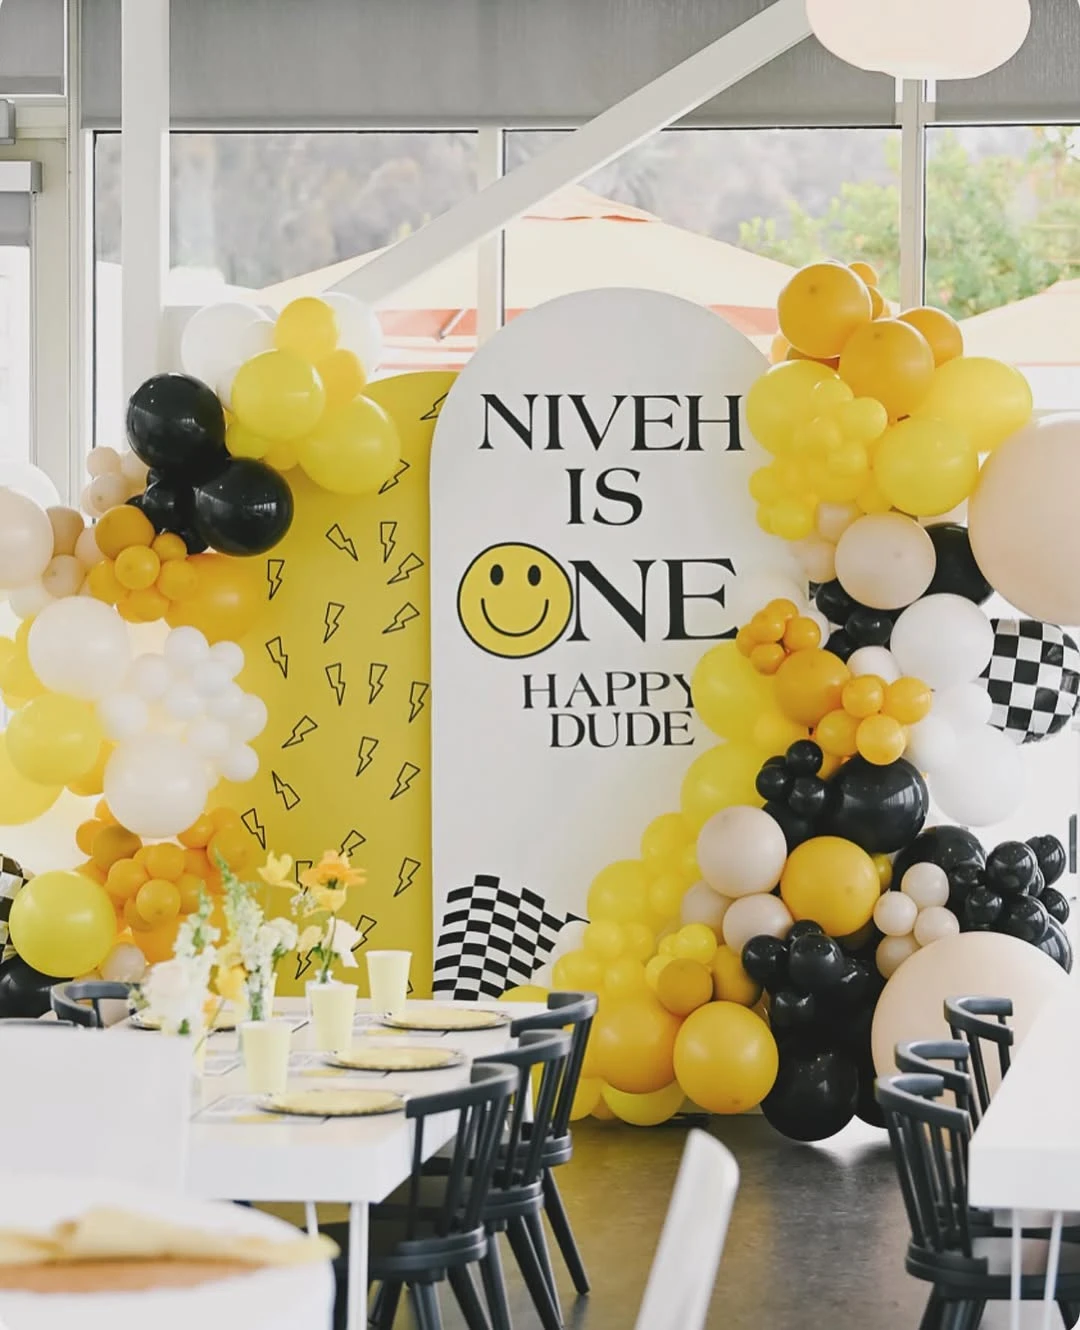
Credit: @navasclickstop / Instagram
Anchor the party space with staggered arch panels featuring bold typography and the theme’s smiley face motif.
Combining solid white and patterned yellow panels creates a 3D effect that serves as a cohesive focal point for photos.
Incorporate a balloon garland using varying sizes in the theme’s palette—yellow, black, white, and tan—to soften the edges of the rigid panels.
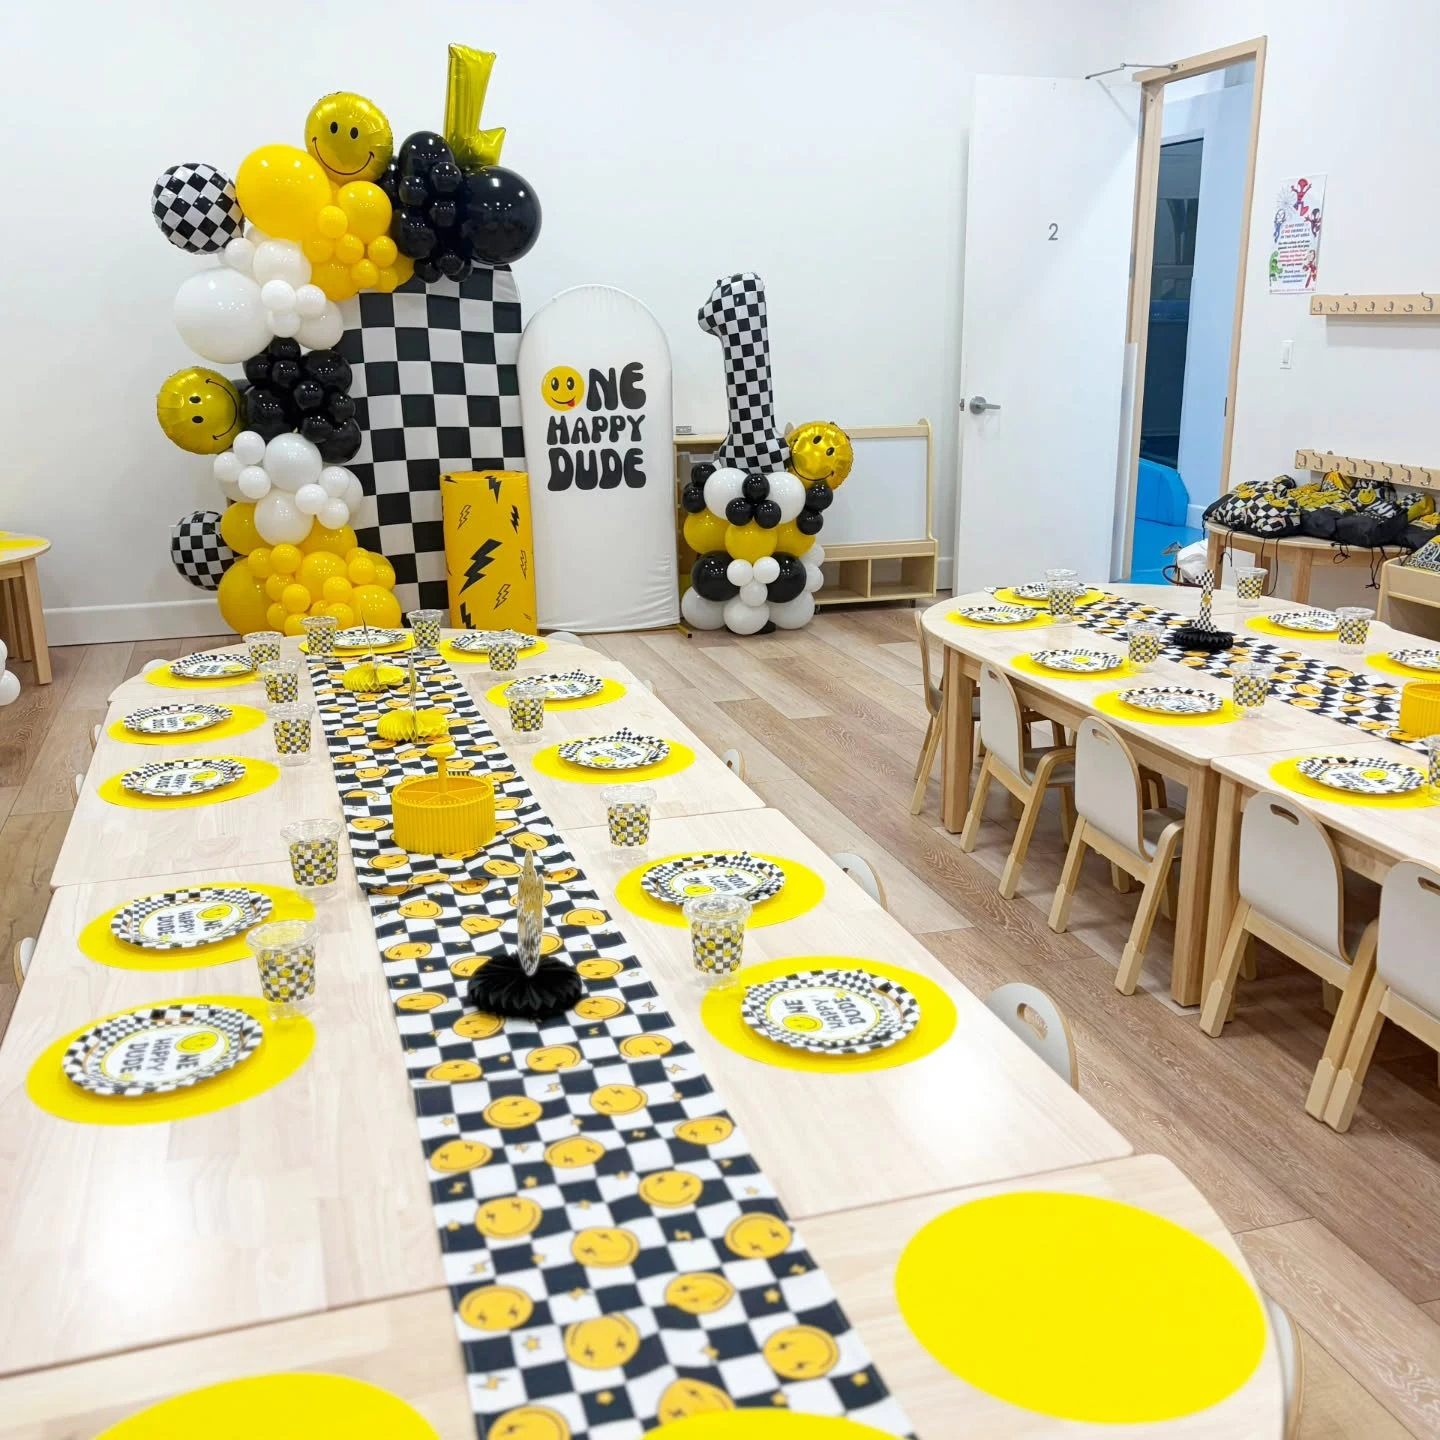
Credit: @betsyeventplanning / Instagram
Create a multi-layered focal point by grouping a checkered backdrop with a custom “One Happy Dude” arch and a coordinated balloon garland.
Combining different shapes—like the rectangular checkered wall and the rounded arch—, while the yellow and black balloon accents pull the color palette together for a cohesive look.
Use a mix of matte and foil balloons, including large smiley face spheres, to add texture and variety to the garland without needing additional decor pieces.
Themed Cakes and Smash Cake Designs
14. Checkered Tiered Smiley Cake
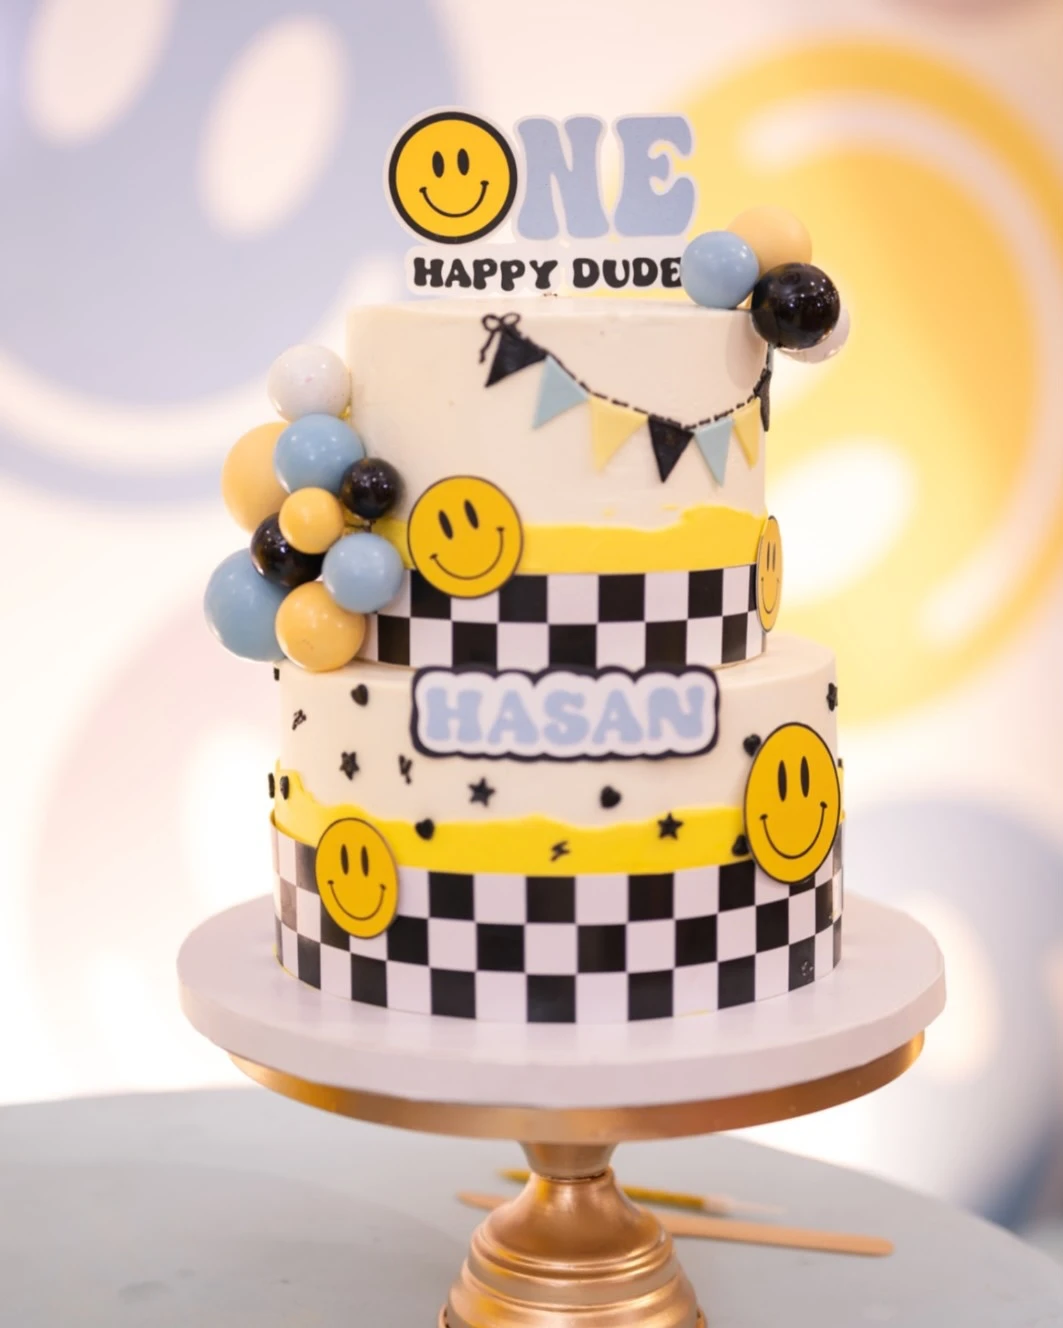
Credit: @alanadecor / Instagram
Tie the dessert table into the room’s decor by using a checkered edible wrap on the bottom tier of the birthday cake.
This repeats the floor pattern and creates a strong visual foundation for the more playful smiley face elements and personalized nameplates.
To save on custom bakery costs, apply checkered ribbon and paper smiley face cutouts to a standard white frosted cake for the same effect.
15. High-Contrast Retro Cake
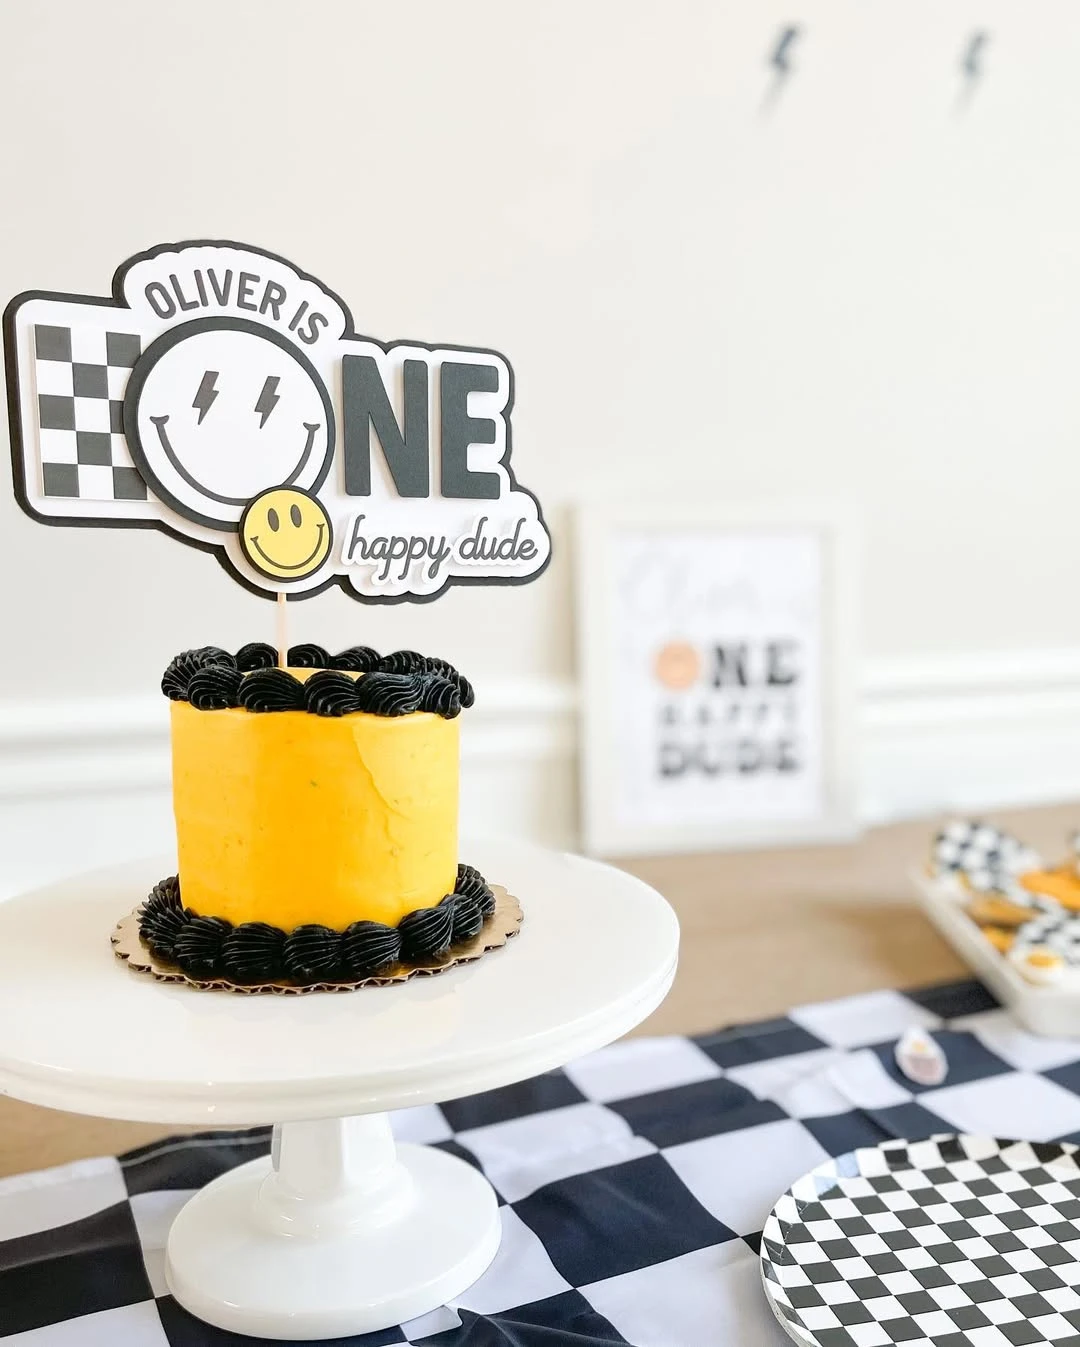
Credit: @abennettx0 / Instagram
Stick to a bold yellow base with black piping for a smash cake that stands out against white backdrops.
The simple color blocking ensures the cake is the star of the ‘smash’ photos without being overly busy.
Use a custom cake topper that incorporates the ‘One Happy Dude’ font and checkered flags to tie the dessert into the broader theme.
16. Multi-Patterned Retro Cake
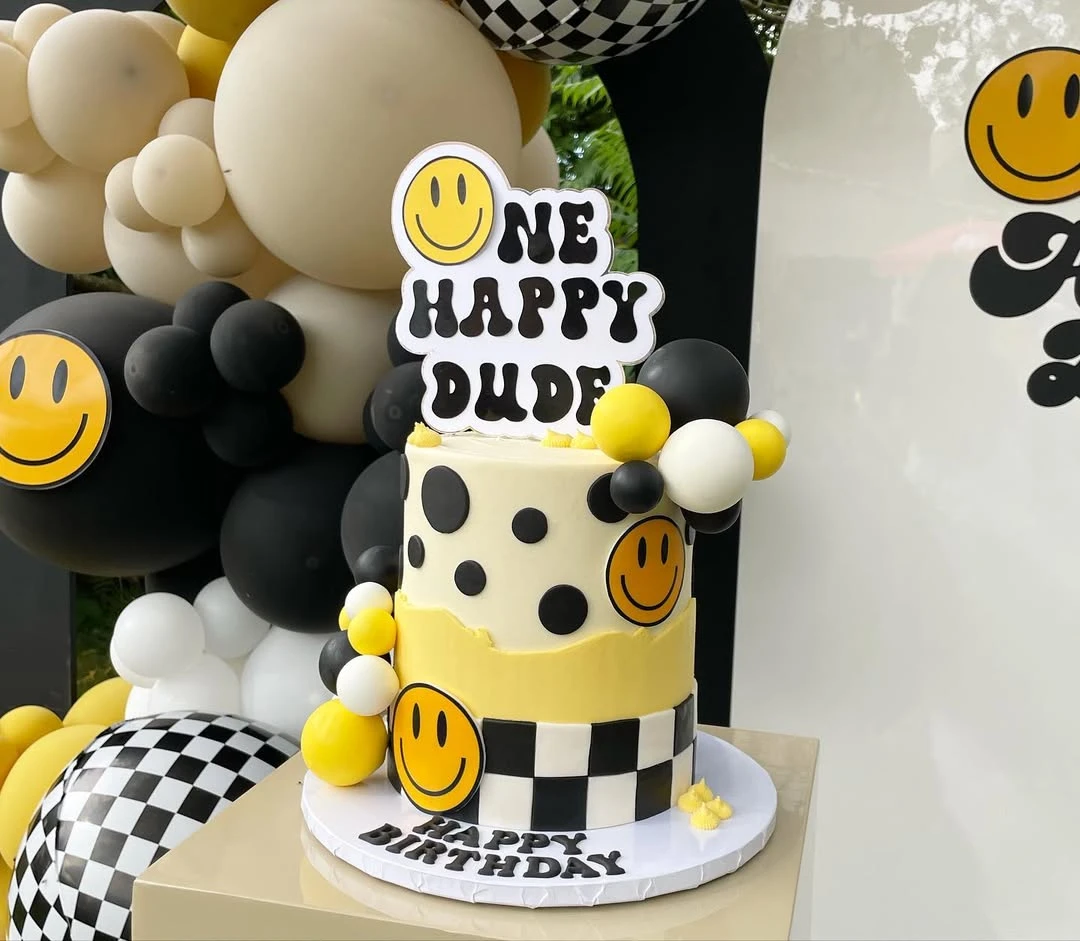
Credit: @sabbilicious / Instagram
Combine bold patterns like checkers and polka dots on a single cake to create a high-energy focal point for the dessert table.
Using a mix of textures and patterns mirrors the eclectic retro vibe without needing complex sculpting or expensive custom fondant figures.
Use edible paper for the checkered pattern and acrylic toppers for the text to keep lines sharp and clean; add small non-edible balloon clusters around the base for extra dimension.
17. Graphic Patterned Dessert Duo
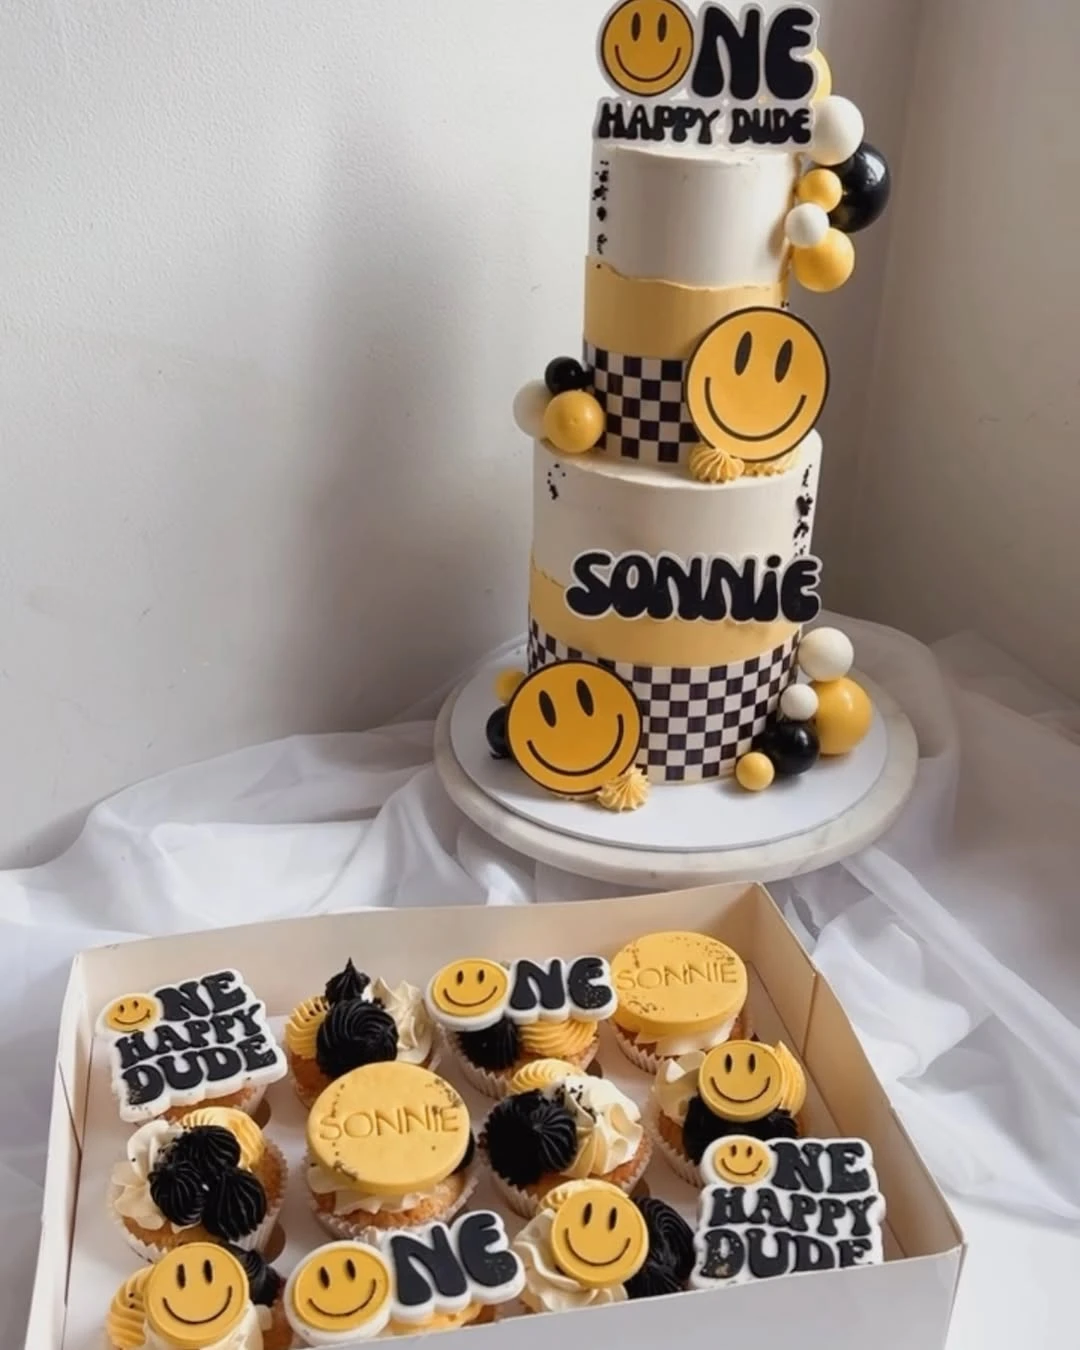
Credit: @abbies_sweet_creations / Instagram
Coordinate a tall centerpiece cake with matching cupcakes to create a high-impact dessert display that emphasizes the retro font and smiley face motif.
Using black and yellow against white frosting provides a high-contrast, modern look that fits the aesthetic without feeling overly juvenile.
To manage costs, order a plain white cake and apply edible checkered sugar sheets or cardstock toppers to achieve this bold graphic effect at home.
18. Smiley and Bolt Cake Design
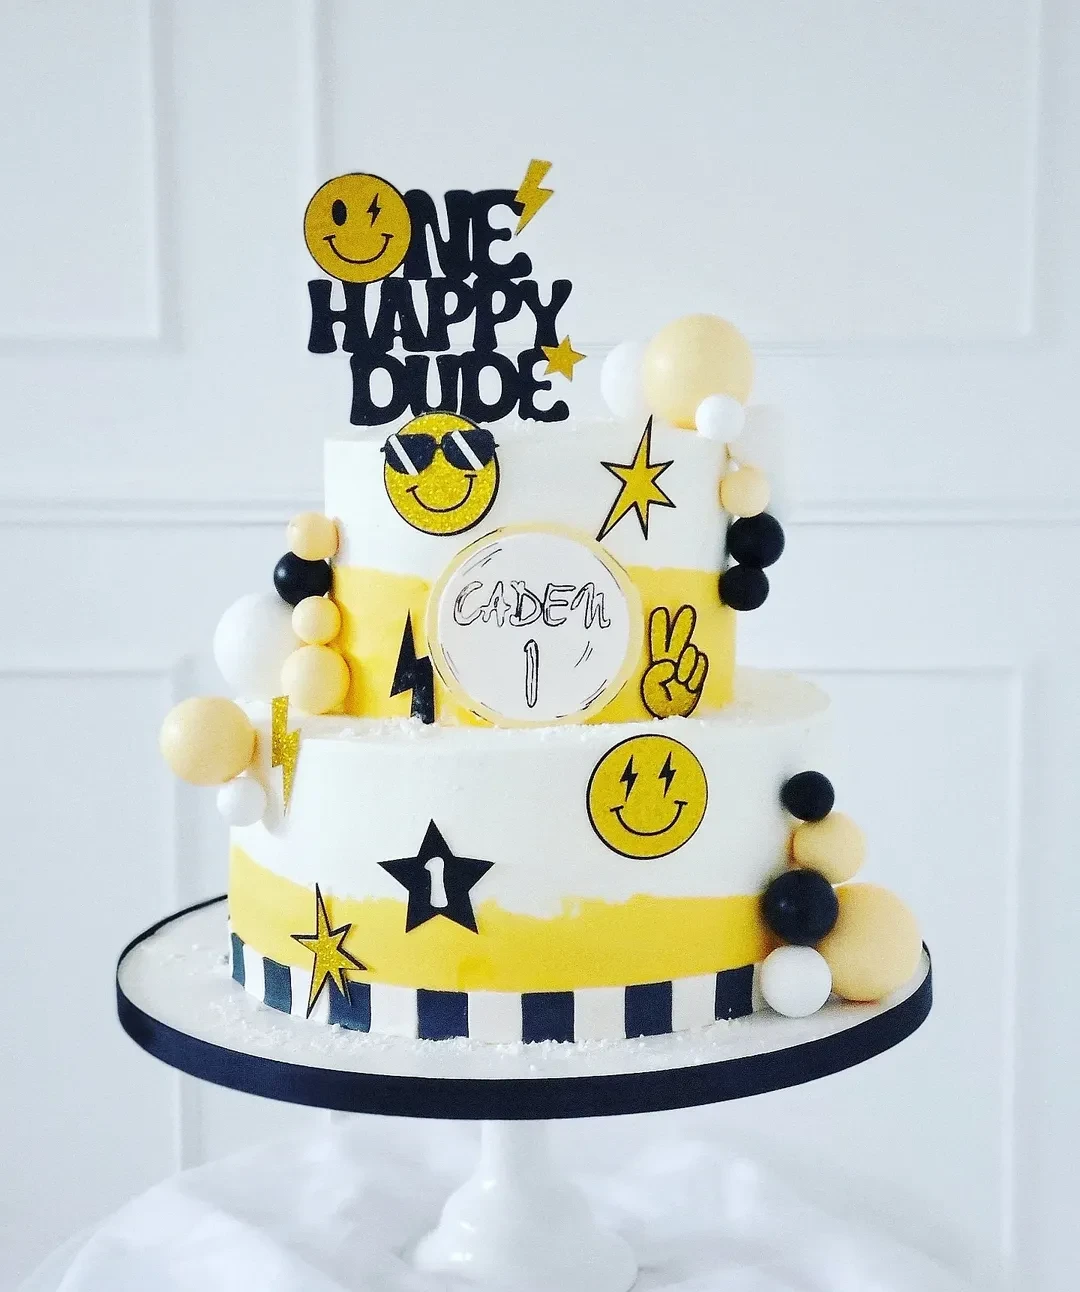
Credit: @martynat / Instagram
Combine bold patterns like checkers and lightning bolts with retro smiley faces to create a cohesive centerpiece for the dessert table.
The high-contrast yellow and black palette creates a modern look that suits the theme without relying on traditional baby motifs.
Apply a checkered edible wrap to the base of the cake for a professional finish that anchors the design. Use stiff cardstock for the lightning bolt and star accents to ensure they stand upright throughout the party.
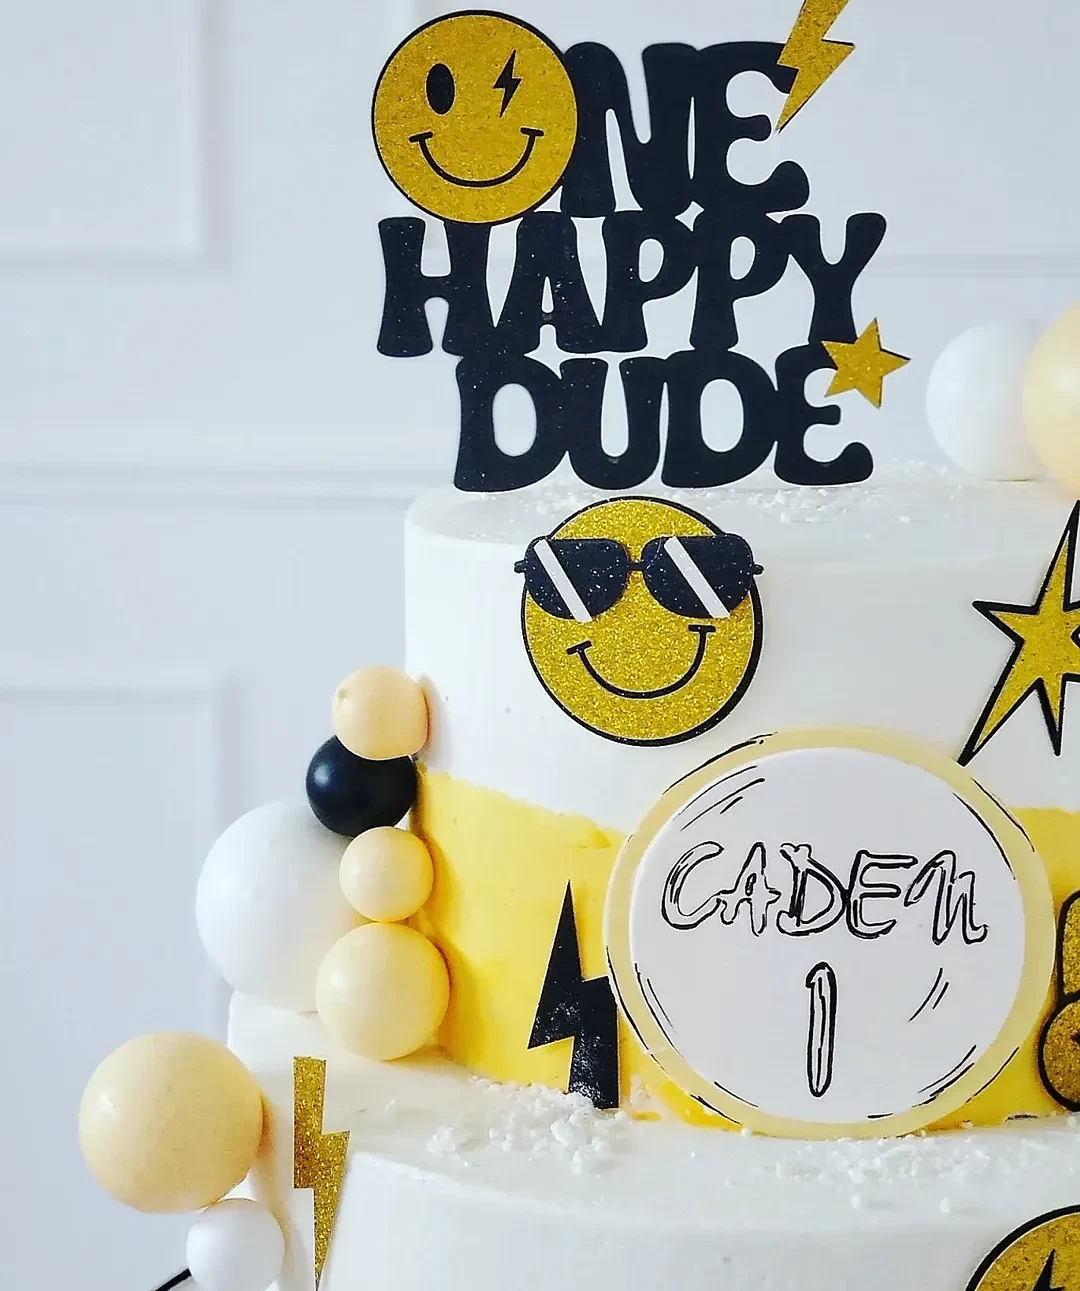
Credit: @martynat / Instagram
Incorporate personalized elements like a name plaque and a glittery topper to make the design unique.
Adding varying sizes of fondant spheres or chocolate balls mimics the look of a balloon garland, providing texture and height to the top tier.
Place the name plaque slightly off-center to create visual interest and leave room for a large ‘1’ or age-specific graphic. For a budget-friendly version, use store-bought yellow gumballs instead of custom fondant spheres.
19. Piped Checkered Tier Cake
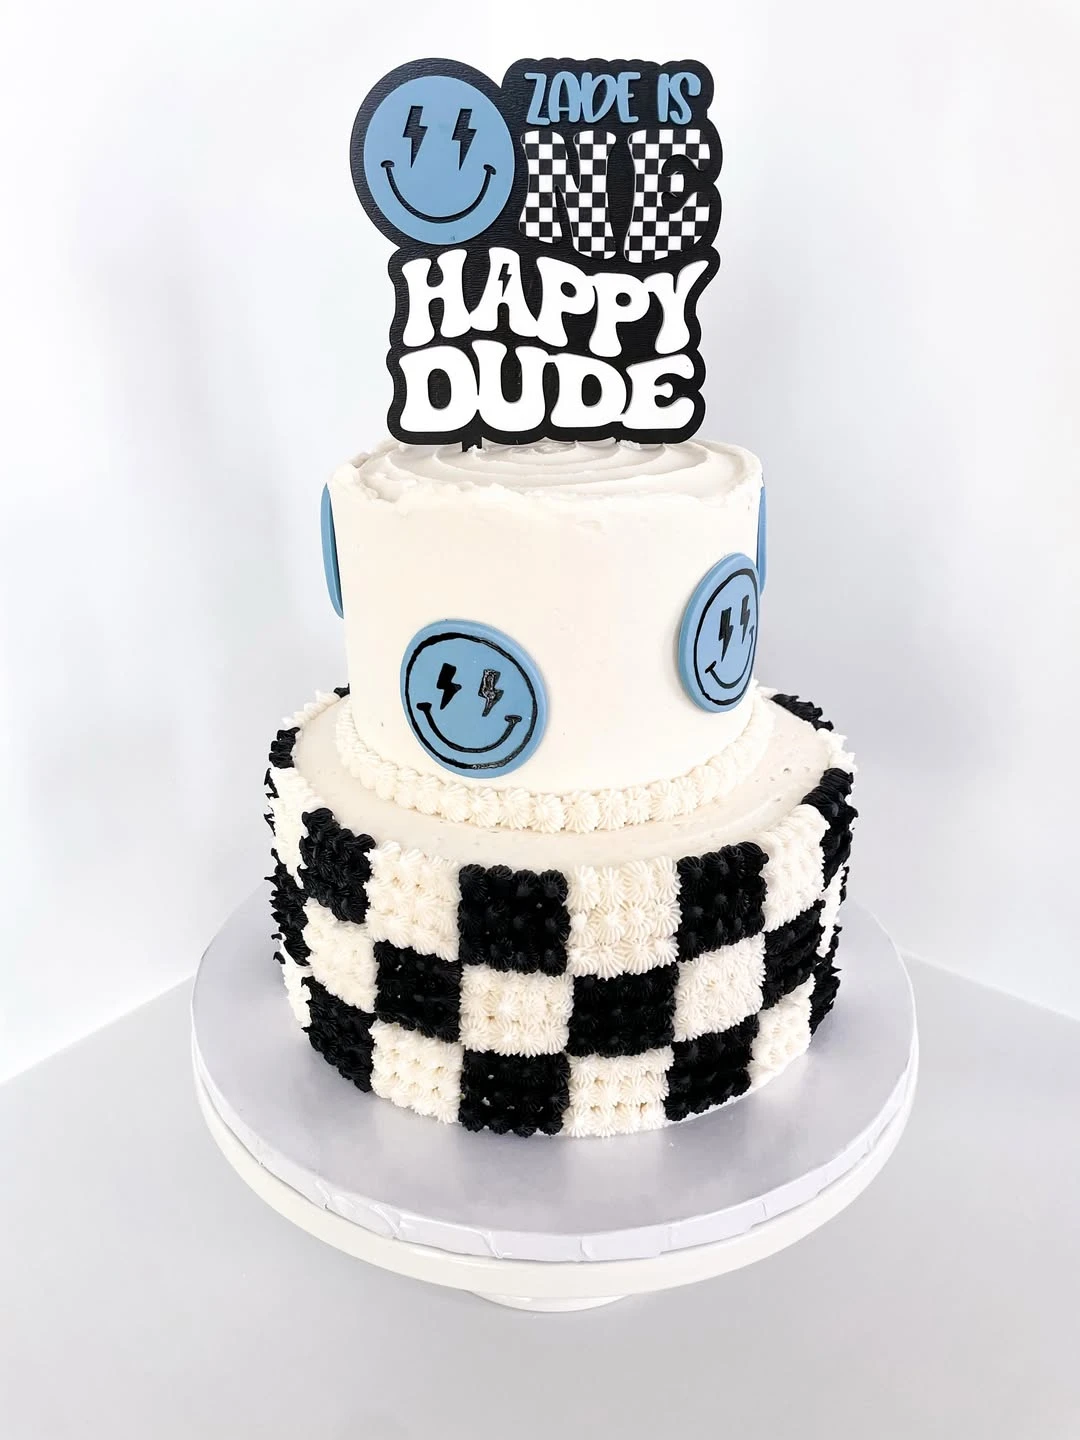
Credit: @groovygoodieslv / Instagram
Use textured piping to create a high-contrast checkered pattern on the base tier.
The piped rosettes add dimension and a softer feel to the bold black and white pattern, making it appropriate for a toddler celebration while maintaining the retro theme.
To manage the budget, use a custom acrylic topper for the height and theme messaging, allowing the cake design to focus on the repeating patterns.
Tablescapes and Place Settings
20. Smiley Face Place Settings
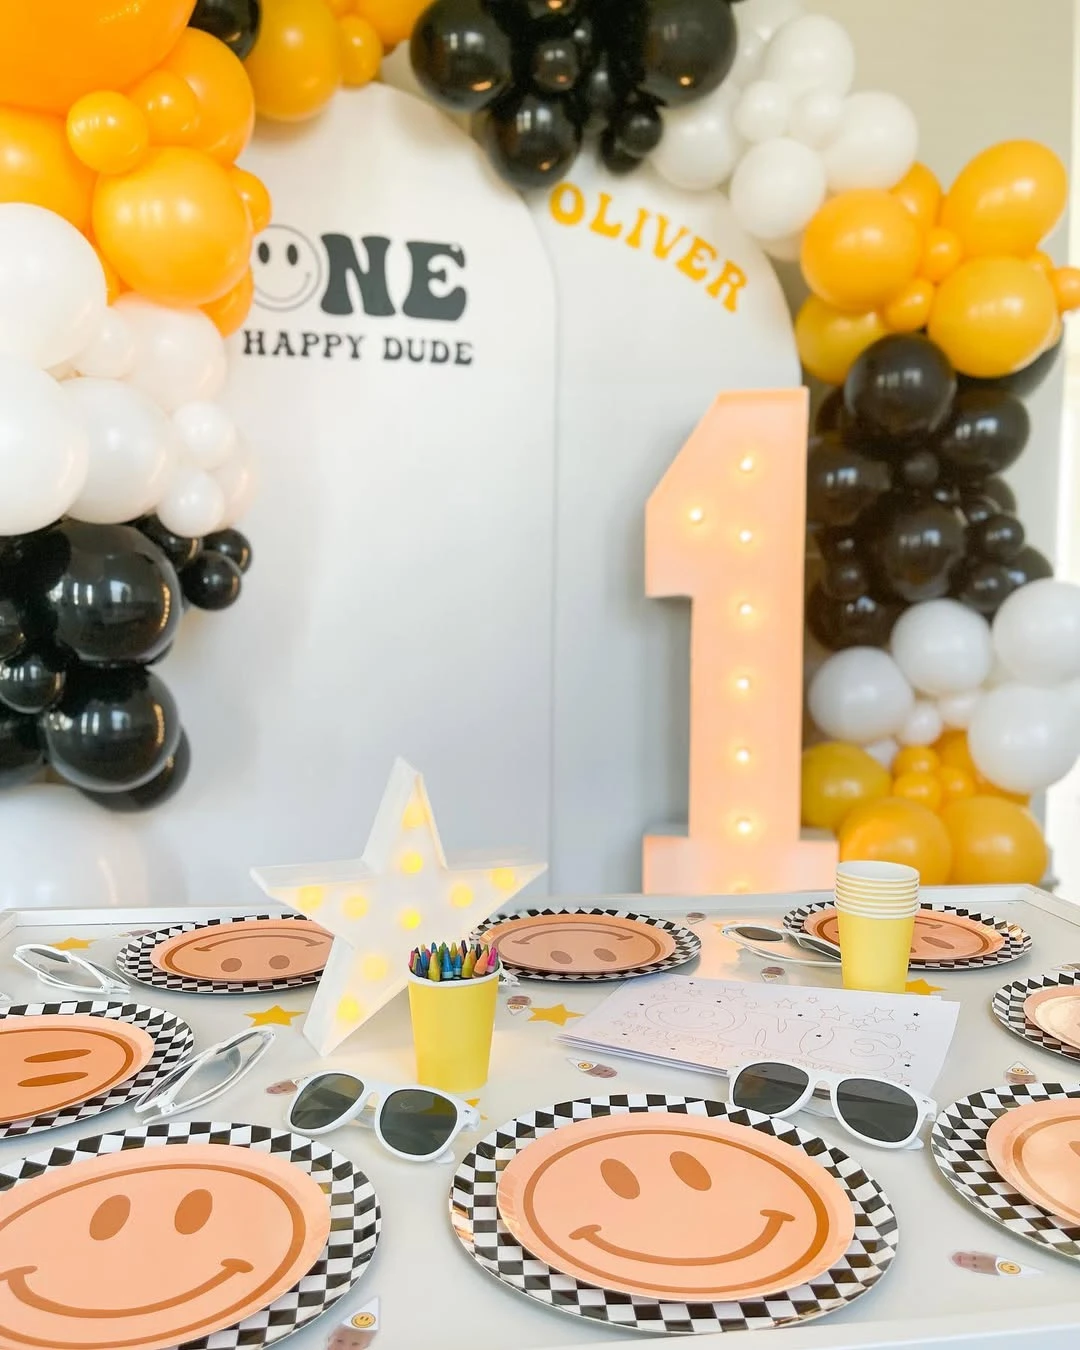
Credit: @abennettx0 / Instagram
Mix patterns and textures to create a high-energy dining area for little guests.
Layering checkered borders with central smiley face motifs creates a cohesive retro look that feels modern and playful.
Use disposable paper plates for easy cleanup and add white-rimmed sunglasses at each seat to serve as both a ‘cool dude’ accessory and a functional party favor.
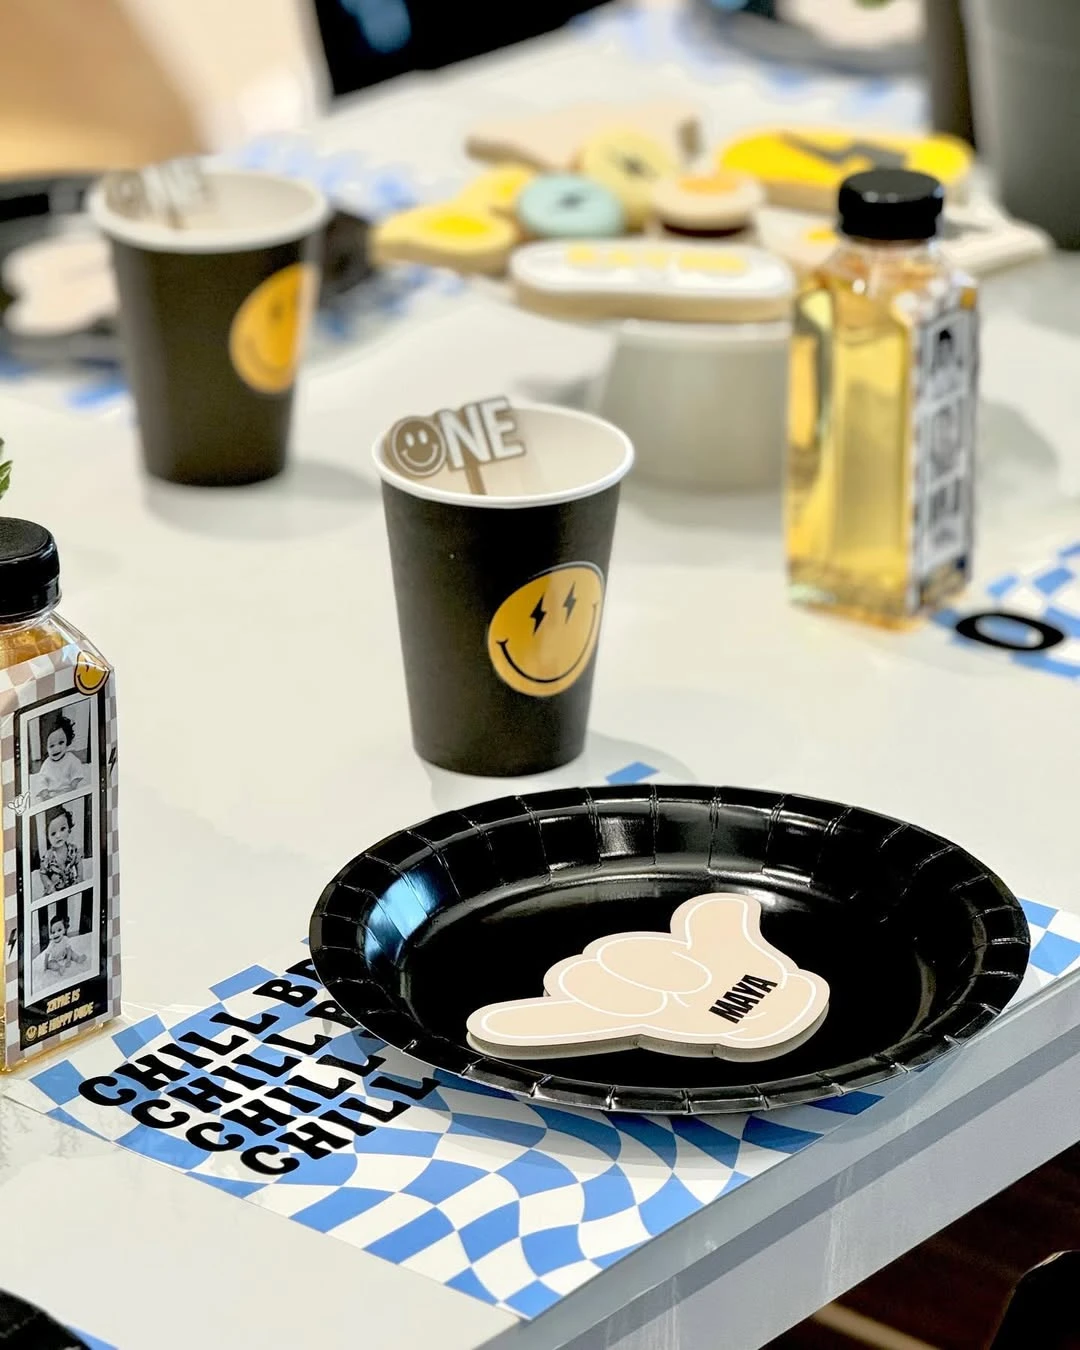
Credit: @velvetandvinedecor / Instagram
Combine checkered placemats with high-contrast black plates and personalized shaka hand cutouts.
The mix of patterns and bold shapes creates a modern look that aligns with the ‘cool dude’ aesthetic without being cluttered.
Use a ‘CHILL’ or checkered pattern for the placemat to break up the solid colors of the table and plates, and add a custom photo strip to drink bottles for a personal touch.
21. Sunglasses Smiley Balloon Centerpiece
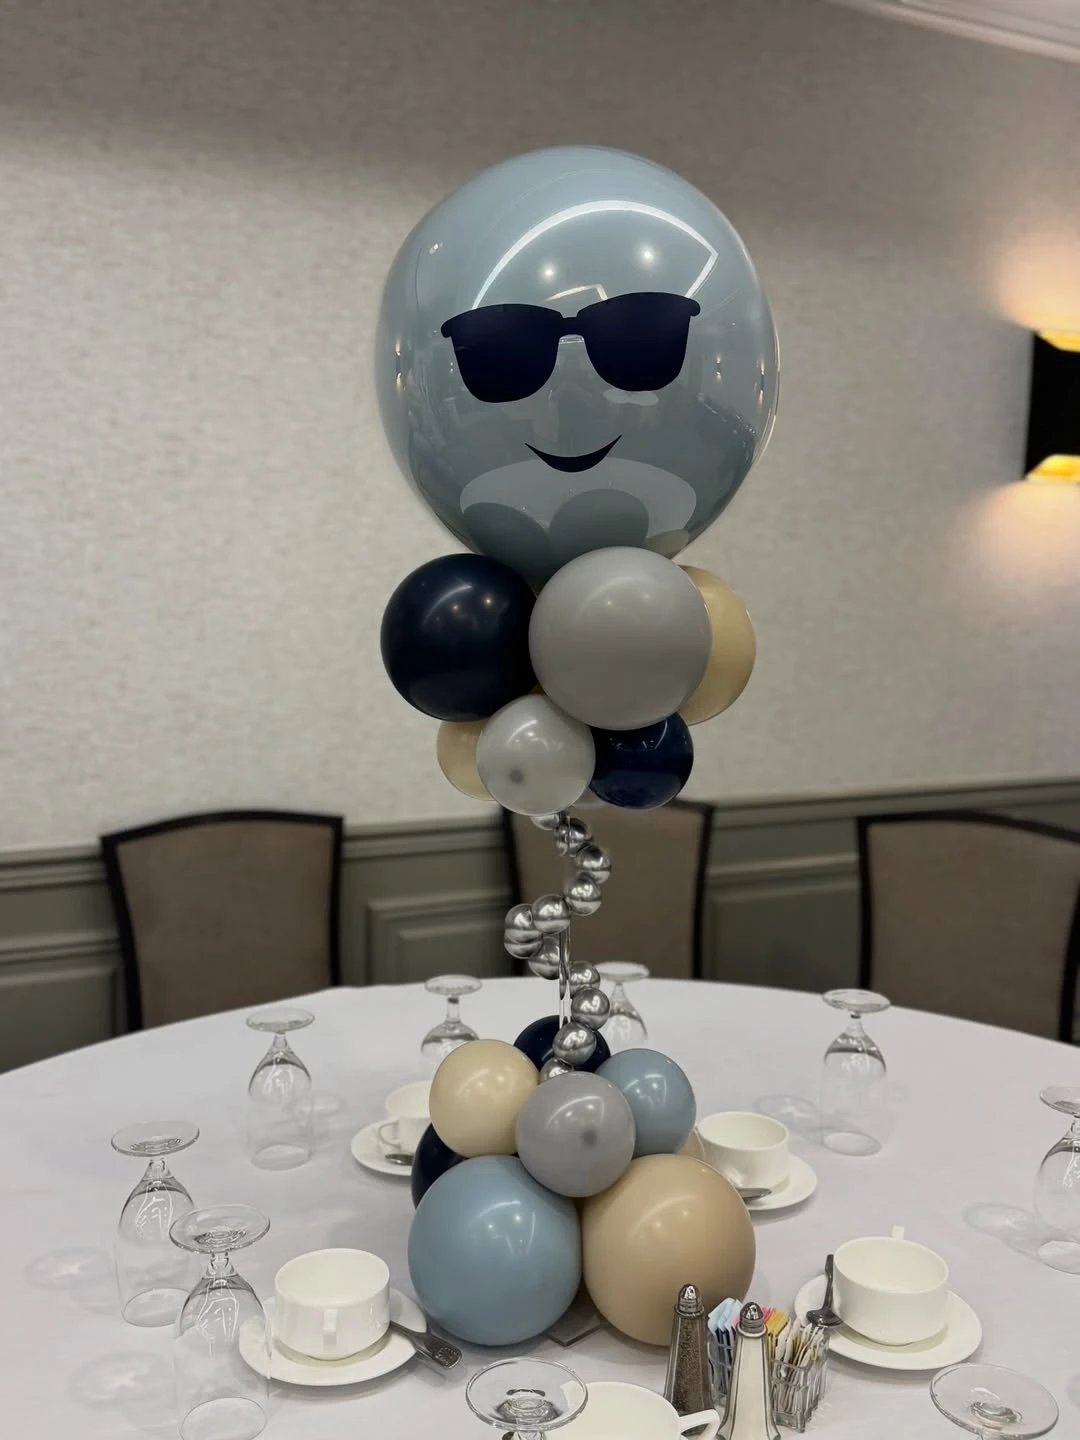
Credit: @j.pop_balloons / Instagram
Add height to guest tables using smiley face balloon towers topped with sunglasses decals.
Balloons are an affordable way to fill large venues and reinforce the ‘cool dude’ persona. The high-contrast black decals on light blue balloons stand out clearly against neutral room backgrounds.
Apply black vinyl decals to a 12-inch light blue balloon to create the face. Use a balloon column stand or a sturdy wire frame to maintain the spiral shape of the smaller accent balloons.
22. Checkered Runner Table Setup
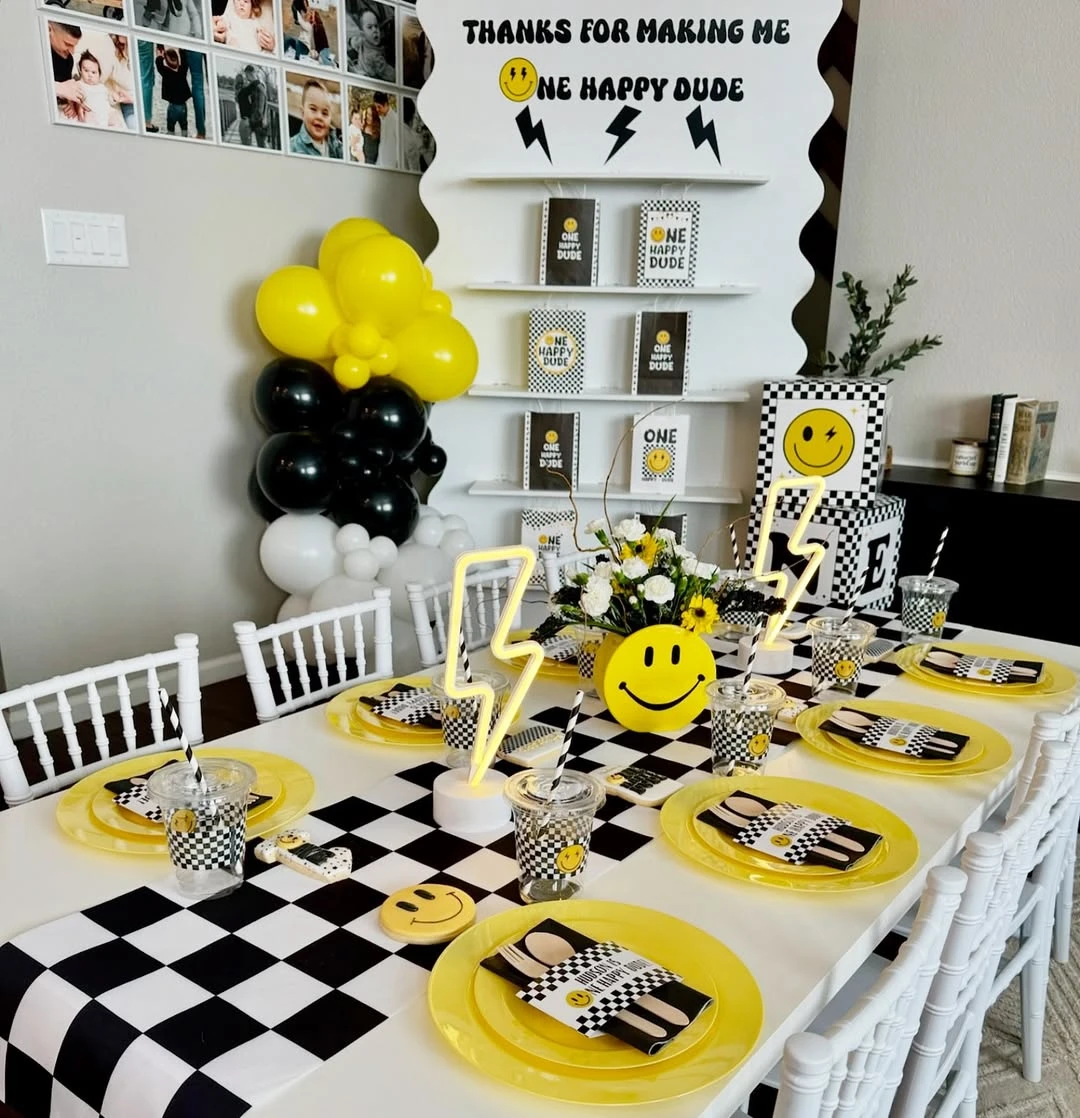
Credit: @enchantedeventsbygina / Instagram
Create a high-contrast dining space by layering a checkered runner over a white tablecloth to establish the theme’s graphic identity.
This setup provides a strong visual base that allows yellow plates and smiley face motifs to stand out, while the repeating patterns coordinate with the background favor wall.
Use battery-operated neon lightning bolts as centerpieces to add height and a modern glow without requiring access to power outlets.
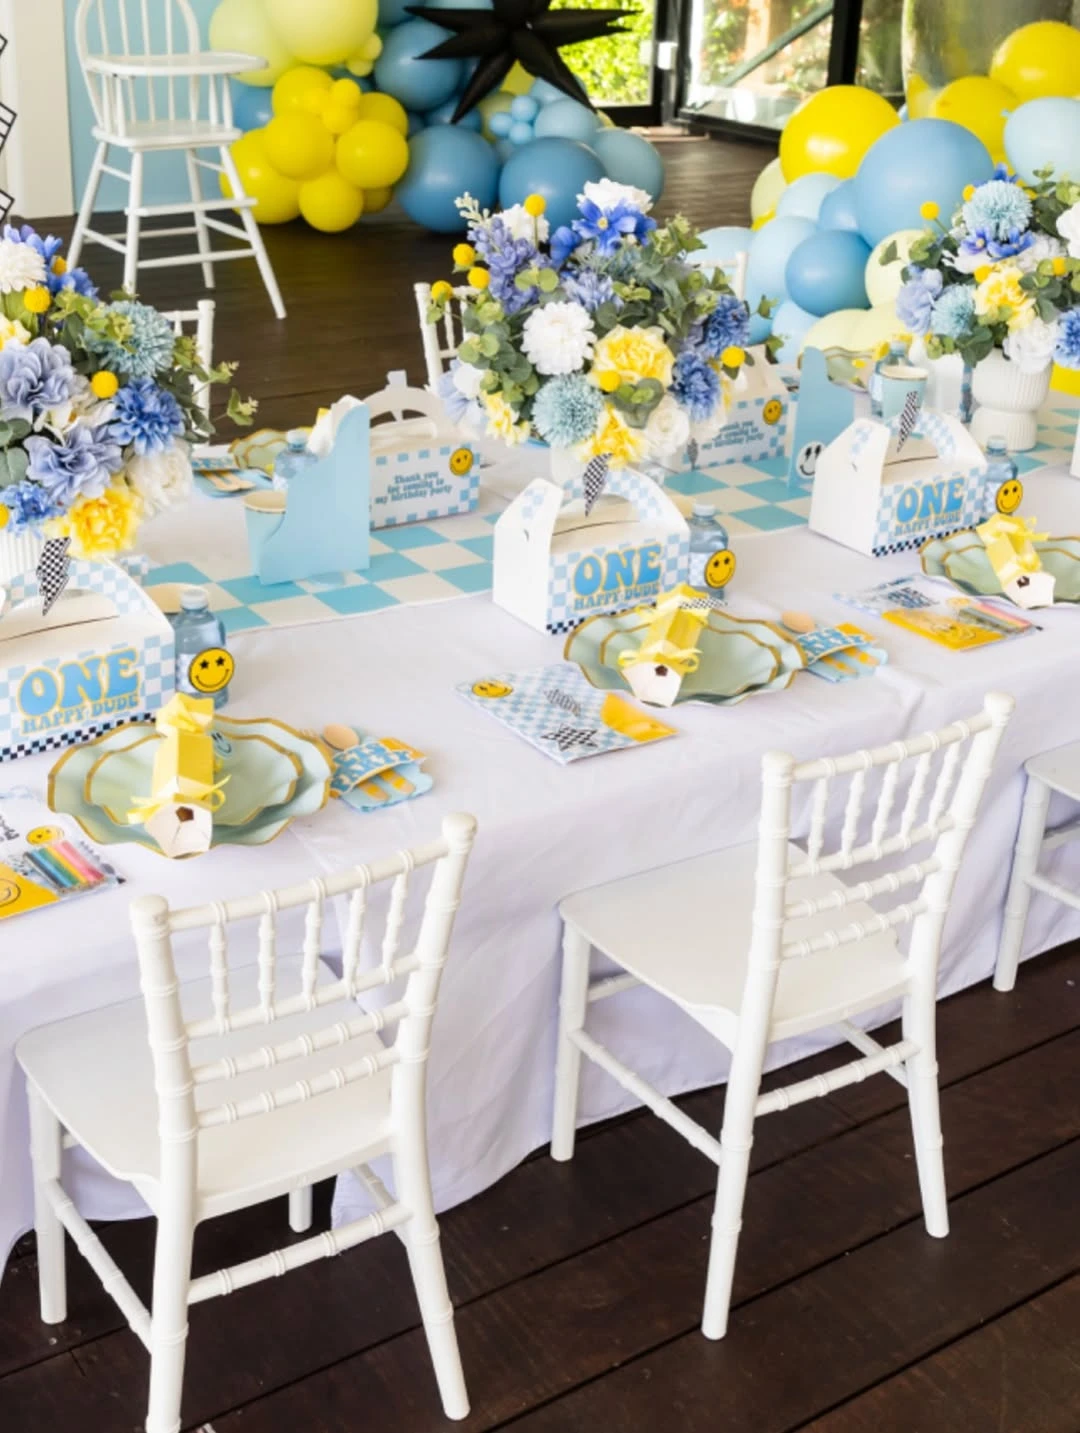
Credit: @fromkasia / Instagram
Use a crisp white tablecloth to provide a neutral foundation for light blue checkered runners.
The white background prevents the checkered patterns from becoming overwhelming in a small space.
Use white linens to save on costs and focus the budget on custom runners and floral accents like blue hydrangeas and yellow billy balls.
23. Personalized Art Station Seating
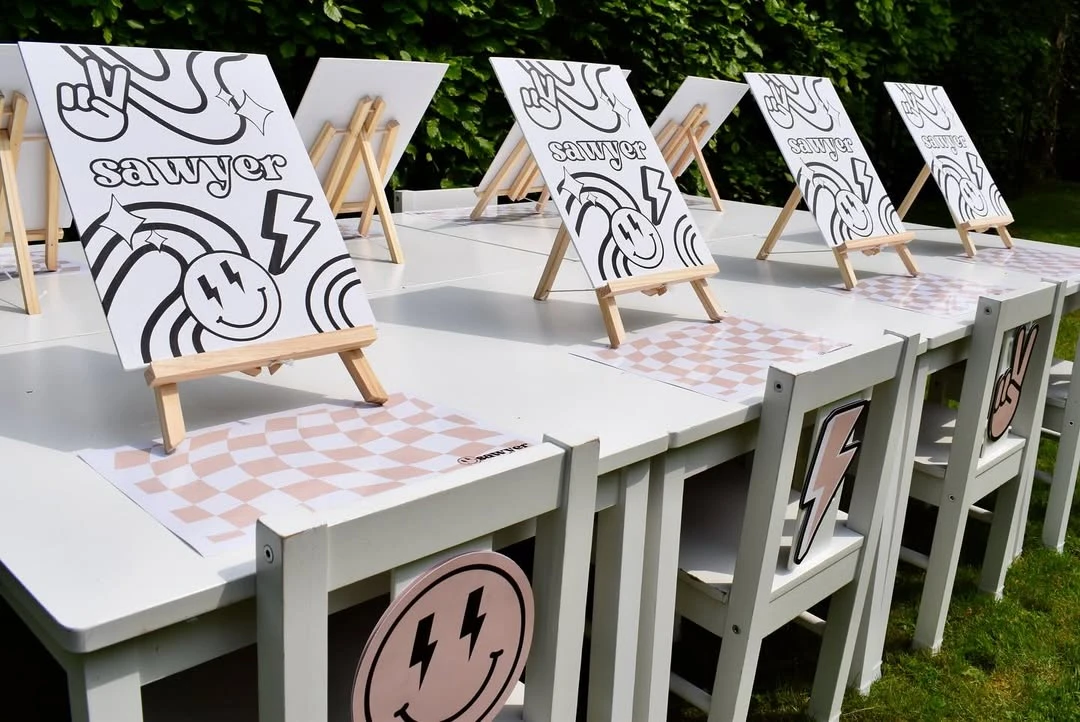
Credit: @daysdesigned_ / Instagram
Create an interactive art station using mini easels and personalized canvases as both an activity and a place setting.
This dual-purpose setup provides immediate entertainment for toddlers while filling the table with high-contrast, on-theme visuals.
Apply large vinyl decals to the back of standard white chairs to add thematic details like smiley faces and lightning bolts without purchasing custom furniture.
24. Patterned Toddler Dining Zone
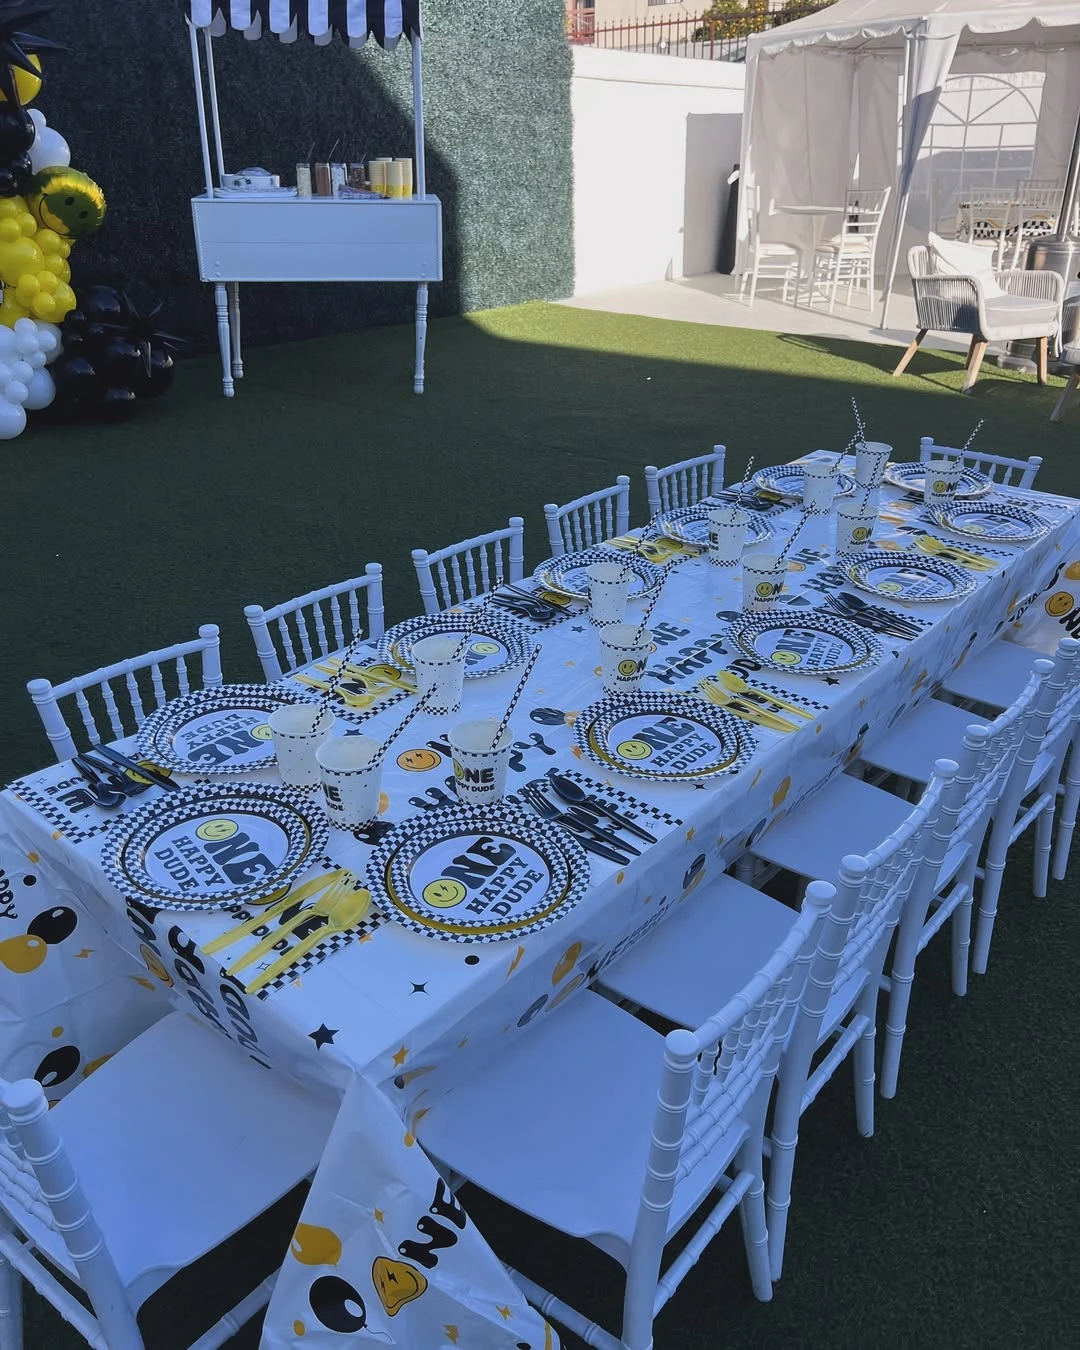
Credit: @padisparty / Instagram
Build a dedicated seating area for young guests using bold, high-contrast patterns that anchor the retro theme.
Repeating the checkered border on plates and cups creates a unified look across a long table while keeping the setup functional for messy eaters.
Use white chairs to maintain a clean, modern look that lets the busy patterns on the tabletop stand out as the focal point.
25. Graphic Checkered Table Settings
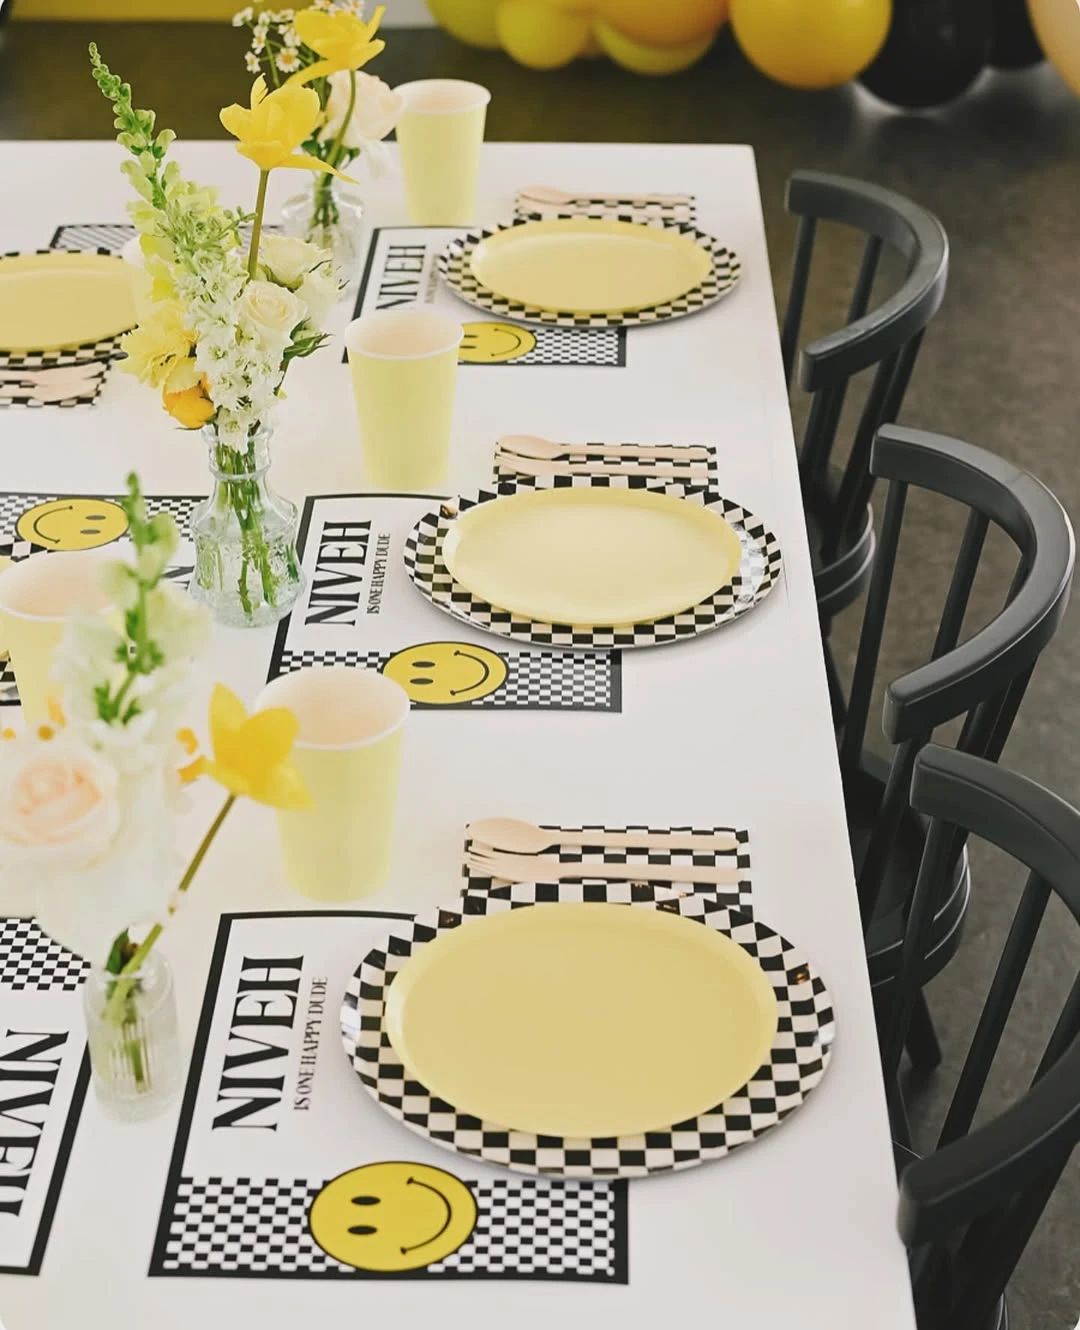
Credit: @navasclickstop / Instagram
Layer checkered paper placemats under solid yellow plates to bring the retro aesthetic to the dining area.
High-contrast patterns like black-and-white checkers provide a modern edge that balances the soft floral centerpieces.
Use wooden or compostable cutlery to maintain a clean, minimalist look while staying within the neutral tan tones of the palette.
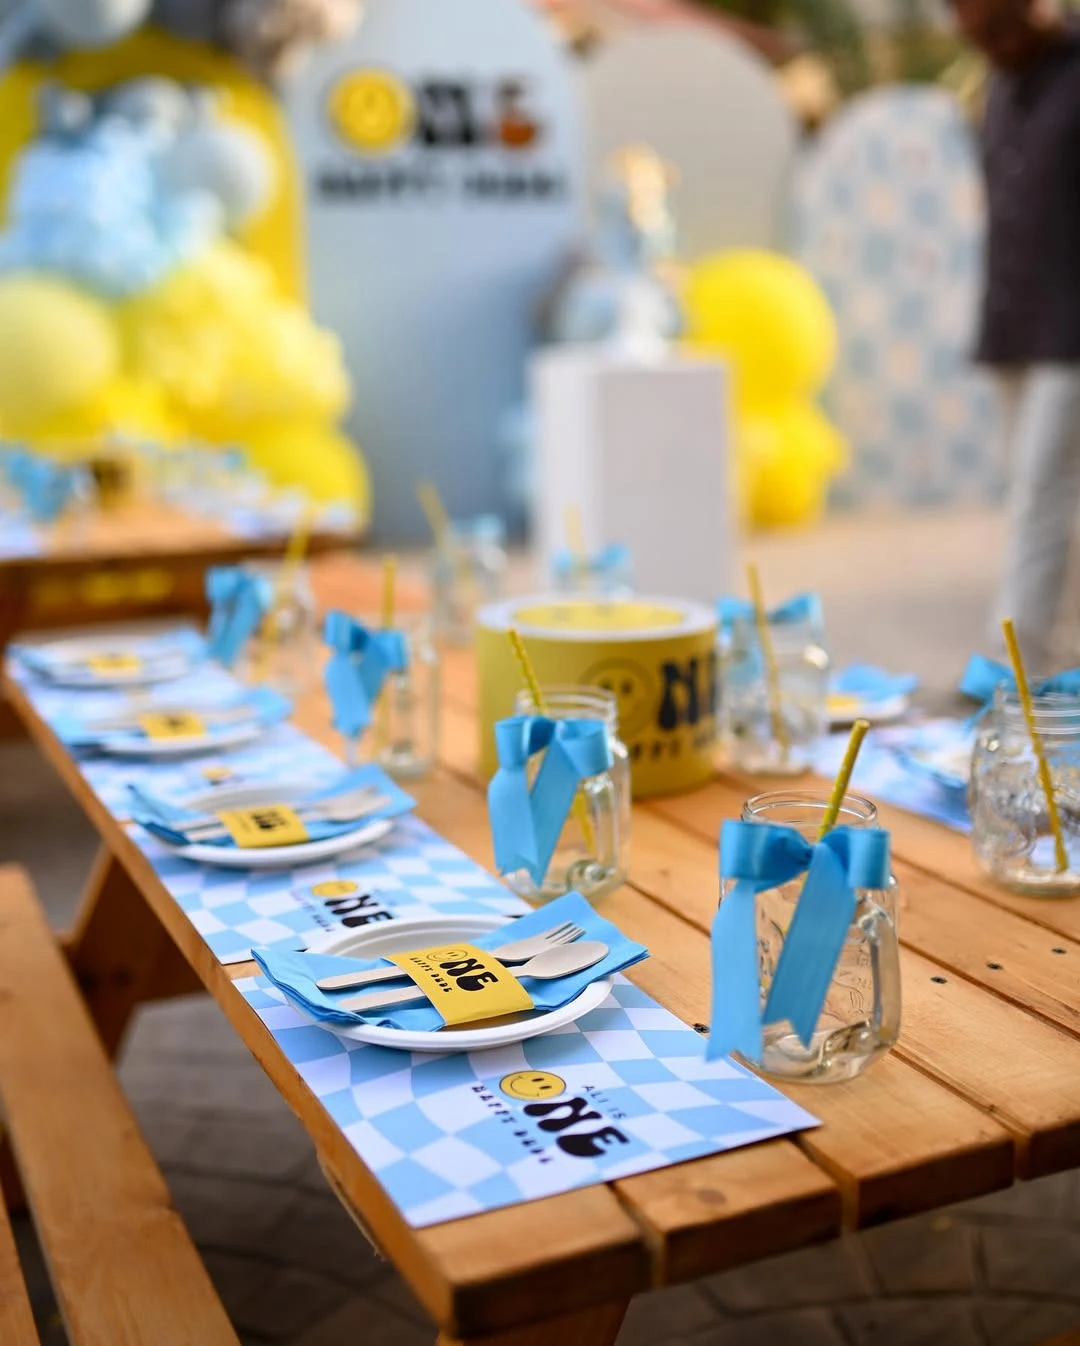
Credit: @thecircuseventsofficial / Instagram
Use custom paper placemats to define individual seating areas on outdoor wooden tables.
The light blue and white checkered pattern provides a softer contrast than black and white, making it suitable for a toddler’s birthday while maintaining the retro theme.
Print these on heavy cardstock to prevent them from blowing away outdoors, or secure them with a small piece of double-sided tape to the table surface.
26. Woven and Checkered Tablescape
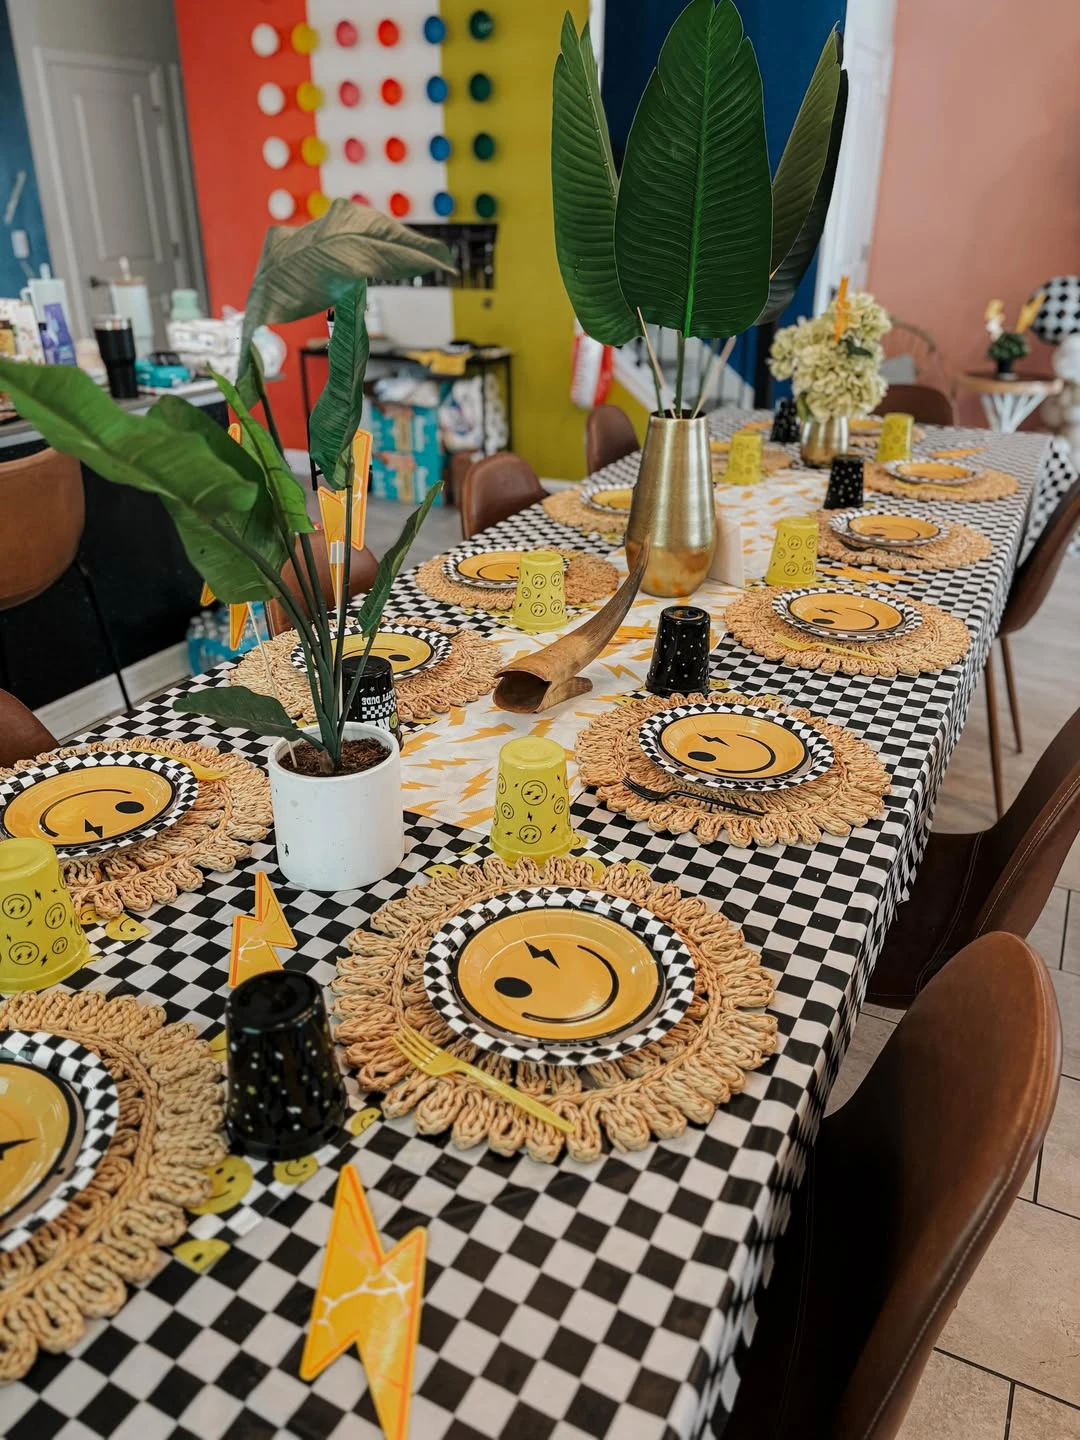
Credit: @t_and_tevents / Instagram
Layer natural woven placemats over a checkered tablecloth to introduce organic texture to the graphic black-and-white base.
Scattered lightning bolt cutouts and yellow smiley face plates add pops of color that break up the repetitive pattern of the linens.
Use low-profile centerpieces like potted greenery or small gold vases to allow guests to see each other across the long table.
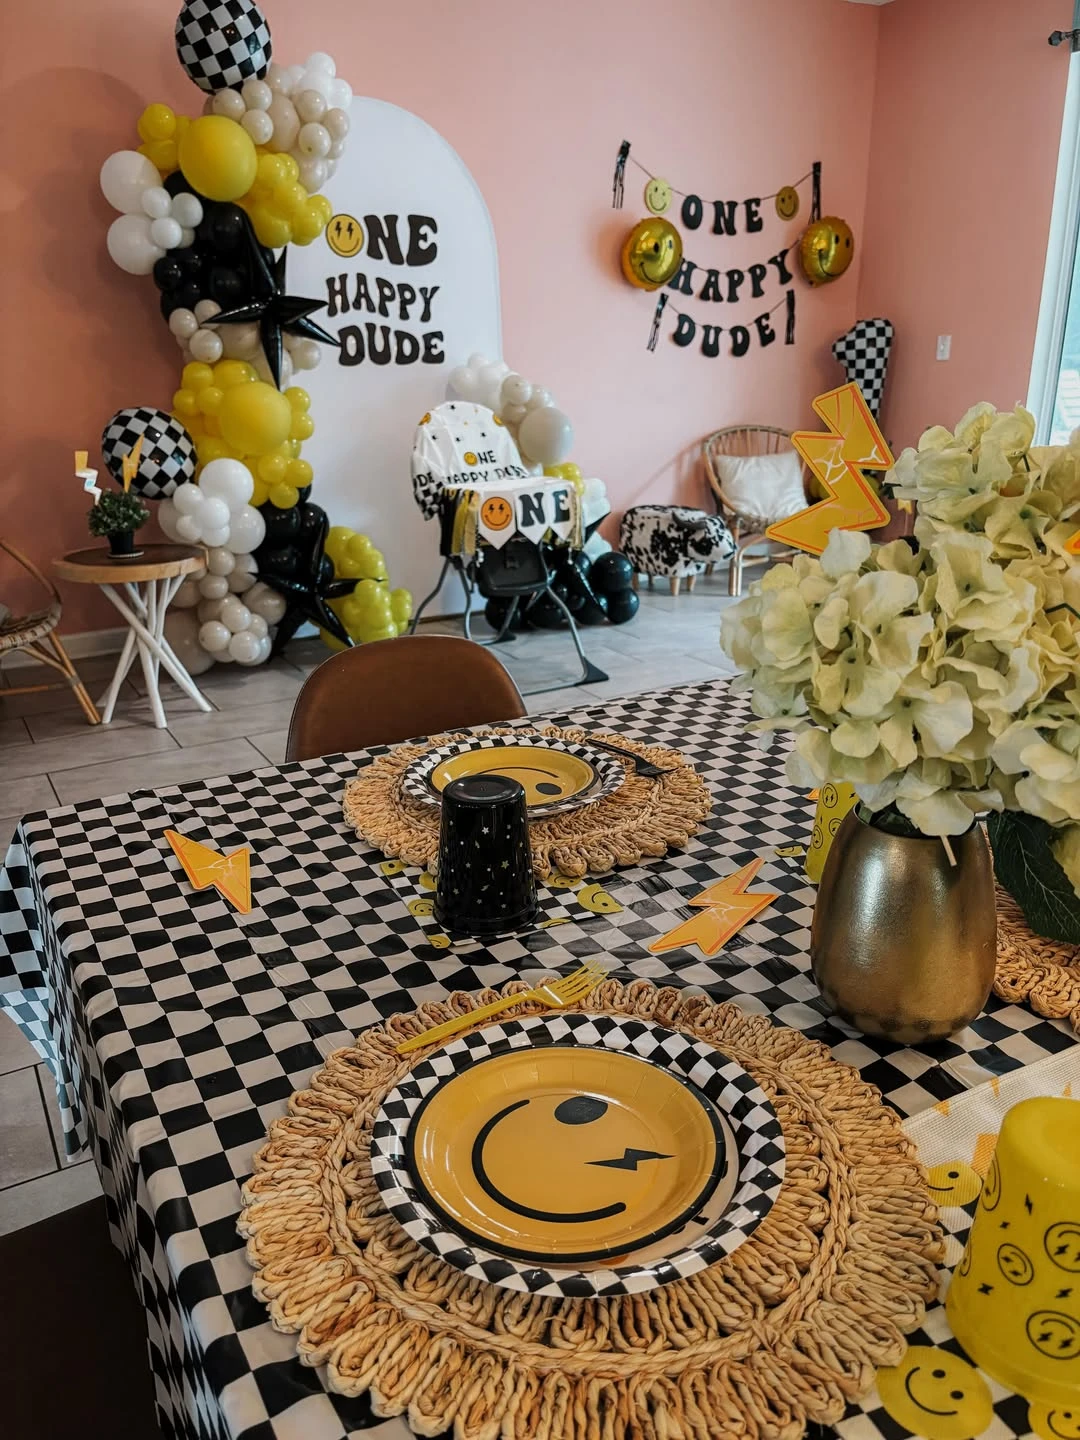
Credit: @t_and_tevents / Instagram
Position the decorated high chair in front of a secondary wall display to create a dedicated space for the smash cake event.
A simple ‘One’ banner and a checkered fabric backing on the high chair tie the seating area into the broader room decor.
Hang a lightweight ‘One Happy Dude’ banner on the wall behind the high chair to fill empty vertical space in wide-angle photos.
27. Smiley Face Chair Accents
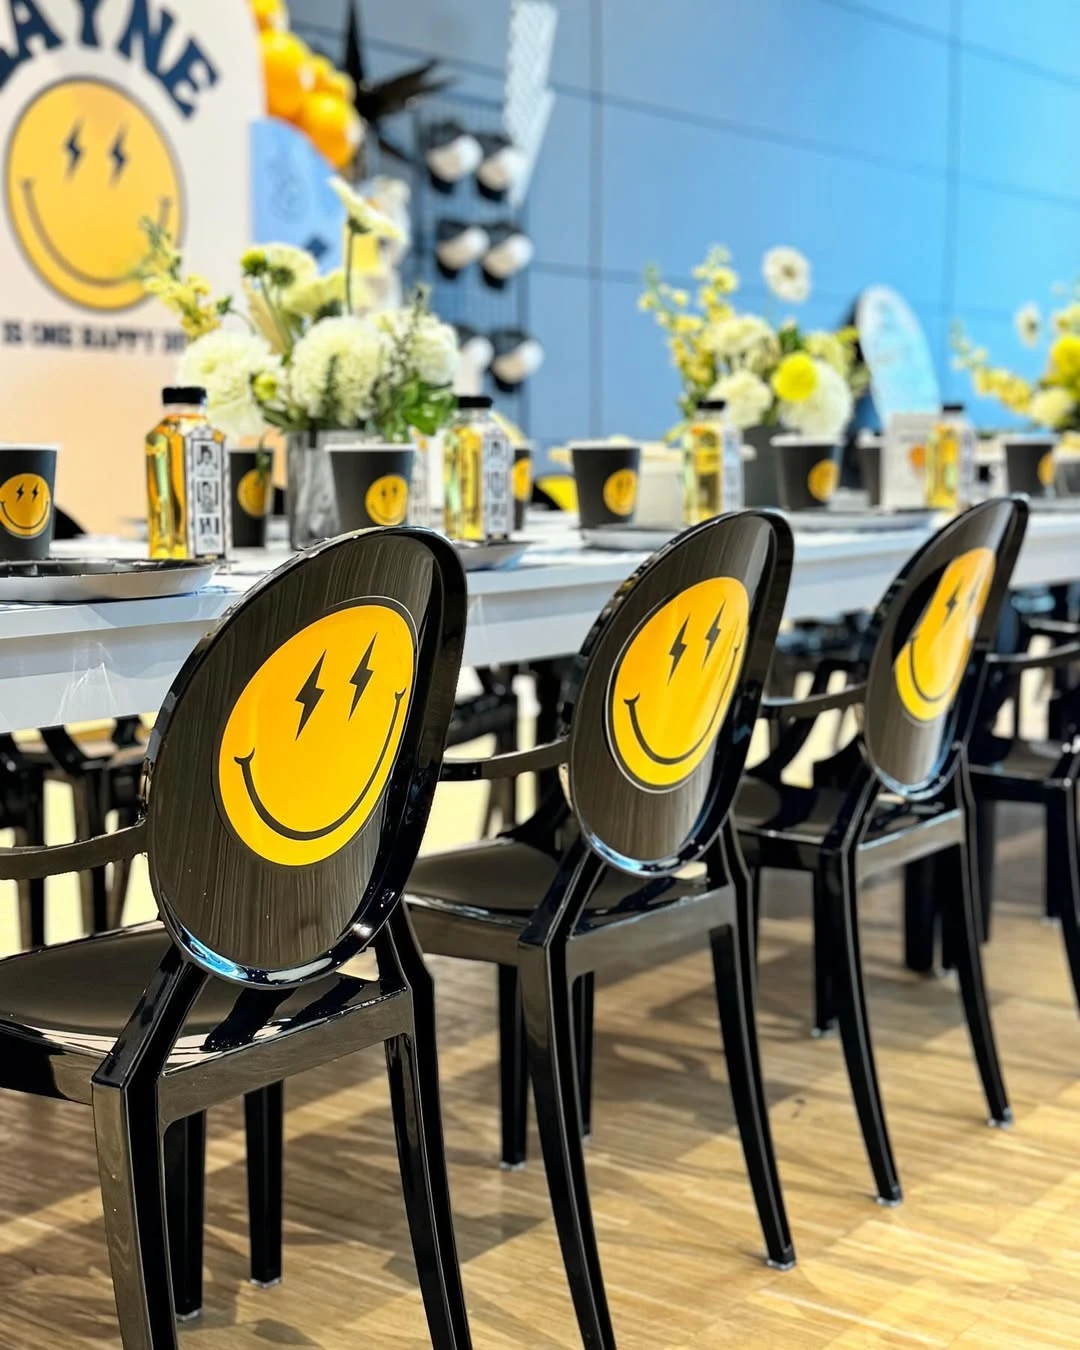
Credit: @velvetandvinedecor / Instagram
Apply large yellow smiley face decals to the back of black chairs for a bold visual impact.
This technique turns functional furniture into part of the decor, ensuring the theme is visible even when guests are seated at the table.
Measure the chair back before ordering decals to ensure the smiley face is centered and does not overhang the edges.
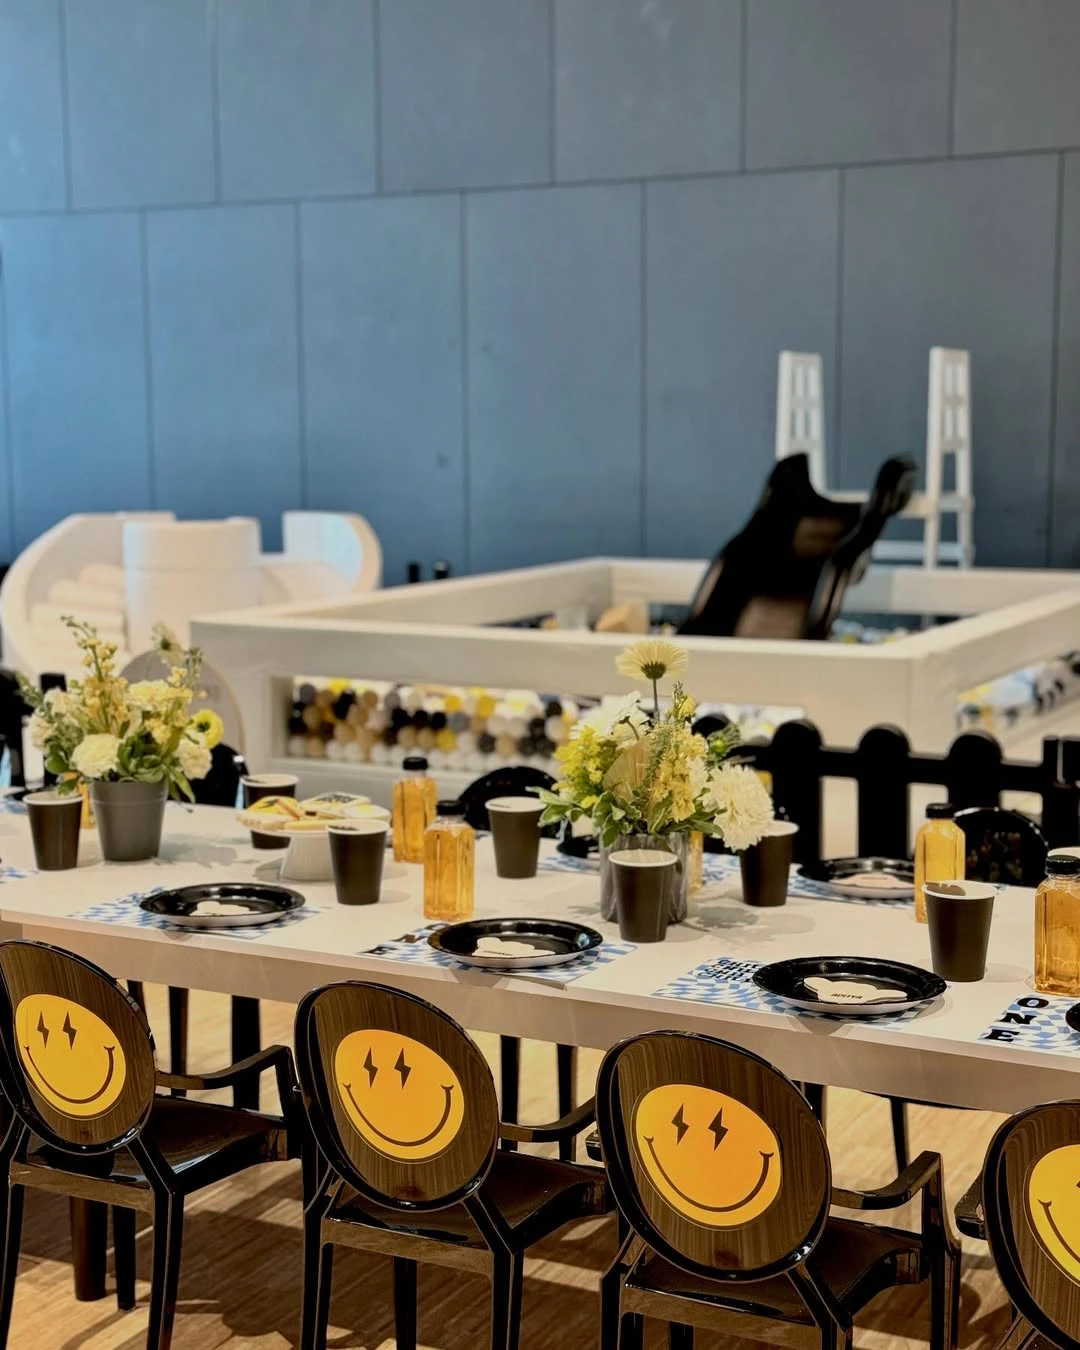
Credit: @velvetandvinedecor / Instagram
Arrange the dining table parallel to a themed play area like a ball pit or slide.
A clear view of the play zone allows parents to supervise while maintaining a structured area for snacks and cake, keeping the party flow organized.
Maintain at least three feet of clearance between the chairs and the play equipment to allow for safe movement and easy access for guests.
Party Favors and ‘Dude’ Bags
28. Checkered Happy Meal Favors
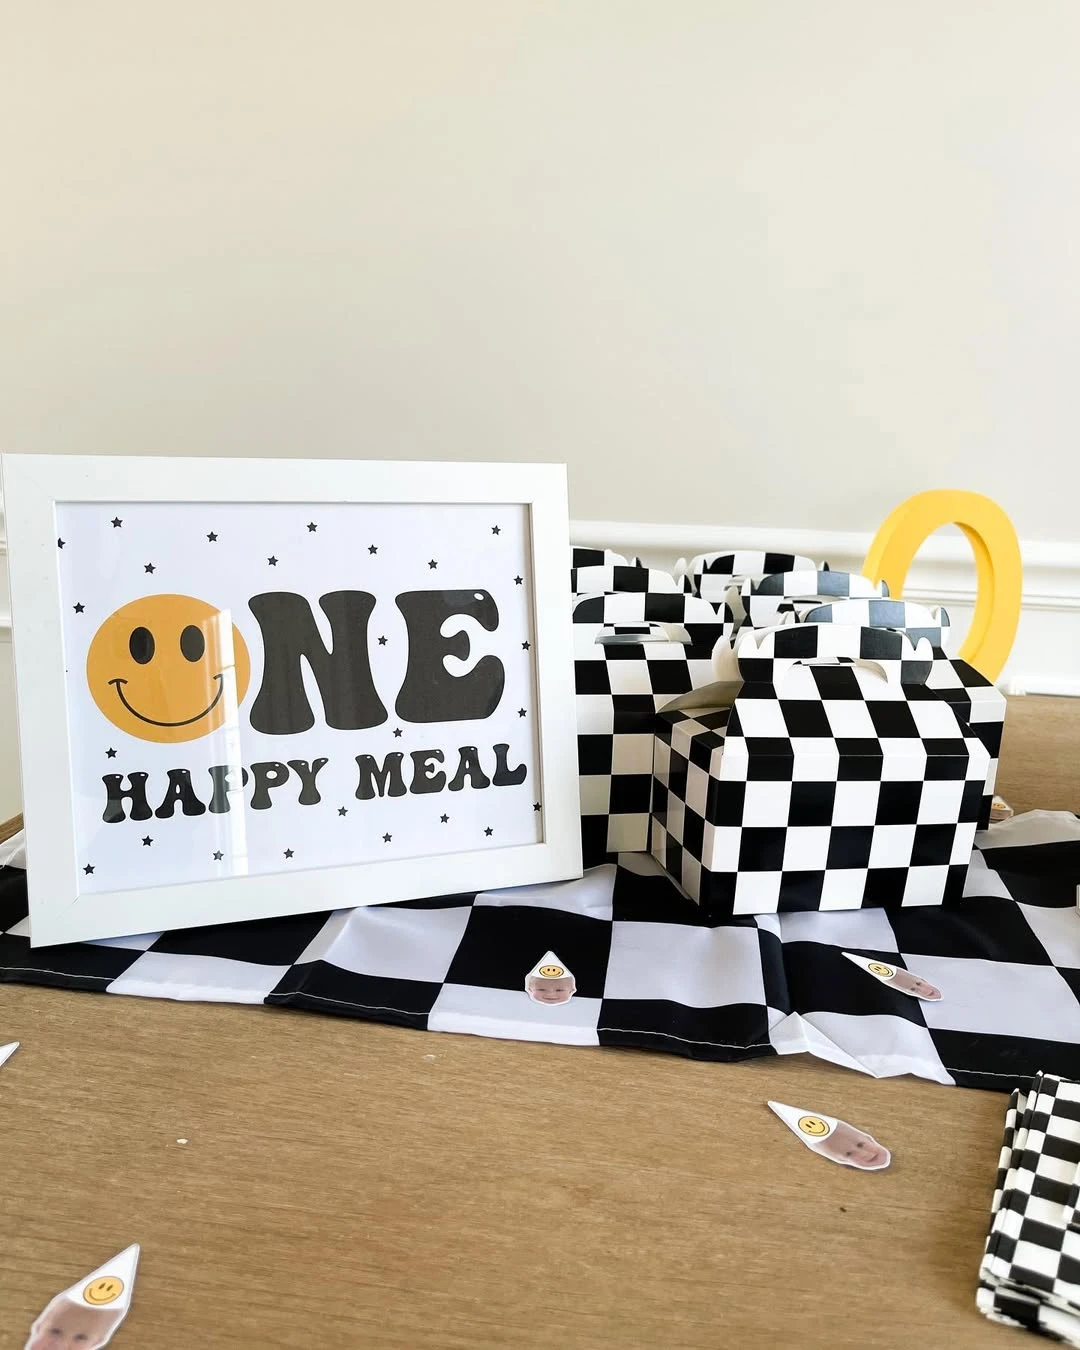
Credit: @abennettx0 / Instagram
Package treats or small toys in black-and-white checkered gable boxes to match the ‘One Happy Meal’ play on words.
These boxes are sturdy, easy to transport for guests, and reinforce the retro diner aesthetic often associated with this theme.
Print a simple ‘One Happy Meal’ sign in a retro font and place it near the favor station to tie the display together.
29. Graphic Favor Box Displays
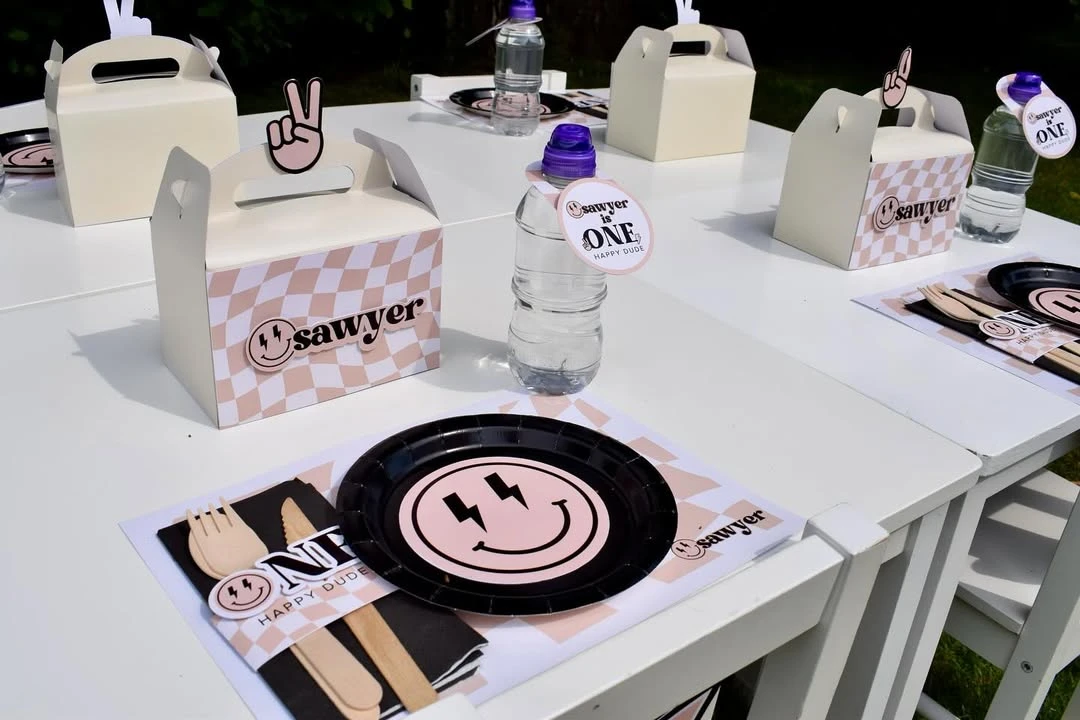
Credit: @daysdesigned_ / Instagram
Integrate party favors into the table design using checkered gable boxes and personalized water bottle labels.
Placing favors at each seat ensures the aesthetic is consistent across all functional items, from the drinks to the take-home treats.
Use plain white favor boxes and wooden cutlery as affordable bases, then customize them with printed checkered stickers and paper wraps.
30. Wall-Mounted Favor Box Display
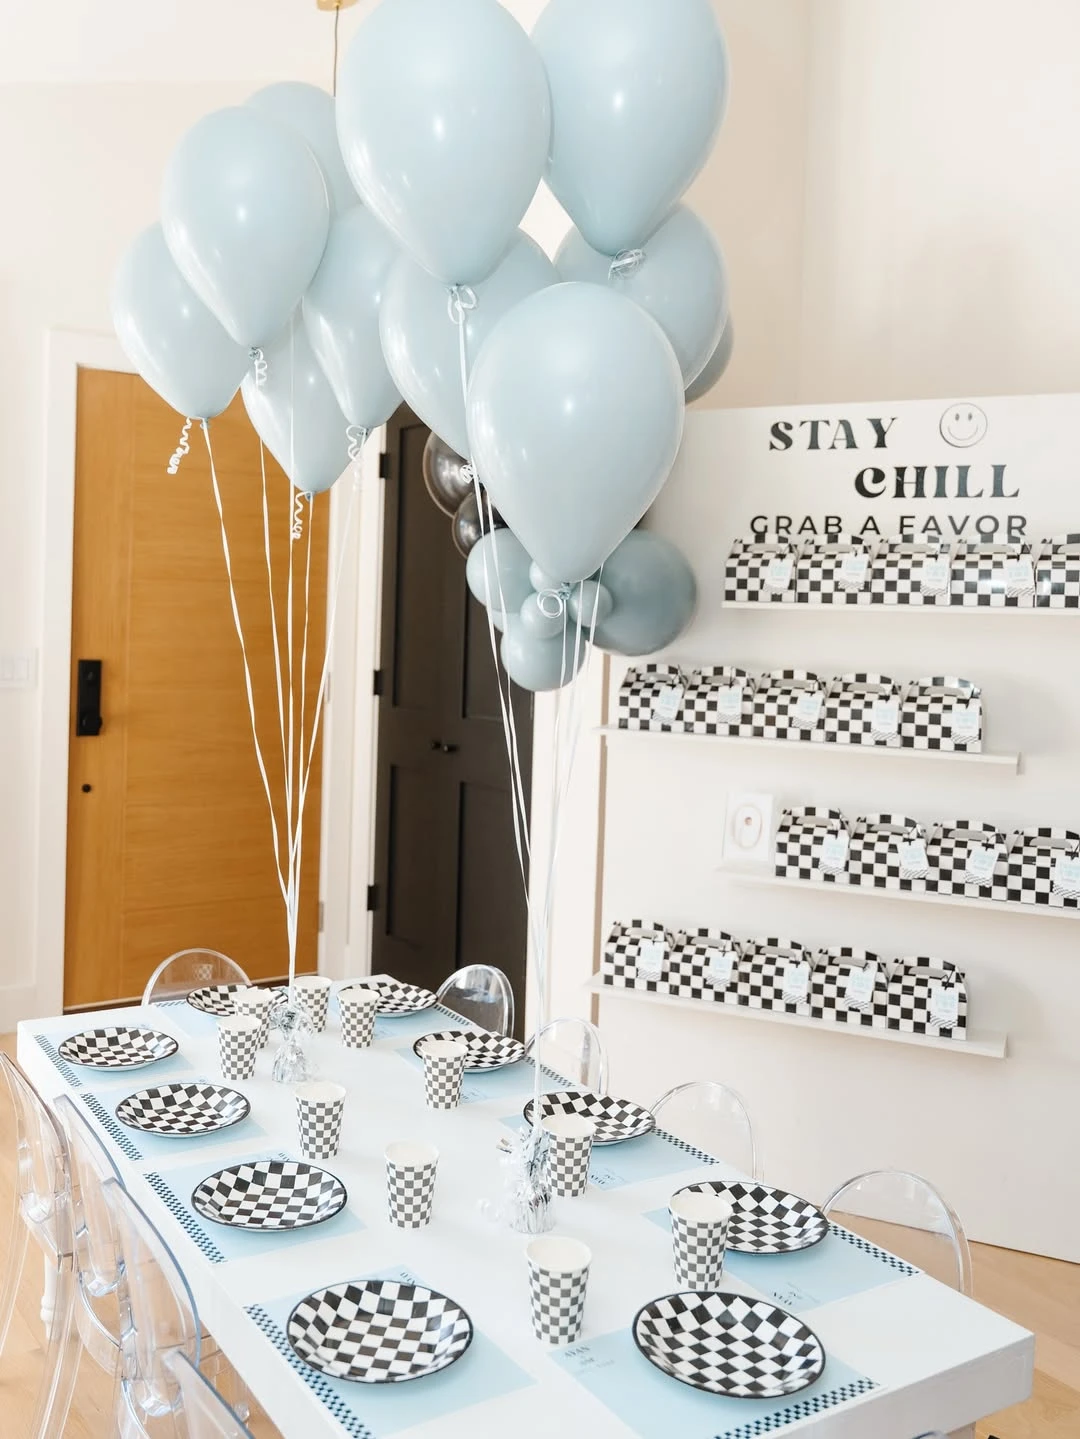
Credit: @skeventstudio / Instagram
Display checkered favor boxes on slim white shelves to create a functional backdrop that saves floor space in a home setting. A simple sign with a smiley face and a phrase like “Stay Chill” provides clear direction for guests while reinforcing the cool dude aesthetic.
Vertical displays turn simple party favors into a large-scale decor element that fills empty wall space without the need for additional tables.
Use lightweight cardboard gable boxes and a foam-core sign for a setup that is easy to mount with temporary adhesive strips and simple to remove after the event.
31. Plush Toy Adoption Station
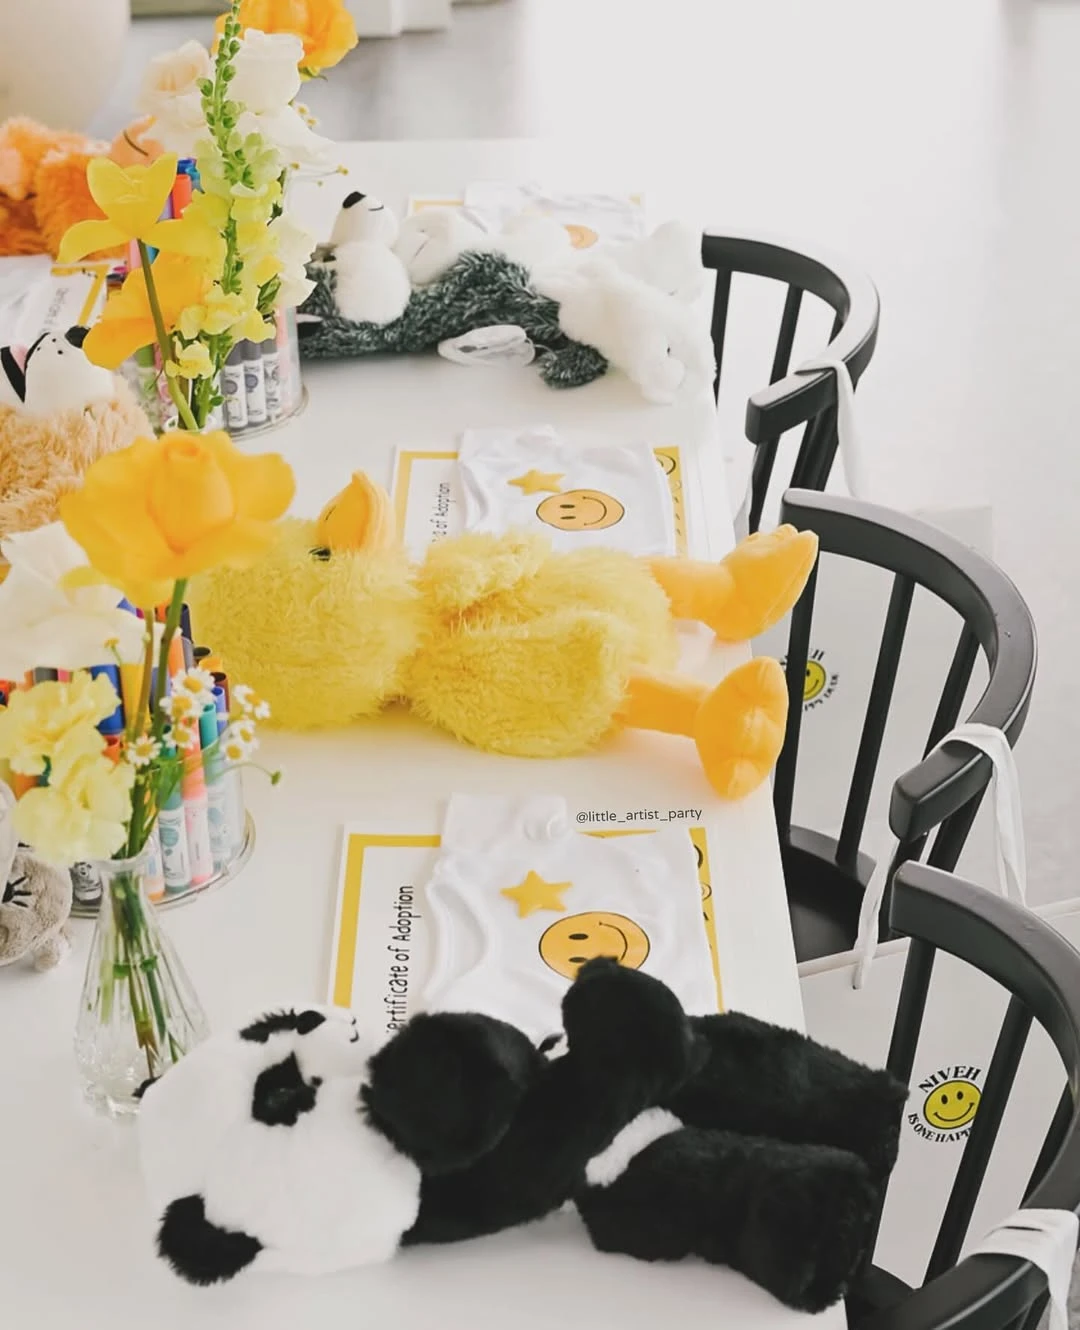
Credit: @navasclickstop / Instagram
Set up a dedicated station where young guests can select a plush animal to ‘adopt’ as their party favor.
This interactive element keeps toddlers engaged and provides a high-quality keepsake that fits the ‘Happy’ theme.
Dress the plush toys in miniature white t-shirts featuring the smiley face logo to tie the favors back to the overall event branding.
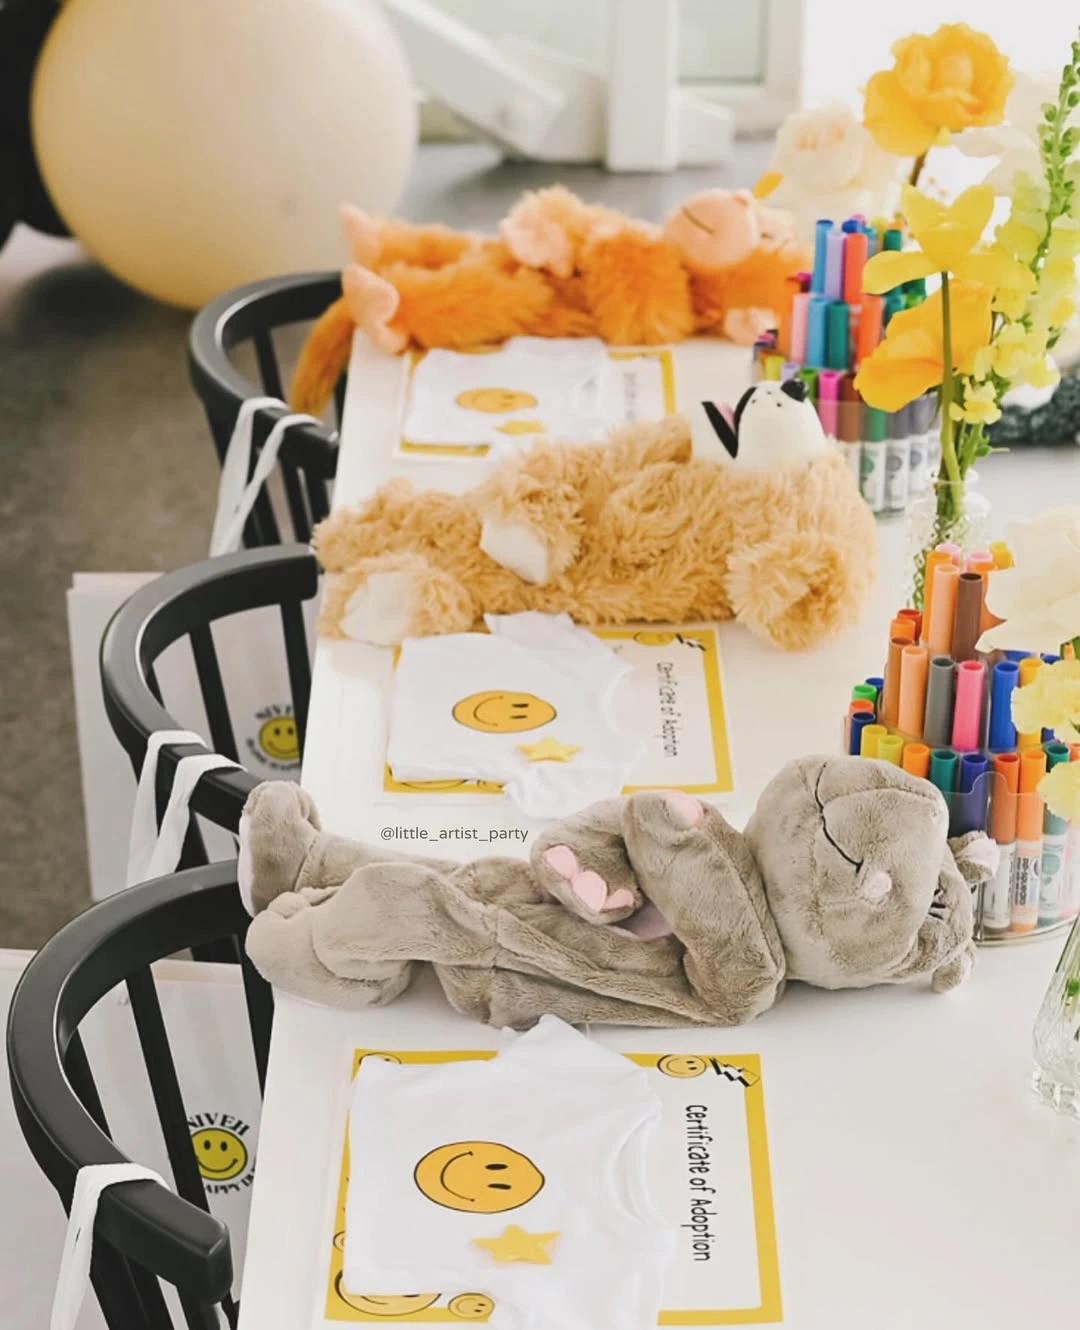
Credit: @navasclickstop / Instagram
Provide custom ‘Certificate of Adoption’ papers and markers for a low-mess activity that personalizes the experience.
It adds a layer of play to the favor selection process, making the gift feel more like an event highlight than a parting thought.
Organize markers in clear acrylic containers to keep the table tidy while displaying the vibrant colors available for decorating.
One Happy Dude Outfits and Apparel
32. Graphic ‘One Happy Dude’ Tee and Beanie
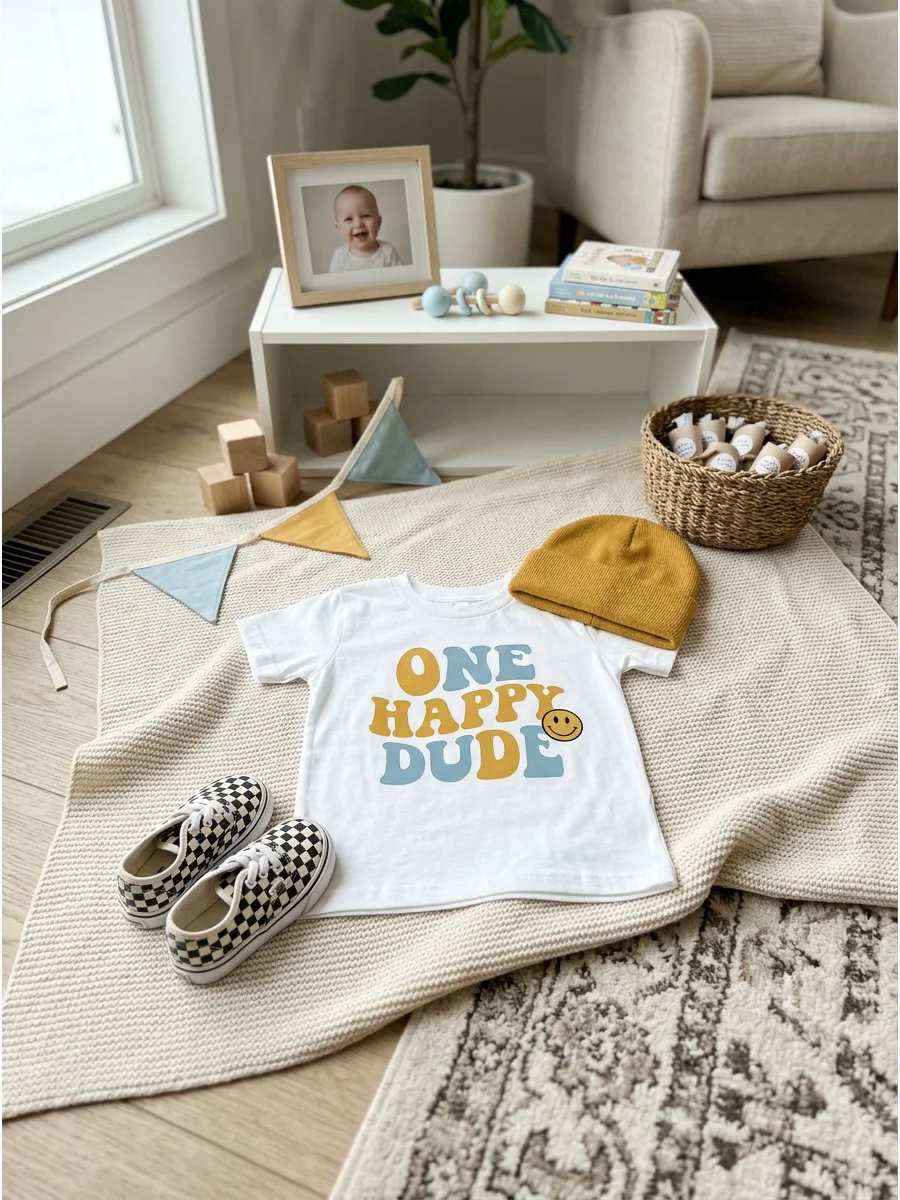
Offers a modern-minimalist outfit option for the ‘cool dude’ vibe.
It fills a useful coverage gap that collected photos may not show clearly.
Keep the setup simple, repeat one main material, and leave enough room for guests.
33. Matching Family ‘Dude Crew’ Shirts
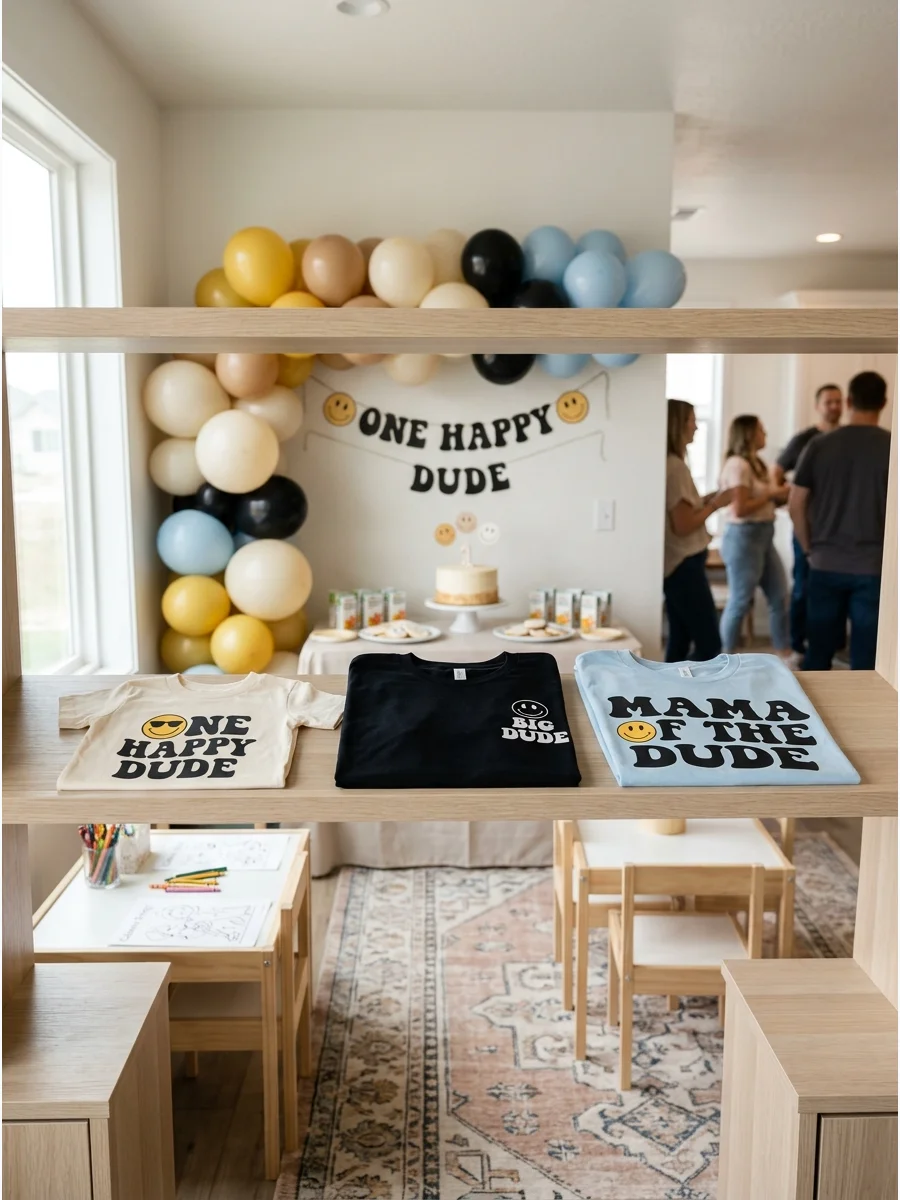
Includes a way for parents and siblings to coordinate with the theme.
It fills a useful coverage gap that collected photos may not show clearly.
Keep the setup simple, repeat one main material, and leave enough room for guests.
Smiley Snacks and Checkered Treats
34. Smiley Face Fresh Fruit Platter
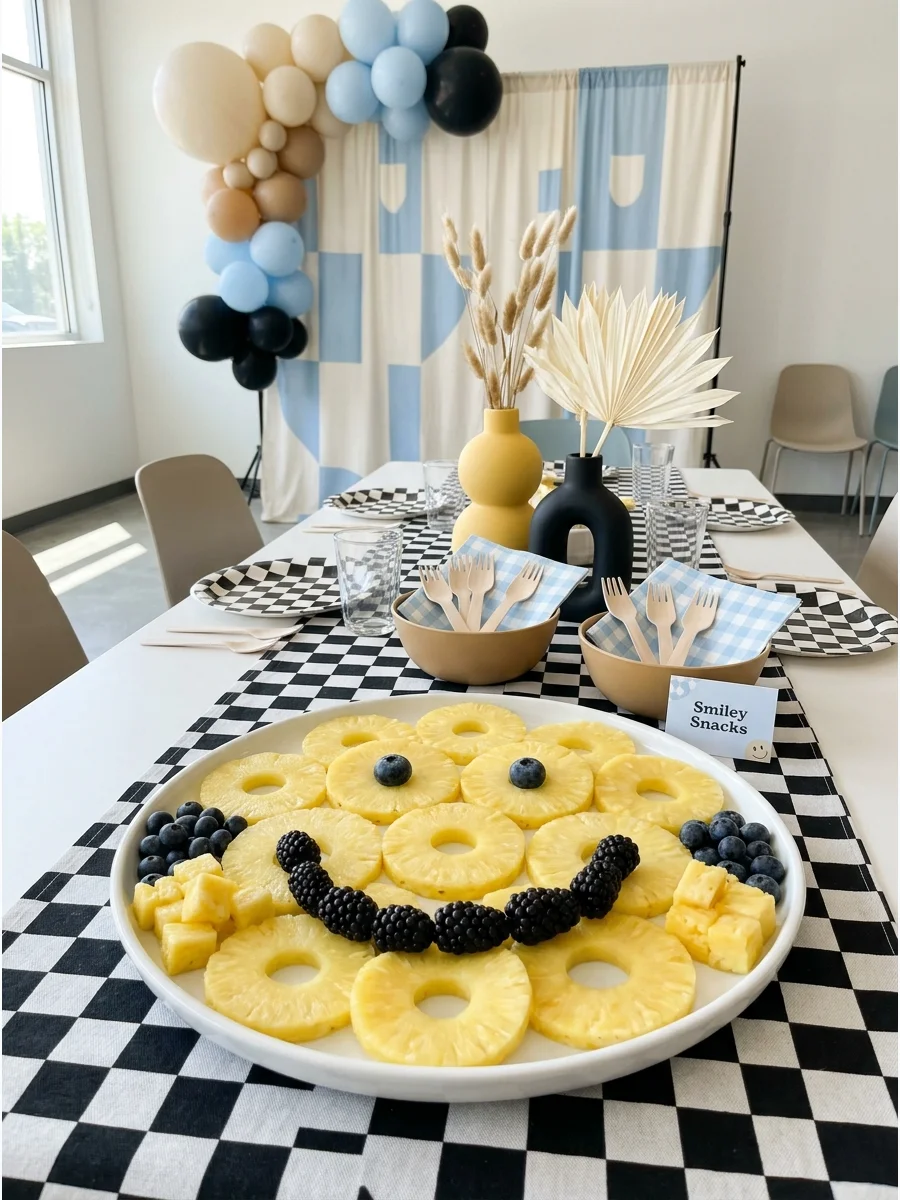
Adds a healthy food option that still adheres strictly to the visual theme.
It fills a useful coverage gap that collected photos may not show clearly.
Keep the setup simple, repeat one main material, and leave enough room for guests.
35. Themed Graphic Cookies
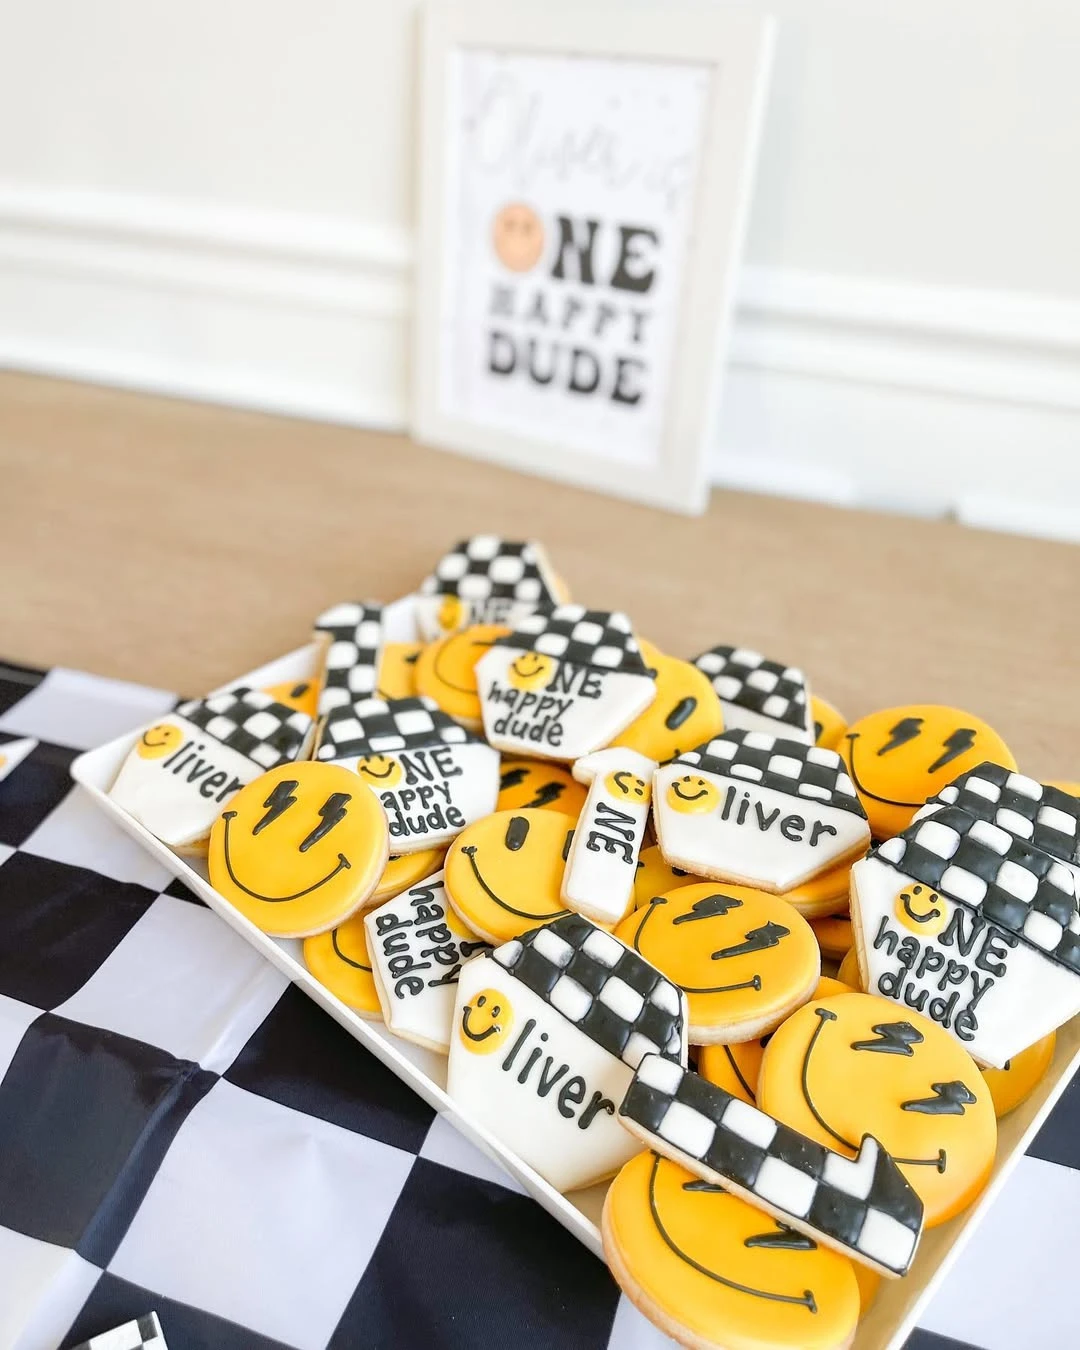
Credit: @abennettx0 / Instagram
Order custom sugar cookies that replicate the party’s specific typography and icons like lightning-eye smileys.
Detailed cookies act as small pieces of art on the dessert table, reinforcing the theme’s modern vibe.
Arrange cookies on a simple white platter over a checkered runner to make the yellow icing pop.
36. Smiley Face Iced Cookies
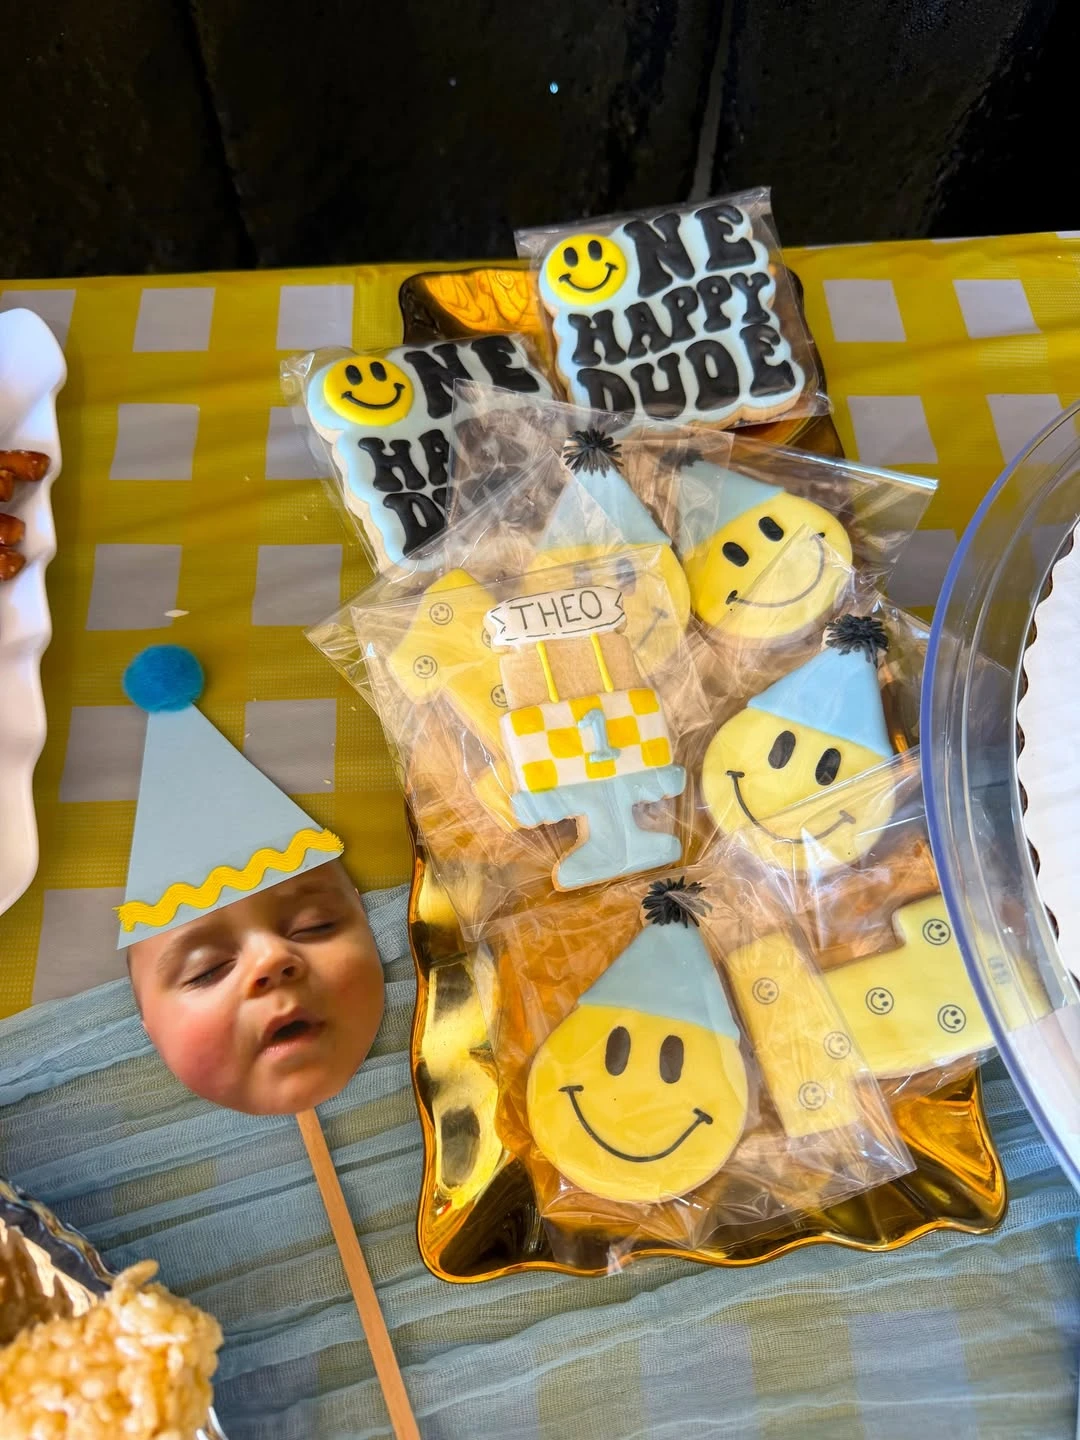
Credit: @gcardenas99 / Instagram
Serve custom-iced sugar cookies that mirror the party’s typography and smiley face motifs.
Individually wrapped treats are easy for guests to take home and serve as a detailed extension of the theme.
Create personalized photo props by mounting cutouts of the birthday boy’s face on wooden sticks to add a humorous touch to the treat tray.
37. Retro Smiley Cupcake Toppers
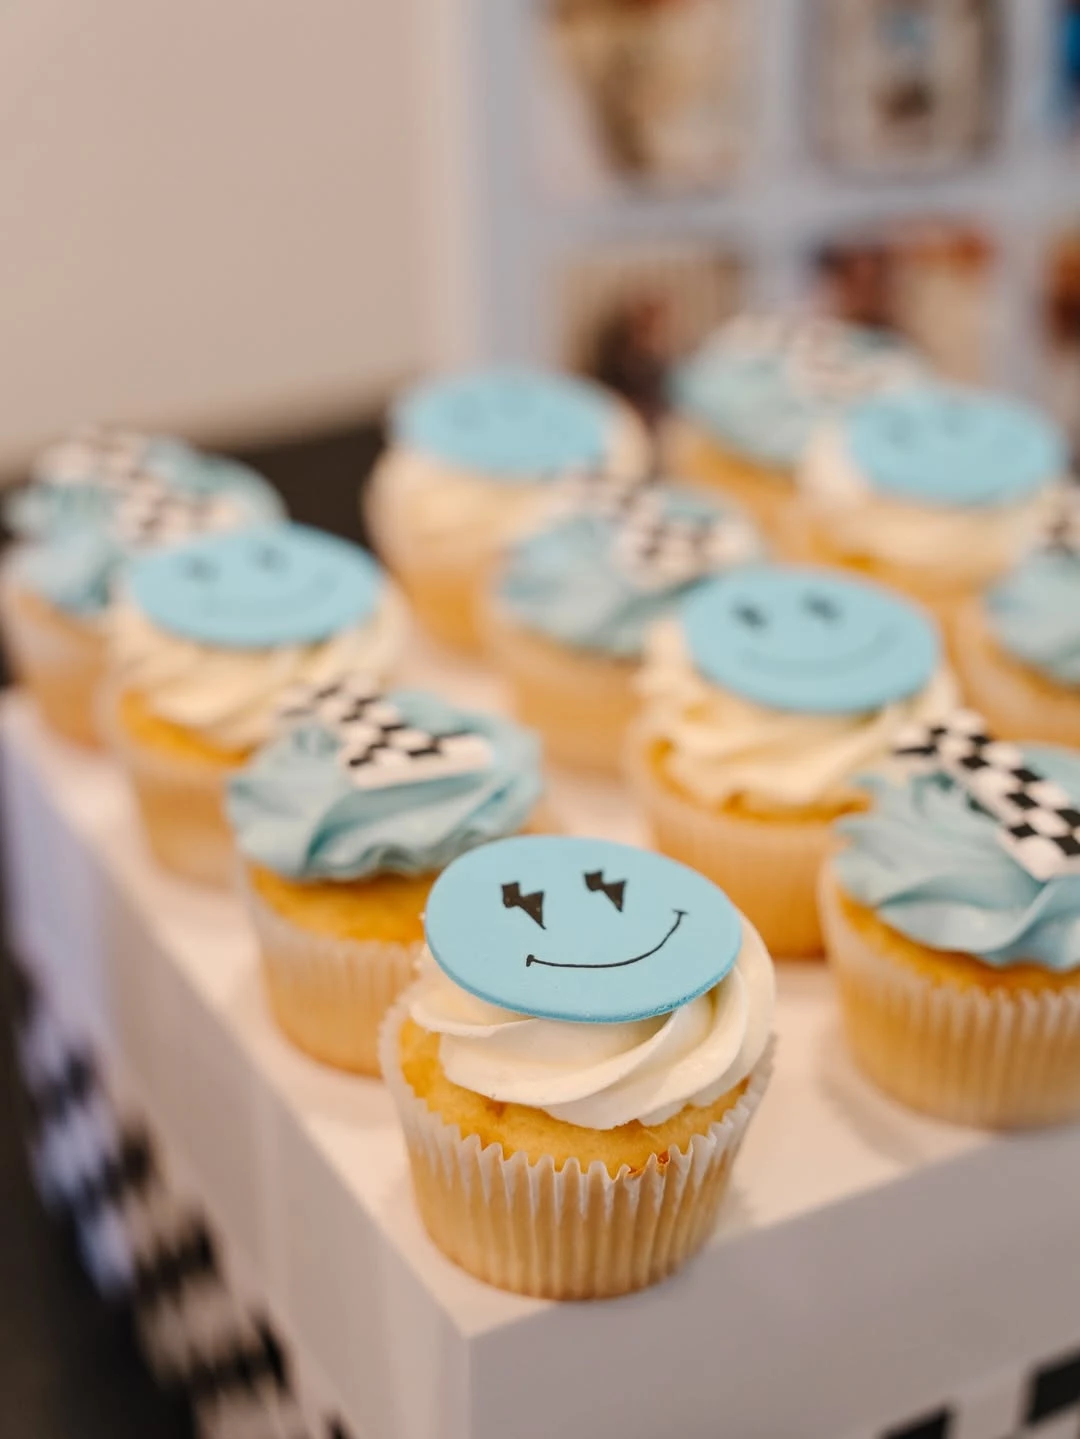
Credit: @skeventstudio / Instagram
Top cupcakes with light blue fondant discs featuring retro lightning-bolt eyes for a modern take on the smiley face motif. Adding checkered flag picks provides visual variety and ties the treats into the broader party patterns.
Custom toppers allow for a high level of theme integration on standard desserts, making even simple vanilla cupcakes look intentional and high-end.
Use a circle cutter for uniform shapes and a food-safe black marker to draw the faces on the fondant once it has slightly hardened to ensure clean, smudge-free lines.
38. Custom Patterned Pretzel Rods
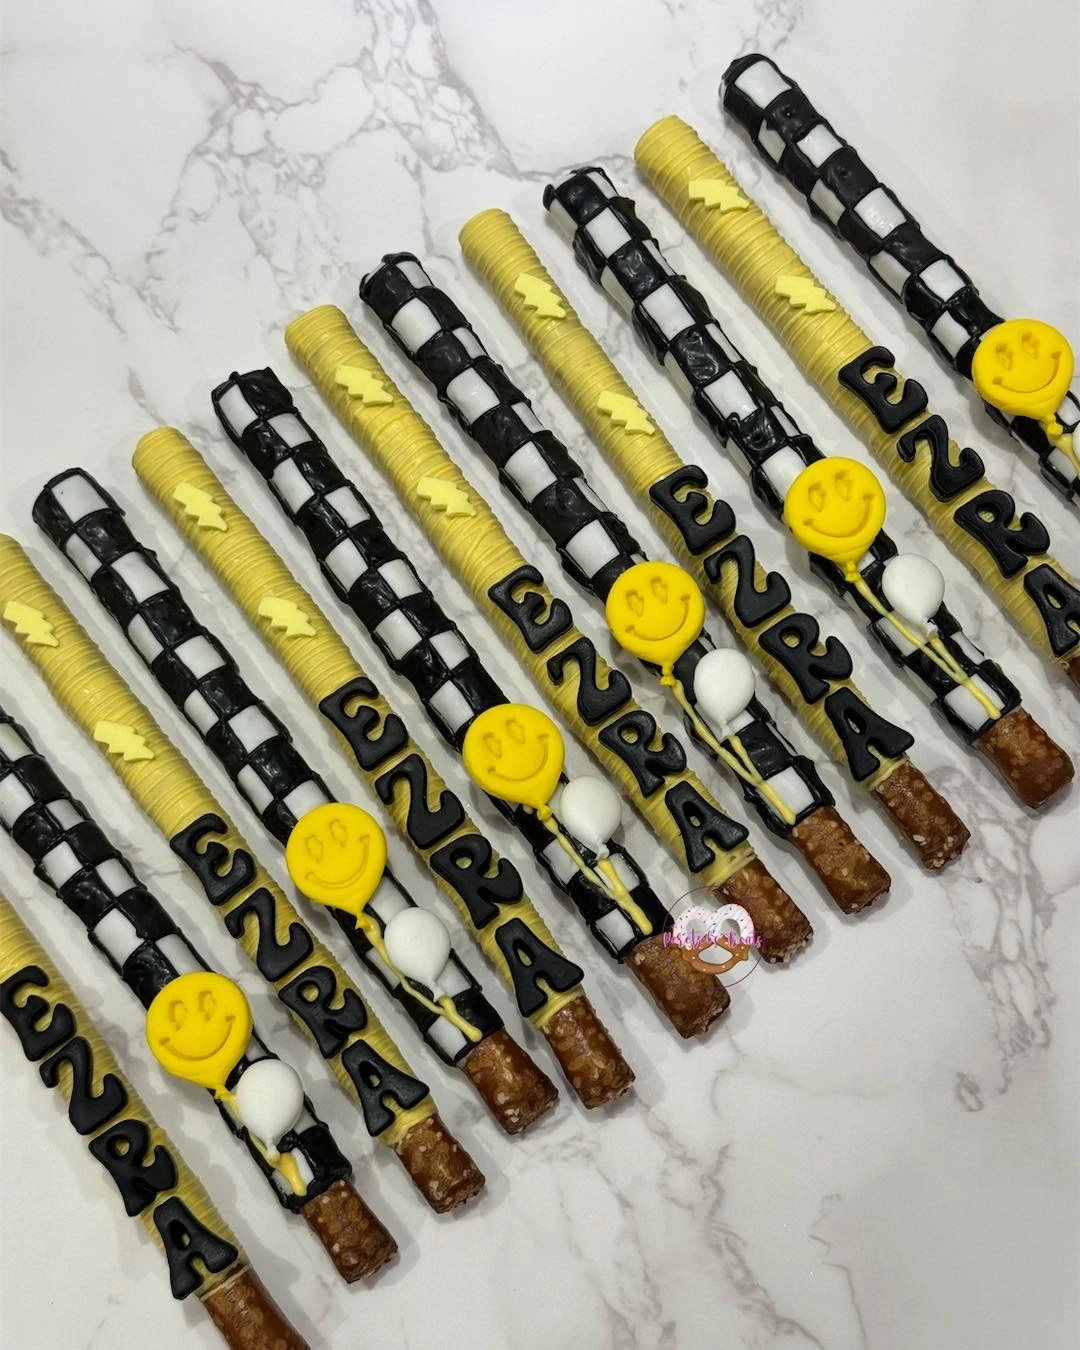
Credit: @peretzelstreats / Instagram
Serve handheld treats that double as decor by applying the theme’s core patterns and colors to chocolate-covered pretzels.
Repeating the checkered and smiley face motifs across small food items creates a unified aesthetic that feels intentional without requiring large-scale construction.
Prepare these in advance and store them in a cool, dry place; use a name mold to personalize the treats for the birthday boy for a custom touch.
39. Retro Graphic Dessert Assortment
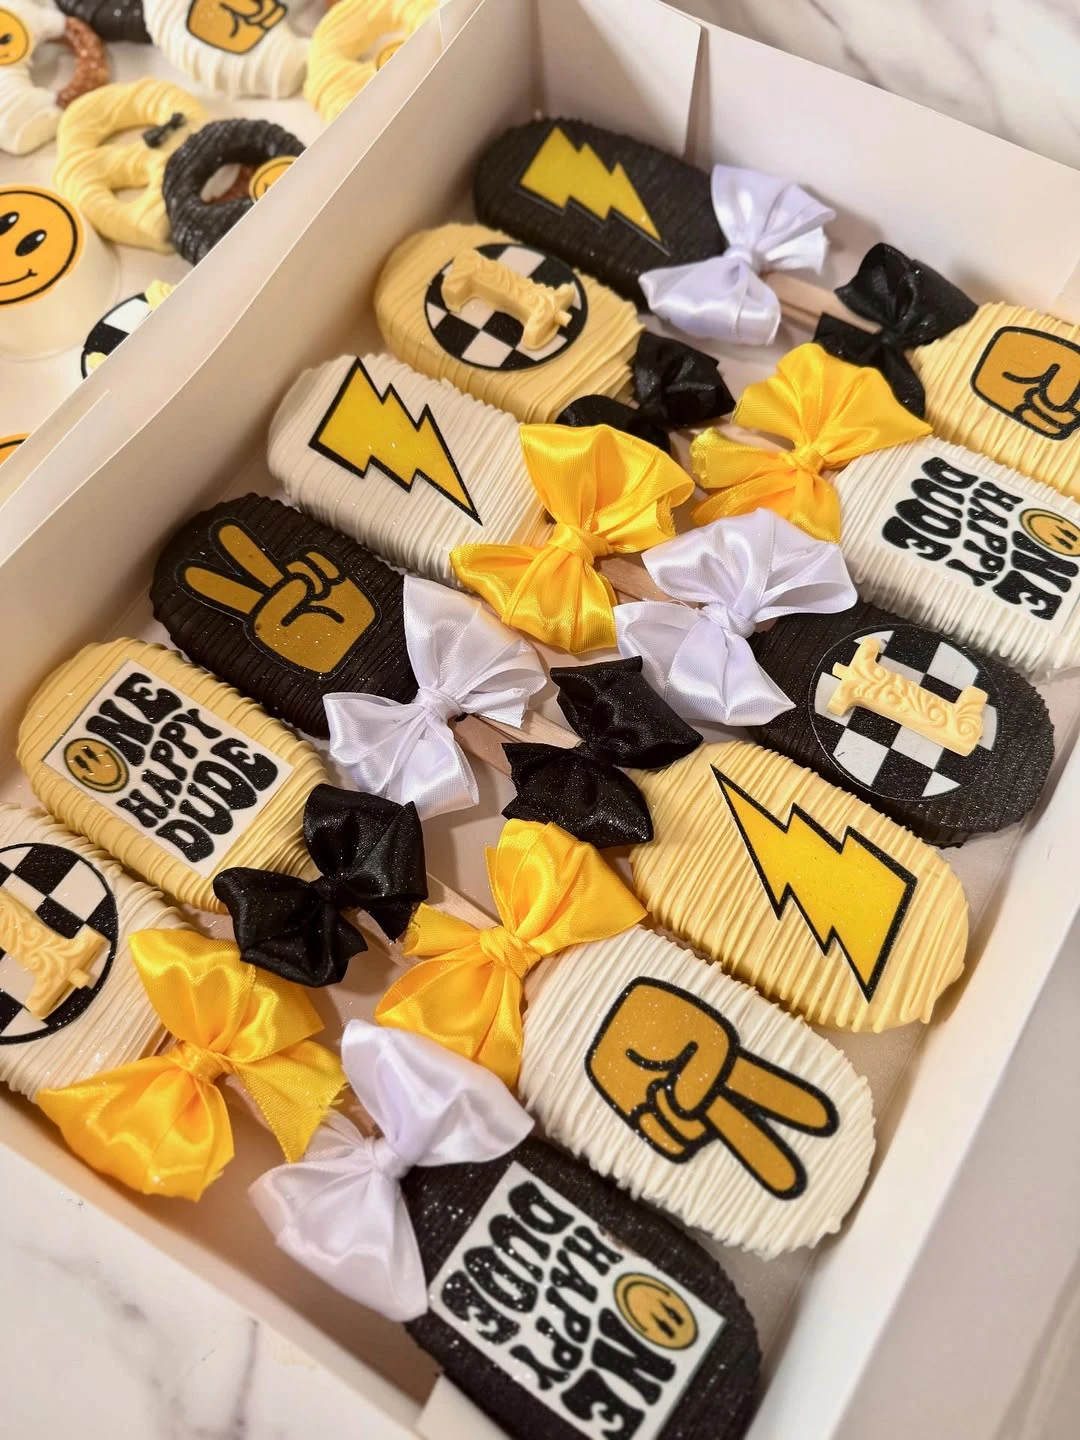
Credit: @for.sweetsake / Instagram
Build a high-impact dessert display by coordinating various sweets with the retro smiley face and checkered aesthetic.
Using a consistent color palette of yellow, black, and white ensures that different types of treats look like a matched set.
Use edible icing sheets or custom fondant stamps to achieve the precise retro typography and smiley face details on cakesicles.
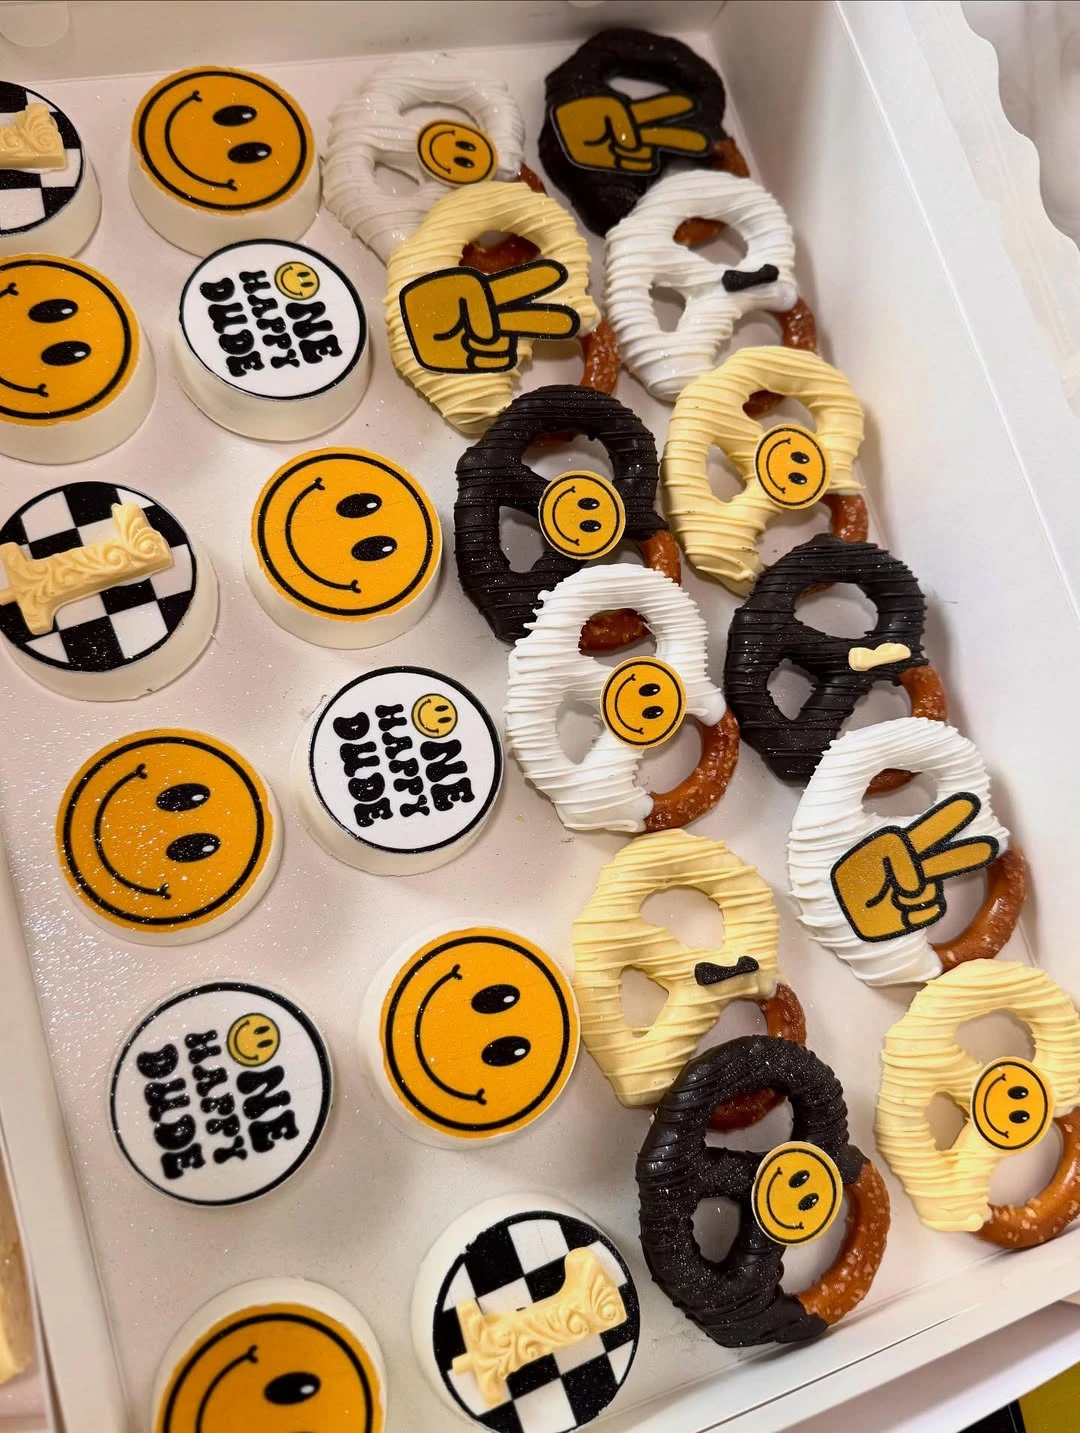
Credit: @for.sweetsake / Instagram
Arrange smaller items like dipped pretzels and Oreos in flat boxes or trays to make them easily accessible for guests to grab during the party.
These smaller items act as great fillers for dessert platters or can be packaged individually as take-home favors.
Drizzle white or yellow chocolate over pretzels in a zig-zag pattern before adding a small fondant smiley face to keep the design clean.
40. Wrapped Graphic Treat Display
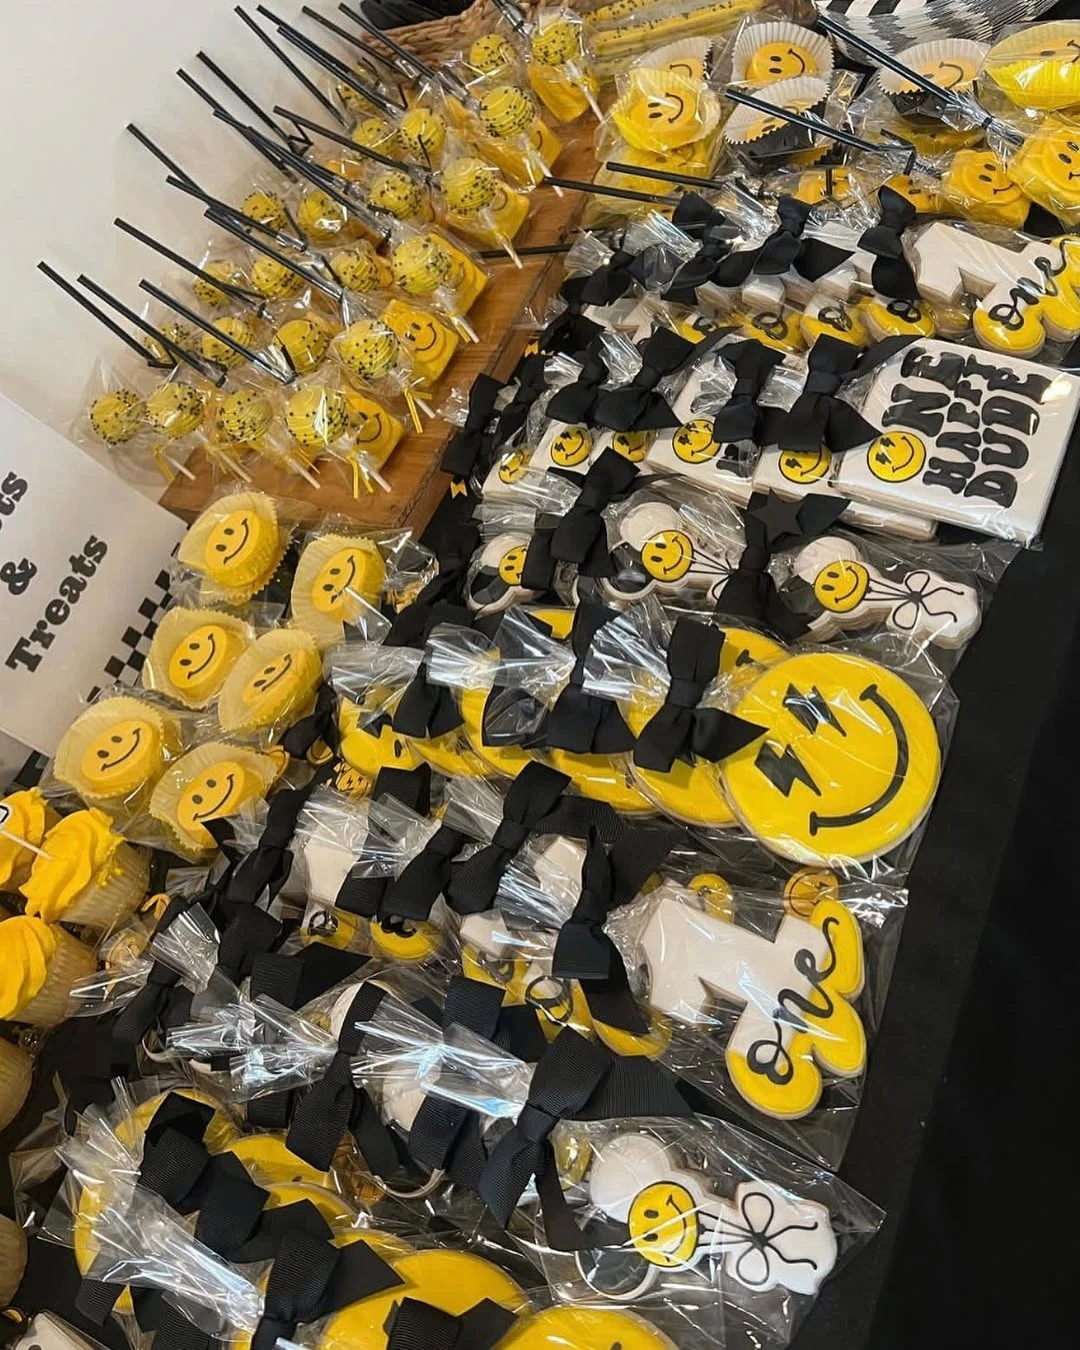
Credit: @orks_tattoos / Instagram
Package individual cookies and cake pops in clear cellophane with black ribbon to create a grab-and-go dessert station that doubles as decor.
Individually wrapped items maintain a clean look and allow guests to take treats home easily, while the black bows add a sharp contrast to the bright yellow smiley faces.
Incorporate different heights by using wooden blocks for cake pops and flat trays for cookies to ensure every themed design is visible to guests.
41. Graphic Smiley Dessert Spread
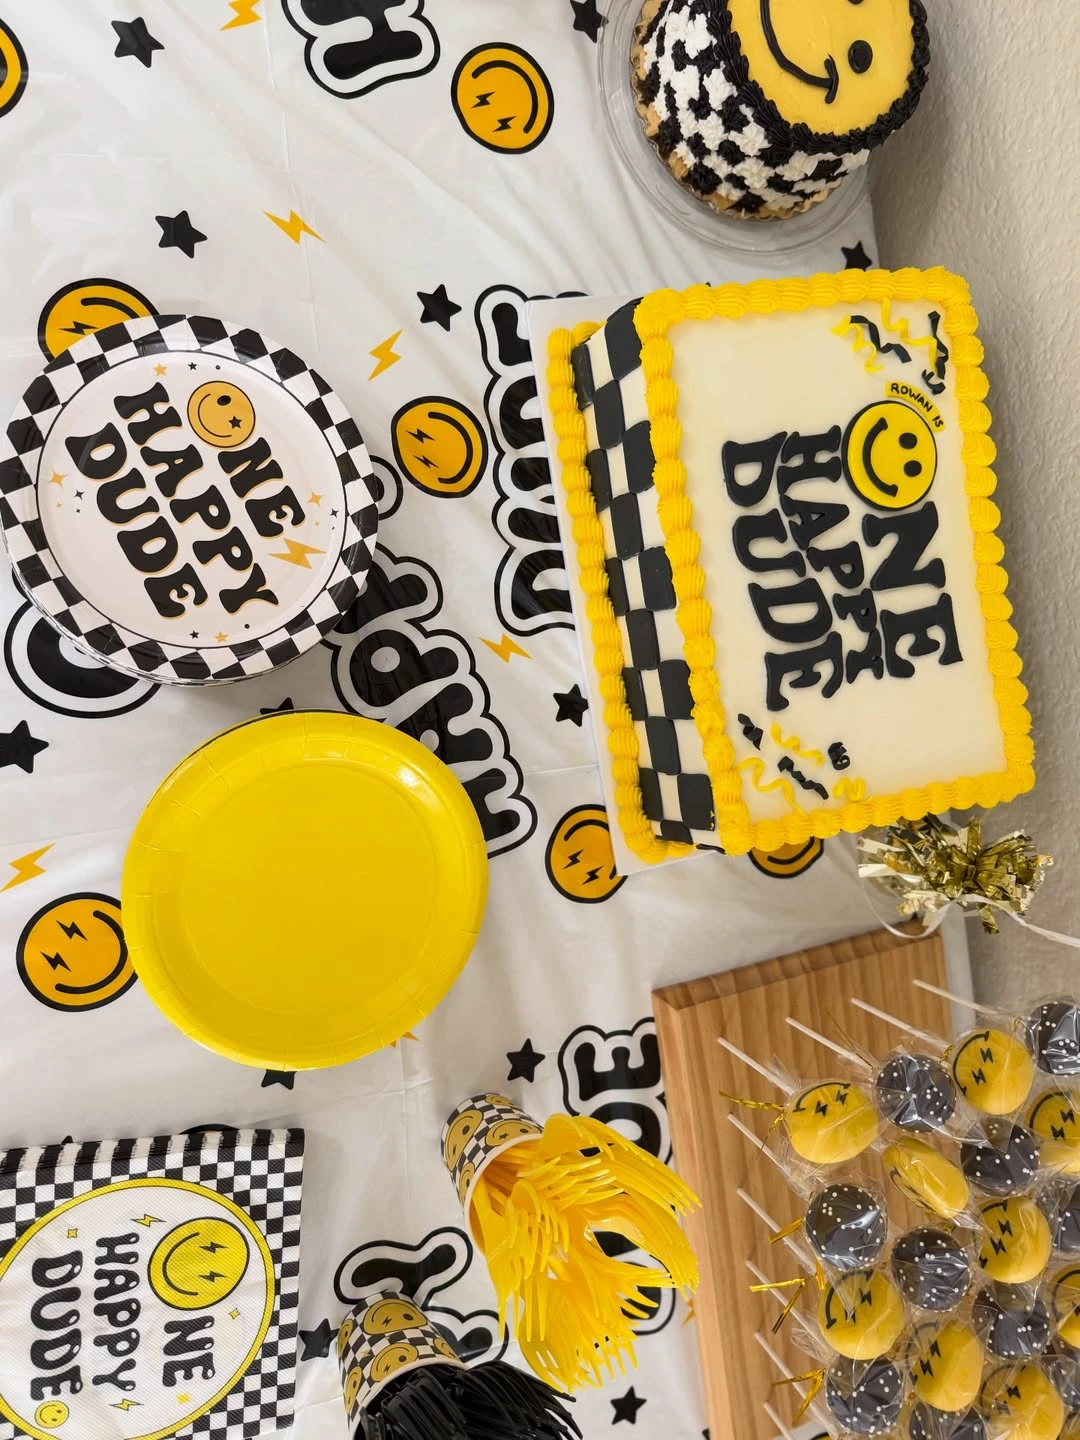
Credit: @merrypoppins / Instagram
Create a cohesive dessert display by repeating the theme’s core graphics across all edible items and serving pieces.
A consistent pattern of checkered borders and smiley face icons on the main cake, smash cake, and cake pops creates a high-energy, unified look that anchors the party room.
To prevent the patterns from feeling cluttered, use a themed tablecloth as the base but serve snacks on simple wooden boards or solid-colored platters to provide visual resting spots.
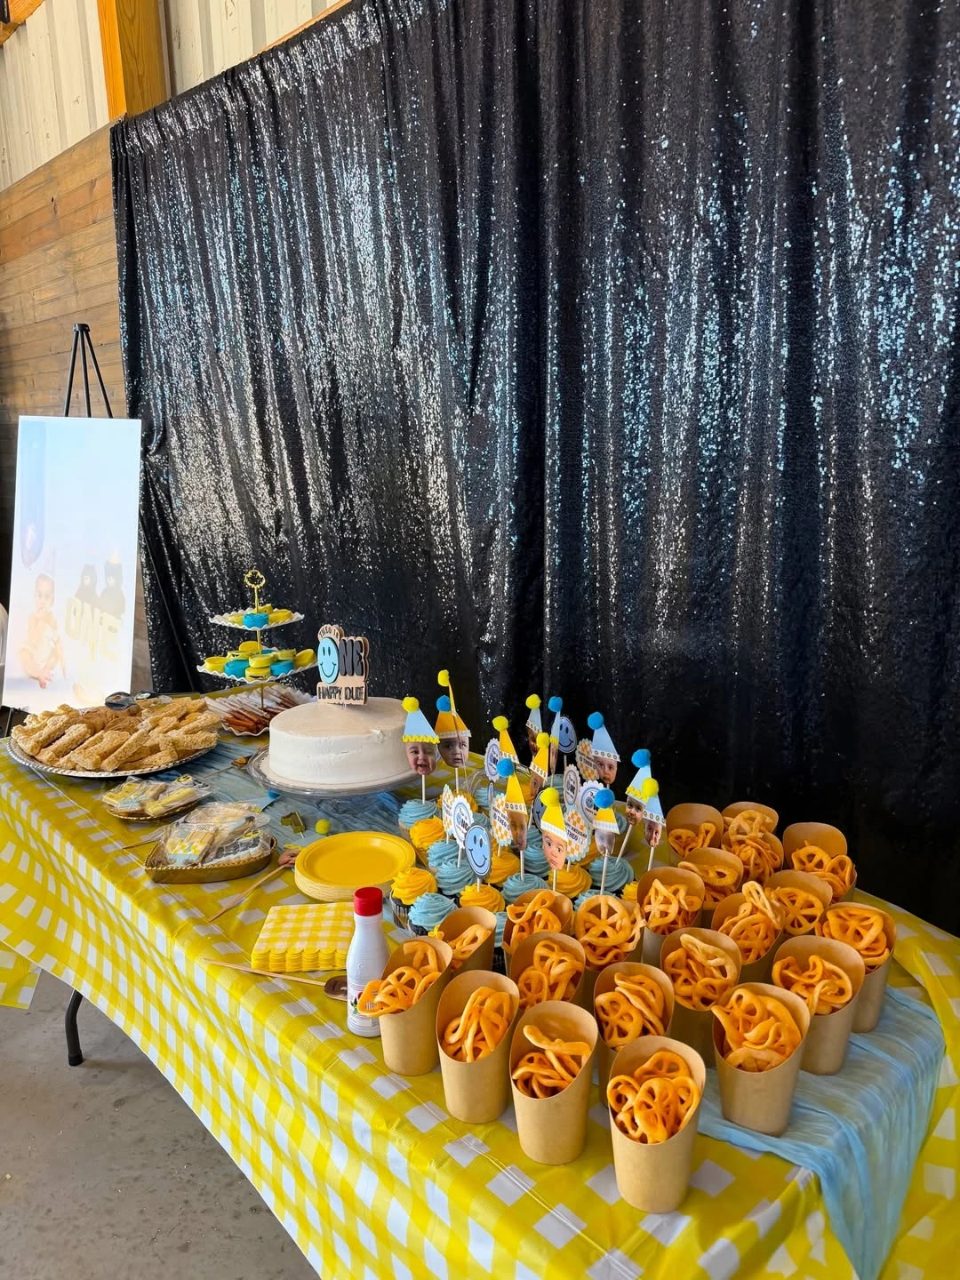
Credit: @gcardenas99 / Instagram
Create a cohesive dessert display by layering a yellow checkered tablecloth with a dark, textured backdrop.
A black sequin backdrop provides a high-contrast surface that makes the yellow and blue decor elements pop.
Place smaller snacks like pretzels in neutral kraft paper cones to provide a clean, organized appearance on a busy table.
Stationery and Invitations
42. Digital Groovy Motion Invitation
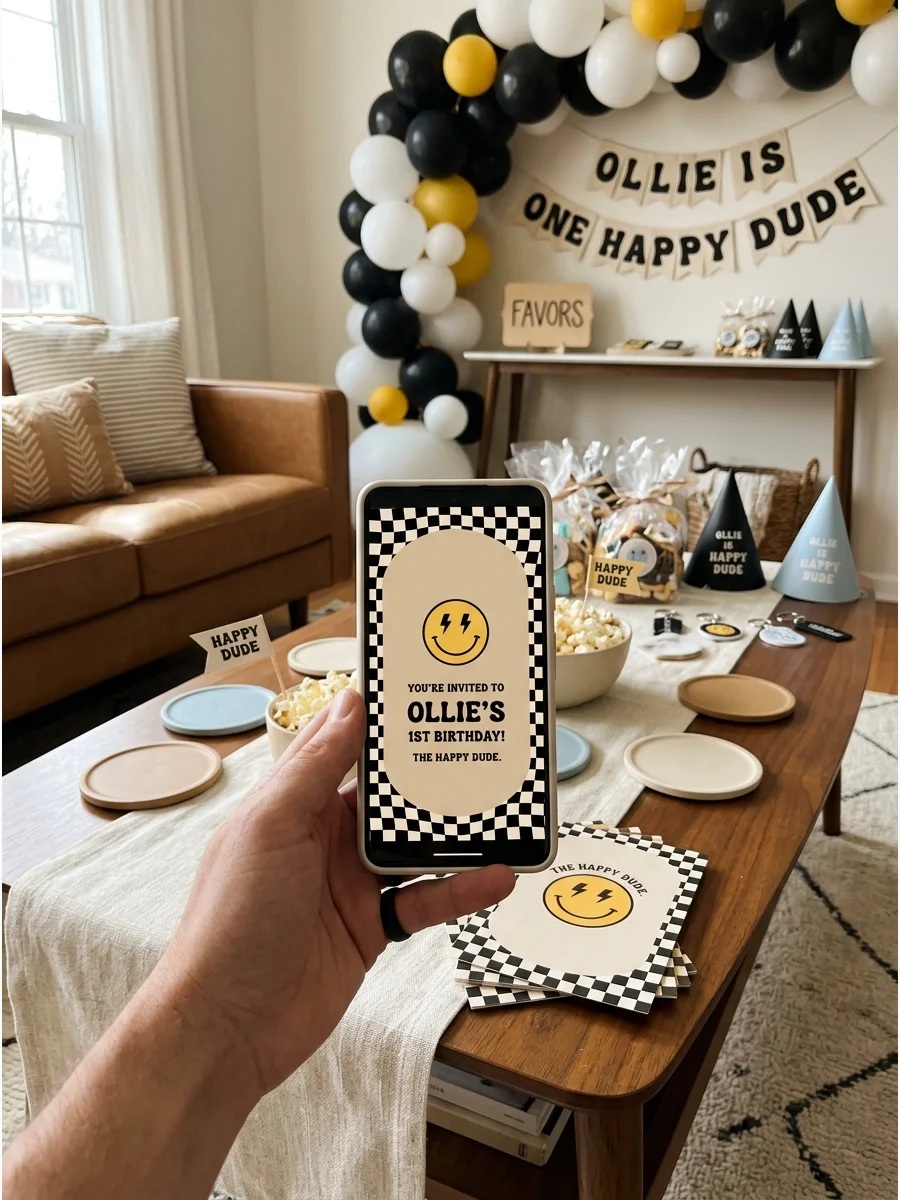
Addresses the modern trend of digital invites with a theme-specific design.
It fills a useful coverage gap that collected photos may not show clearly.
Keep the setup simple, repeat one main material, and leave enough room for guests.
43. Retro ‘Dude’s Stats’ Milestone Board
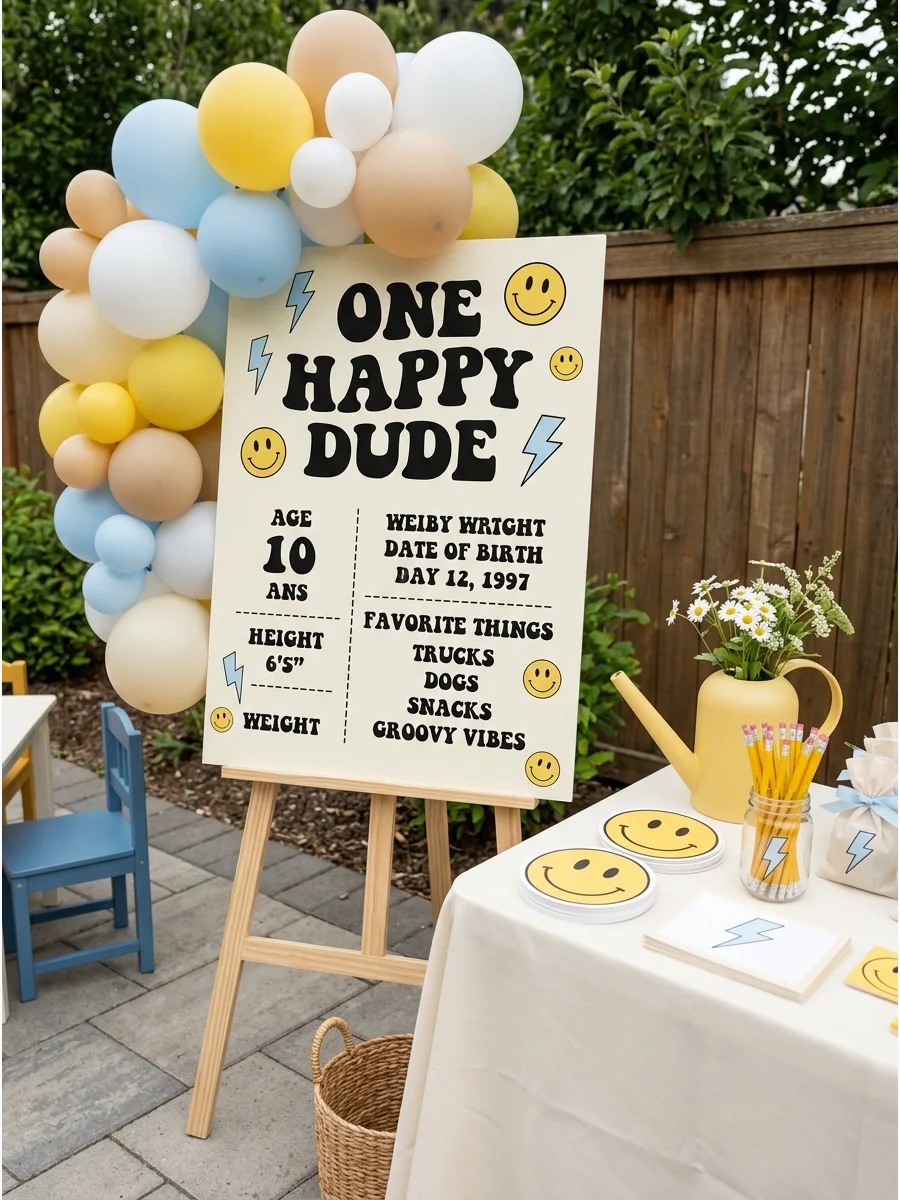
Provides a staple first birthday item customized for this specific niche.
It fills a useful coverage gap that collected photos may not show clearly.
Keep the setup simple, repeat one main material, and leave enough room for guests.
44. Checkered Polaroid Thank You Cards
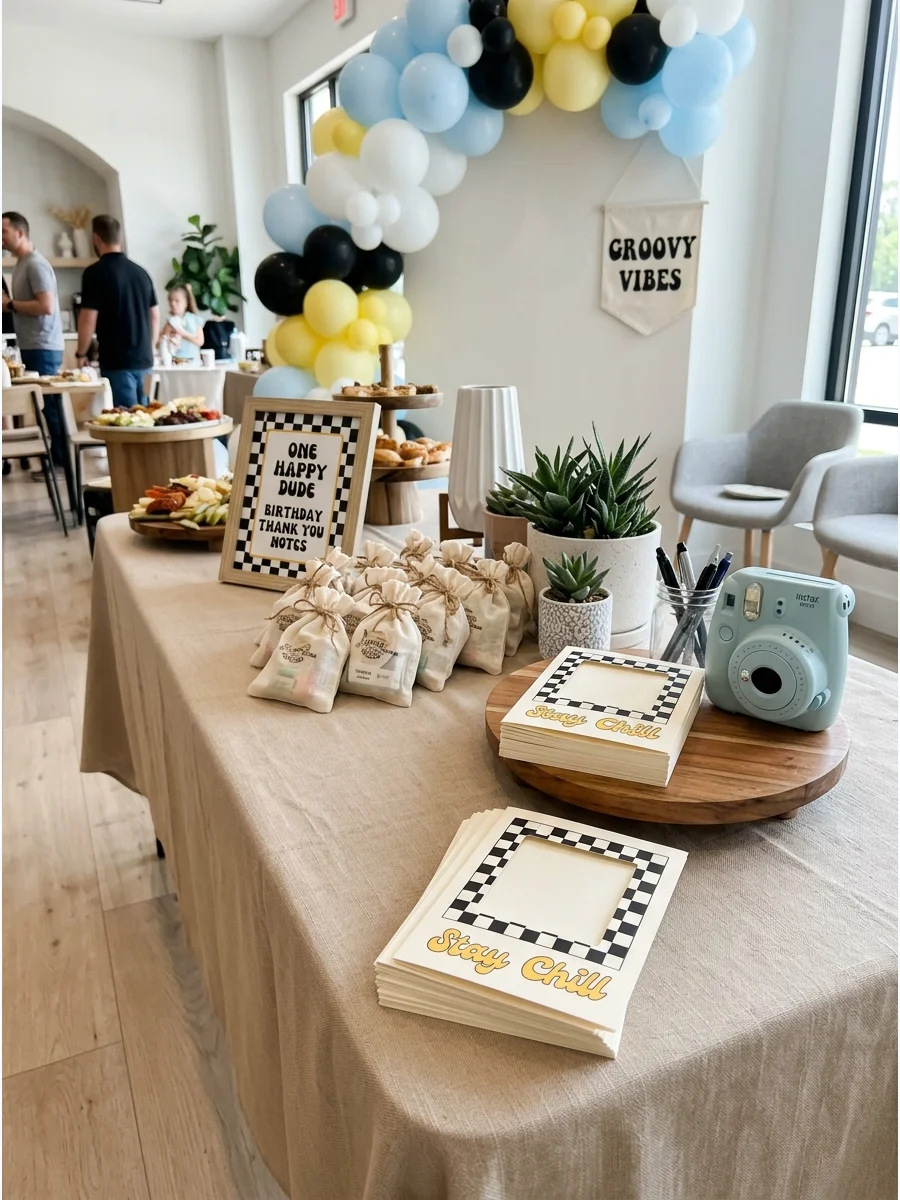
Offers a cohesive way to end the event with themed stationery.
It fills a useful coverage gap that collected photos may not show clearly.
Keep the setup simple, repeat one main material, and leave enough room for guests.
45. Retro Graphic Welcome Poster
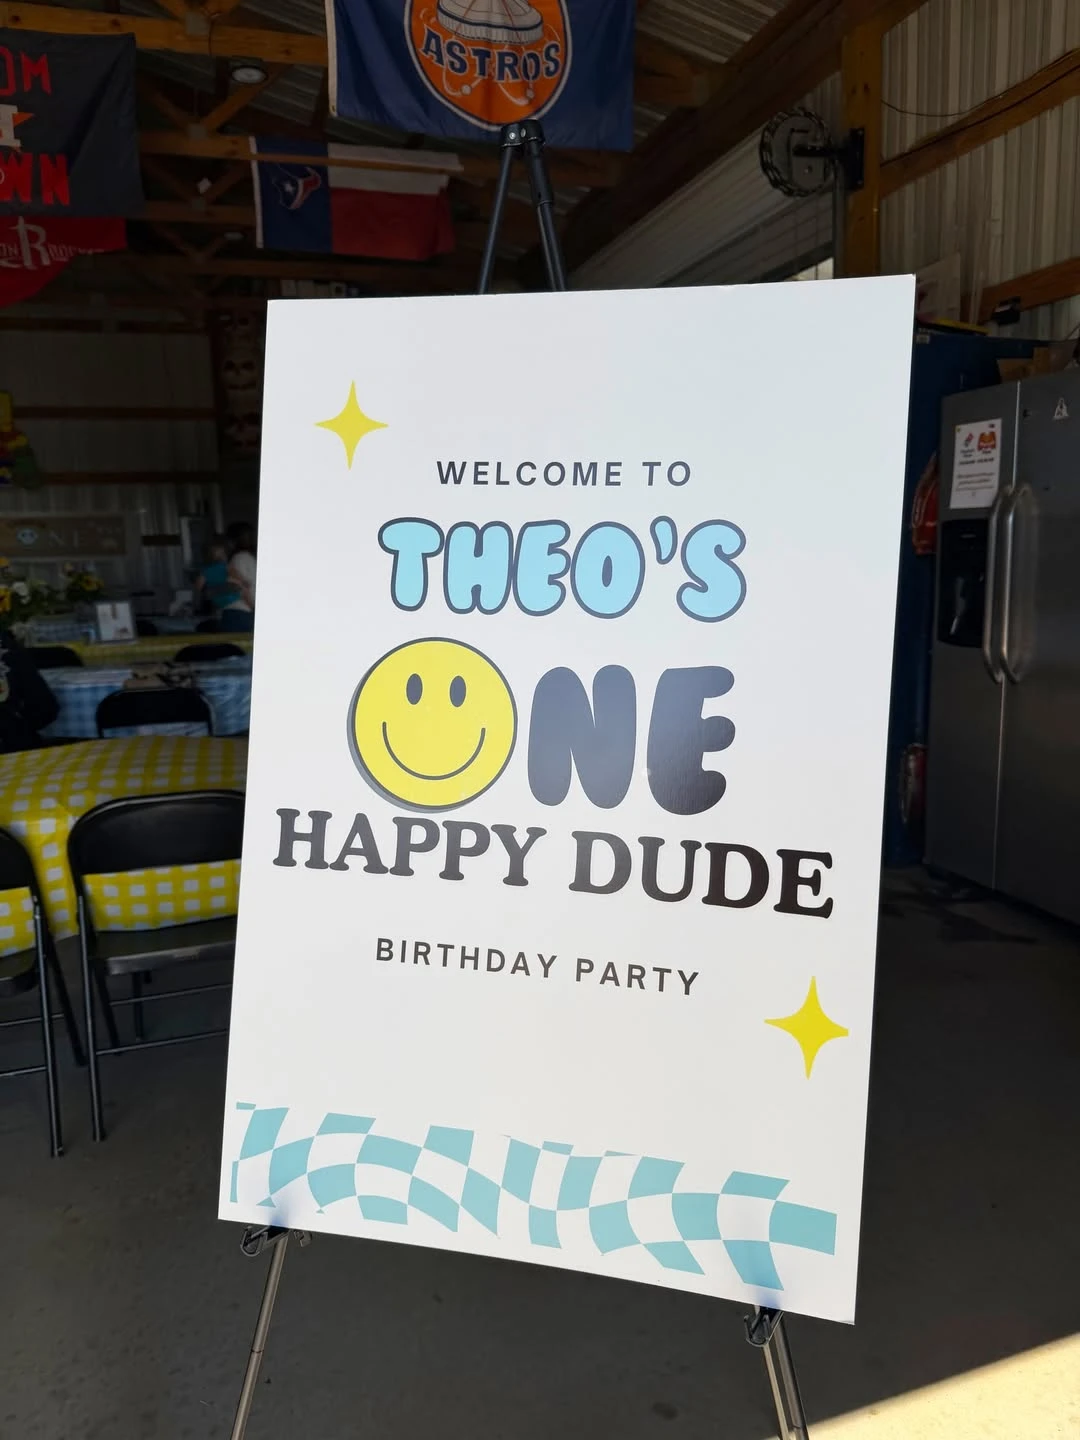
Credit: @gcardenas99 / Instagram
Greet guests with a large-format welcome sign that establishes the retro aesthetic from the start.
A clean, professional-looking sign provides a clear transition into the event space and reinforces the specific color palette.
Mount the printed sign on foam board to ensure it stays upright on an easel throughout the event.
Frequently Asked Questions
What is the primary color palette for a One Happy Dude birthday?
The theme centers on a retro, groovy aesthetic using a mix of mustard yellow, black, and white. To keep the look modern and soft for a first birthday, incorporate accents of light blue, tan, and cream. This combination balances the bold smiley face icons with a minimalist, ‘cool’ feel.
How can the checkered pattern be used without looking like a racing theme?
To maintain the ‘One Happy Dude’ vibe, focus on wavy or distorted checkered patterns rather than rigid, straight lines. Pairing the pattern with retro smiley faces and groovy, rounded fonts shifts the aesthetic from the racetrack to a 70s-inspired style. Using the pattern in tan or light blue instead of high-contrast black and white also helps soften the appearance.
What are some creative food puns for a One Happy Dude menu?
Incorporate the ‘dude’ and ‘smiley’ motifs into the catering with labels like ‘Dude Dogs’ for mini hot dogs, ‘Happy Hummus,’ ‘Checkered Chips,’ and ‘Groovy Grapes.’ For the dessert table, ‘One Happy Cake’ or ‘Smiley Sliders’ (mini ice cream sandwiches) keep the menu cohesive and playful.
What are the essential decor elements for this theme?
Key items include large-scale smiley face backdrops, checkered table runners, and ‘One Happy Dude’ neon or wooden signage. Balloon arches in the theme’s signature palette and retro-style typography for all stationery ensure a consistent, social-media-ready visual flow.
What are some outfit ideas for the birthday boy to match the aesthetic?
A popular choice is a checkered romper or a graphic tee featuring a smiley face wearing sunglasses. Accessories such as a tiny trucker hat, retro round sunglasses, or checkered slip-on sneakers complete the ‘cool dude’ look while remaining practical for a one-year-old.
This post may contain affiliate links: full affiliate disclosure.